
Car repair AvtoVAZ Car repair Renault Car repair Hyundai Car repair Ford Car repair Volkswagen Car repair Audi Car repair Chevrolet
English Русский
Български
Беларускі
Український
Српски
Hrvatski
Română
Polski
Slovenský
Magyar
articles sitemap contacts bookmark
LadaMan.ru


Kalina Granta Priora Vesta Largus XRAY
Kalina Sedan (2004-2013, VAZ-1118) Kalina Hatchback (2004-2013, VAZ-1119)

Adjusting valve clearances (Kalina 1118)

  • Main
  • Kalina
  • Kalina Sedan
  • Power unit
  • Engine repair
  • Adjusting valve clearances
0
To compensate for thermal expansion of the valve, a gap is specified between the end of the valve stem and the camshaft cam. If the clearance is increased, the valve will not open completely, and if it is decreased, it will not close completely.

The gap is measured with a feeler gauge on a cold engine (at a temperature of +20°C) between the camshaft cam (the cam must point upwards away from the pushrod) and the valve tappet adjusting washer. The nominal clearance for the inlet valve is (0.2+0.05) mm, for the outlet valve - (0.35+0.05) mm. Clearances are adjusted by selecting the thickness of the valve adjusting washers. Spare parts include valve adjusting washers with a thickness of 3 to 4.5 mm in increments of 0.05 mm.

Counting from the timing belt, the 1st, 4th, 5th and 8th valves are exhaust valves, the 2nd, 3rd, 6th and 7th are intake valves.

The order in which the valve clearances are adjusted does not matter.

To adjust the gaps in the valve drive on the car, you will need: a device for compressing the valve springs, a set of flat probes, tweezers, a cap wrench "on 17" (or socket head) to turn the crankshaft.

1. Remove the engine splash guard (see "Removal and installation the engine mudguard") to provide access to the crankshaft pulley mounting bolt.

2. Remove the cylinder head cover (see "Replacing the cylinder head cover gasket").
2. Remove the cylinder head cover (see «Replacing the cylinder head cover gasket»).


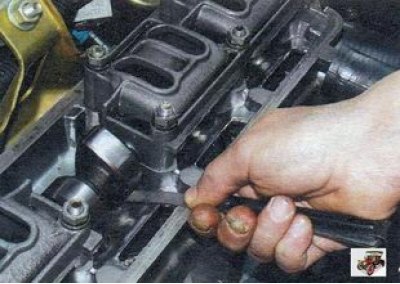
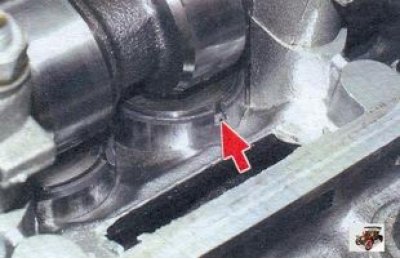
3. Using a set of feeler gauges, measure the clearances in the drive of those valves whose cams are directed upwards from the tappets (in this case these are the 4th, 6th, 7th and 8th valves). It is necessary to replace the adjusting washers of those valves whose clearances differ from the nominal value. Record the measured valve clearances.


3. Using a set of feeler gauges, measure the clearances in the drive of those valves whose cams are…


4. To make it easier to remove the valve adjusting washer, two grooves are made in the tappet. Using a screwdriver, turn the pusher by the groove so that it is convenient to pry off the valve adjusting washer. For ease of operation, remove oil from the top of the cylinder head (around the pushers).

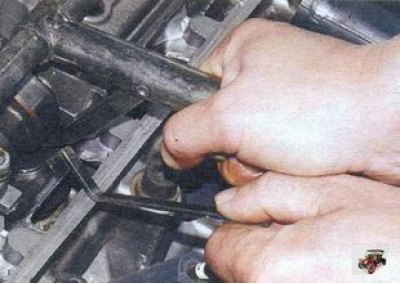
5. Install a special device for compressing valve springs on the cylinder head cover mounting studs and secure it with the cover mounting nuts.
5. Install a special device for compressing valve springs on the cylinder head cover mounting studs…


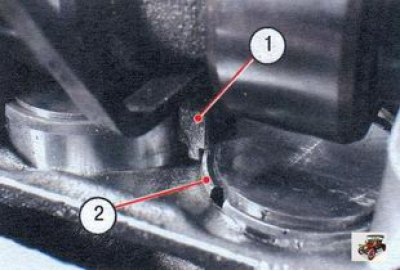
6. By pressing the lever of the device down, press the pusher on which the adjusting washer is being replaced, and insert the retainer under the camshaft so that...
6. By pressing the lever of the device down, press the pusher on which the adjusting washer is…


7. ...the protrusion on the retainer 1 fixed the pusher 2 in the recessed position.
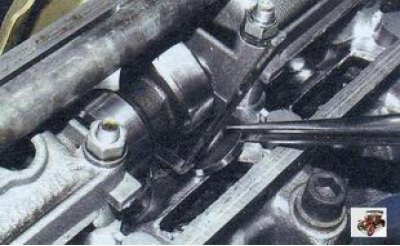


7. ...the protrusion on the retainer 1 fixed the pusher 2 in the recessed position.


8. Use a screwdriver to pry up the valve adjusting washer and, using tweezers, for example, remove it from the tappet.

9. Record the thickness of the adjusting washer, which is marked on one side of it. If the inscription is not visible, measure the thickness of the washer with a micrometer.

10. Calculate the thickness N new adjusting washer according to the formula (all values in mm)

H = B + A - C,

where B is the thickness of the old valve washer;
A - the value of the measured valve clearance;
C - nominal valve clearance.

For example (for intake valve): H = 3.75 mm; A = 0.26 mm; C = 0.2 mm. Then H = 3.75 + 0.26 - 0.2 = 3.81 (mm). Within the clearance tolerance (±0.05 mm), we select the closest washer in thickness - 3.8 mm.

11. Install a new washer into the pusher, the thickness of which is calculated according to the formula, with the inscription facing down (to the pusher). Press the plunger with the tool and remove the retainer.

12. Check the gap with a feeler gauge. If it differs from the nominal value, repeat the valve adjustment.

13. Turn the crankshaft one revolution (360°) and adjust the clearances in the drive of the 1st, 2nd, 3rd and 5th valves in the same order. Then pour oil into the top of the cylinder head if it was removed.


14. Check the condition of the cylinder head cover gasket, replace it if necessary.

15. Install all removed parts on the vehicle in the reverse order of removal.


This article is available at russian, bulgarian, belarusian, ukrainian, serbian, croatian, romanian, polish, slovak, hungarian
This article has been reviewed: Daniil Markelov
Share with friends:
◀ Previous
Lada Kalina Sedan: Engine repair
Next ▶

Replacing the timing belt and tension roller
Adjusting the timing belt tension (camshaft drive)
Checking and setting the valve timing using marks
Setting the piston of the first cylinder to the TDC position
Cleaning the crankcase ventilation system
Removal, inspection and installation of the flywheel
Replacing the cylinder head cover gasket
Replacing the cylinder head gasket
Replacing the camshaft seal
Replacing valve stem seals
More articles with information from manuals for Lada:

• Valve timing drive clearances — adjustment Lada Granta 1 (2011-2023, VAZ-2190)
• Adjusting the position of the front seats Lada Priora 1 (2007-2018, VAZ-2170)
• Adjusting the seat and steering wheel position Lada Vesta 1 (2015-2023, VAZ-2180)
• Adjusting clearances in the timing drive mechanism (K7M engine) Lada Largus 1 (2012-2023)
• Checking and adjusting the clearance in the front wheel hub bearings Lada X-Ray 1 (2015-2022)
Link to this article in various formats
Reviews and comments of visitors
No comments yet


Add up two numbers: 36 + 46


Kalina Sedan (2004-2013) 
  • General information
  • Vehicle device
  • Operation and maintenance
  • Faults en route
  • Power unit
  • Engine repair
  • Cooling and lubrication system
  • Exhaust system
  • Supply system
  • Ignition and control
  • Transmission
  • Clutch and drive shafts
  • Car gearbox
  • Chassis (running gear)
  • Front suspension
  • Rear suspension
  • Steering
  • Brake system
  • Body and interior
  • Exterior (external elements)
  • Interior (internal elements)
  • Doors, locks and windows
  • Electrical equipment
  • Equipment and devices
  • Power devices
  • Lighting and signaling
  • Heating and ventilation
Kalina Hatchback (2004-2013) 
  • General information
  • Vehicle Details
  • Maintenance
  • Troubleshooting
  • Power unit
  • Engine repair
  • Cooling system
  • Supply system
  • Control system
  • Exhaust system
  • Transmission
  • Clutch
  • Car gearbox
  • Drive shafts
  • Chassis (running gear)
  • Wheels and tires
  • Front suspension
  • Rear suspension
  • Steering
  • Brake system
  • Body and interior
  • Exterior (external elements)
  • Interior (internal elements)
  • Doors, locks and windows
  • Electrical equipment
  • Equipment and devices
  • Power devices
  • Lighting and signaling
  • Electrical circuits
LadaMan.ru © 2018–2026 | Mobile version | About Lada | Sitemap: EN BG BY UA RS HR RO PL SK HU | Contacts with admin | | Add to bookmarks
Kalina Hatchback (2004-2013) | Kalina Sedan (2004-2013) | Granta 1 (2011-2023) | Priora 1 (2007-2018) | Vesta 1 (2015-2023) | Largus 1 (2012-2023) | X-Ray 1 (2015-2022) |
This site uses cookies to ensure everything runs smoothly.