
Car repair AvtoVAZ Car repair Renault Car repair Hyundai Car repair Ford Car repair Volkswagen Car repair Audi Car repair Chevrolet
English Русский
Български
Беларускі
Український
Српски
Hrvatski
Română
Polski
Slovenský
Magyar
articles sitemap contacts bookmark
LadaMan.ru


Kalina Granta Priora Vesta Largus XRAY
Largus 1 (2012-2023)

Adjusting clearances in the timing drive mechanism (K7M engine) (Largus 1)

  • Main
  • Largus
  • Largus 1
  • Power unit
  • Engine repair
  • Adjusting clearances in the timing drive mechanism (K7M engine)
0
Contents: Preparing for adjustment ⇣ Adjustment values ⇣ Adjustment ⇣ Completion of adjustment ⇣

Preparing for adjustment


Place the vehicle on a two-post lift, apply the parking brake, turn off the ignition and disconnect the ground wire from the battery.

Remove the air filter housing.

Remove the cylinder head cover.

Remove the right front wheel.

Remove the right side mudguard.

Remove the accessory drive belt.

Remove the crankshaft pulley.

Remove the right engine mount.

Unscrew the plug of the hole for the TDC locking device (torx El4 replacement head, extension, ratchet wrench).
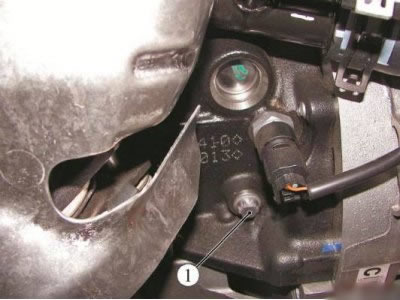
Figure 10-1 - Removing the TDC locking pin hole plug: 1 - plug of the hole for the TDC lock

Figure 10-1 - Removing the TDC locking pin hole plug: 1 - plug of the hole for the TDC lock


Remove the upper timing belt cover.

Tighten the crankshaft pulley mounting bolt with a spacer (replaceable head 18, ratchet).

Turn the crankshaft clockwise so that the mark on the camshaft toothed pulley is one tooth away from the vertical axis of the toothed pulley, and the mark on the crankshaft toothed pulley is one tooth away from the vertical axis of the pulley (replaceable head 18, ratchet).

Install the TDC locking device (tDC locking device Mot. 1489 or 67.7820-9701 L).

Turn the crankshaft clockwise until it stops against the locking pin so that it is in the locking groove of the crankshaft (replaceable head 18, ratchet).


Make sure that timing mark 1, Figure 10-2, on the camshaft timing pulley is aligned with the mark on the cylinder head cover, and mark 2 on the crankshaft timing pulley is aligned with the mark on the cylinder block.
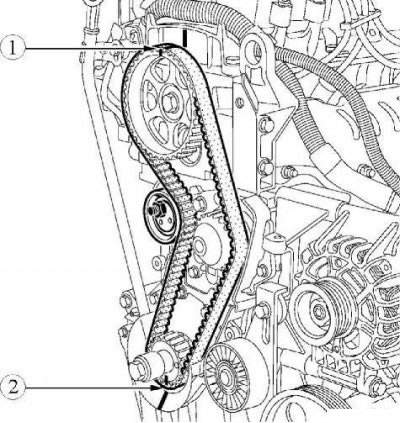
Figure 10-2 - Checking the alignment of timing marks on the timing drive: 1 - timing mark on the…

Figure 10-2 - Checking the alignment of timing marks on the timing drive: 1 - timing mark on the camshaft pulley; 2 - timing mark on the crankshaft toothed pulley


Remove the TDC locking pin (tDC locking device Mot. 1489 or 67.7820-9701 L).

Adjustment values


Inlet valves: 0.10-0.15 mm.

Exhaust valves: 0.25-0.30 mm (without replacing valves). Exhaust valves: 0.20-0.25 mm (with valve replacement). The tightening torque of the lock nut is 9 Nm (0.9 kgf·m).

Adjustment


"Full Open Exhaust Valve" Method


Please note: The cylinder count is from the flywheel.
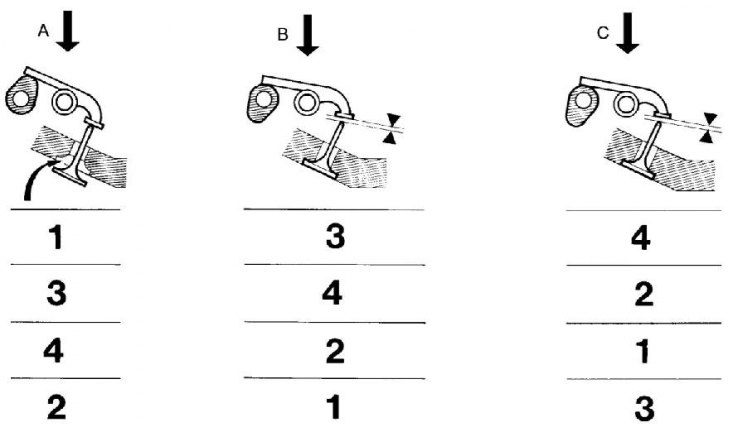

Figure 10-3 - Timing drive mechanism clearance adjustment procedure: 1...4 - engine cylinder…

Figure 10-3 - Timing drive mechanism clearance adjustment procedure: 1...4 - engine cylinder ordinal number; A, B, C - stages of adjustment of the timing drive mechanism.


Adjust the timing drive mechanism clearances in the order shown in Figure 10-3 (spanner 10, pliers).
  • A - Set the exhaust valve of cylinder 1 to the fully open position.
  • B - Check the clearance of the intake valve of cylinder 3.
  • C - Check the clearance of the exhaust valve of cylinder 4.

Repeat the adjustment operations for the other cylinders in the order shown in Figure 10-3.

After adjusting the valves, tighten the lock nuts to a torque of 9 N·m (0.9 kgf·m) (replaceable head 10, torque wrench).

Completion of adjustment


Apply sealant to the thread of plug 1, Figure 10-1, the hole for the TDC lock and tighten the plug. Tightening torque of the plug 20 Nm (2.0 kgf·m) (torx E14 socket head, extension, ratchet wrench, torque wrench).

Install the upper timing belt cover.

Install the lower timing belt cover.

Install the right engine mount.

Install the crankshaft pulley.

Install the accessory drive belt.

Install the right side mudguard.

Install the right front wheel.

Install the cylinder head cover.

Install the air filter housing.

Connect the ground wire terminal to the battery.


This article is available at russian, bulgarian, belarusian, ukrainian, serbian, croatian, romanian, polish, slovak, hungarian
This article has been reviewed: Daniil Markelov
Share with friends:
◀ Previous
Lada Largus 1: Engine repair
Next ▶

Replacing the cylinder head cover gasket
Engine flywheel — removal and installation
Rear crankshaft oil seal — replacement
Front crankshaft oil seal — replacement
Timing belt tensioner and roller defects
Removal the cylinder head and replacing the cylinder head gasket
Left Powertrain Mount — Removal and Installation
Right Powertrain Mount — Removal and Installation
Rear Powertrain Mount — Removal and Installation
More articles with information from manuals for Lada:

• Adjusting the clearances in the timing drive of the 1.6i engine Lada Kalina Hatchback (2004-2013, VAZ-1119)
• Valve timing drive clearances — adjustment Lada Granta 1 (2011-2023, VAZ-2190)
• Checking and adjusting the parking brake drive Lada Priora 1 (2007-2018, VAZ-2170)
• Adjusting the seat and steering wheel position Lada Vesta 1 (2015-2023, VAZ-2180)
• Checking the functionality and adjusting the drive of the rear brake… Lada X-Ray 1 (2015-2022)
Link to this article in various formats
Reviews and comments of visitors
No comments yet


Add up two numbers: 10 + 29


Largus 1 (2012-2023) 
  • General information
  • Vehicle device
  • User manual
  • Maintenance
  • Power unit
  • Engine repair
  • Cooling and lubrication system
  • Supply system
  • Ignition system
  • Exhaust system
  • Spare parts catalog
  • Transmission
  • Clutch
  • Car gearbox
  • Drive shafts
  • Spare parts catalog
  • Chassis (running gear)
  • Suspension and wheels
  • Steering
  • Brake system
  • Spare parts catalog
  • Body and interior
  • Exterior (external elements)
  • Interior (internal elements)
  • Doors, locks and windows
  • Heating and ventilation
  • Spare parts catalog
  • Electrical equipment
  • Equipment and devices
  • Power devices
  • Lighting and signaling
  • Spare parts catalog
  • Electrical circuits
LadaMan.ru © 2018–2026 | Mobile version | About Lada | Sitemap: EN BG BY UA RS HR RO PL SK HU | Contacts with admin | | Add to bookmarks
Kalina Hatchback (2004-2013) | Kalina Sedan (2004-2013) | Granta 1 (2011-2023) | Priora 1 (2007-2018) | Vesta 1 (2015-2023) | Largus 1 (2012-2023) | X-Ray 1 (2015-2022) |
This site uses cookies to ensure everything runs smoothly.