Car repair AvtoVAZ Car repair Renault Car repair Hyundai Car repair Ford Car repair Volkswagen Car repair Audi Car repair Chevrolet
English Русский
Български
Беларускі
Український
Српски
Hrvatski
Română
Polski
Slovenský
Magyar
articles sitemap contacts bookmark
LadaMan.ru


Kalina Granta Priora Vesta Largus XRAY
Largus 1 (2012-2023)

Right Powertrain Mount — Removal and Installation (Largus 1)

  • Main
  • Largus
  • Largus 1
  • Power unit
  • Engine repair
  • Right Powertrain Mount — Removal and Installation
0
Contents: Removal ⇣ Installation ⇣
A worn right engine mount is one of the most common causes of strong body vibrations.

Note: For the catalog number of this part, see here.


See also Replacing the left support and Replacing the rear support.

Removal


Place the vehicle in a work area, apply the parking brake, turn off the ignition and disconnect the ground wire terminal from the battery.

Remove the engine crankcase guard (see here).

If special equipment is available:


Install crossbar 1, Figure 14-4, on the gutters of the engine compartment and hook it onto lifting eye 2 on the engine on the timing drive side (crossbar for hanging the engine type RST-500 ES f. "RANGER").
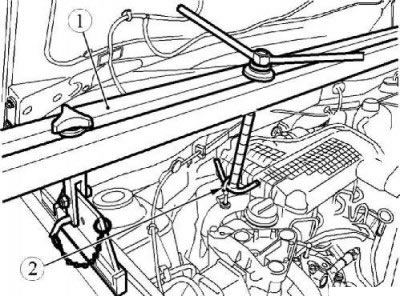
Figure 14-4 - Installing the engine support beam: 1 - crossbar for hanging the engine; 2 - lifting…

Figure 14-4 - Installing the engine support beam: 1 - crossbar for hanging the engine; 2 - lifting eye


In the absence of special equipment:


We place a support under the engine crankcase (for example a jack) through a wooden block.
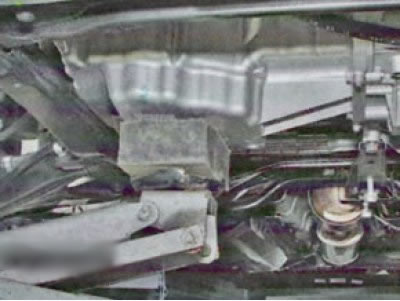
We place a support under the engine crankcase (for example a jack) through a wooden block.


If you don't have a suitable support or jack, you can use a mounting paddle to slightly lift the right side of the engine (for the oil pan, resting the spatula on the subframe) and insert a wooden wedge between the subframe and the oil pan.
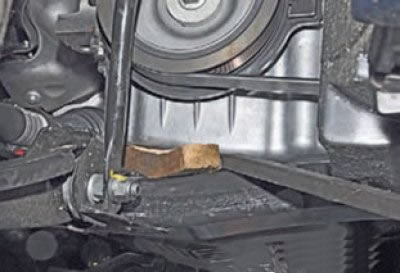


If you don't have a suitable support or jack, you can use a mounting paddle to slightly lift the…


For cars with K4M engine


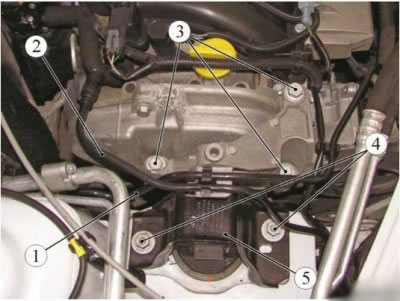
Disconnect fuel pipe 1, Figure 14-5, and pipe 2 of the gasoline vapor recovery system from the holders.
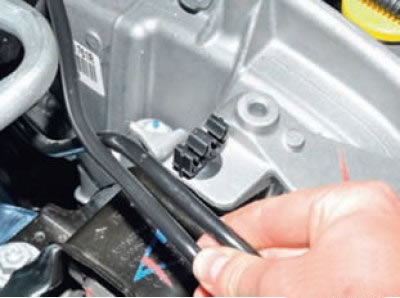
Disconnect fuel pipe 1, Figure 14-5, and pipe 2 of the gasoline vapor recovery system from the…


Figure 14-5 - Removing the right engine mount support K4M: 1 - fuel pipe; 2 - pipe of the gasoline…

Figure 14-5 - Removing the right engine mount support K4M: 1 - fuel pipe; 2 - pipe of the gasoline vapor recovery system; 3 - bolt for fastening the bracket of the right suspension support to the engine; 4 - bolt for fastening the right engine mount support to the body; 5 - right engine mount support


Mark the position of the right engine mount support on the body with a marker.

Loosen bolts 3 securing the right suspension support bracket to the engine (replacement head 16, extension, ratchet).
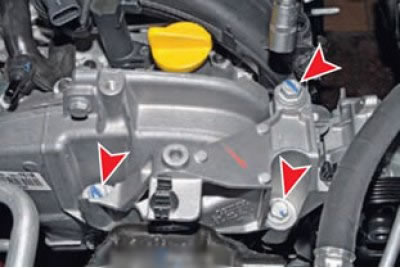
Loosen bolts 3 securing the right suspension support bracket to the engine (replacement head 16,…


Loosen the 4 bolts securing the right engine mount to the body (replacement head 16, extension, ratchet).
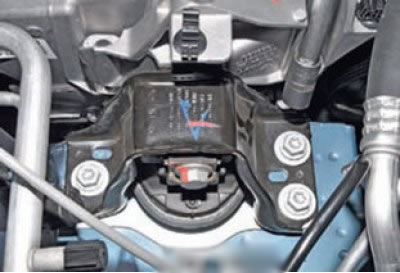
Loosen the 4 bolts securing the right engine mount to the body (replacement head 16, extension,…


Remove the right engine mount assembly with the bracket.
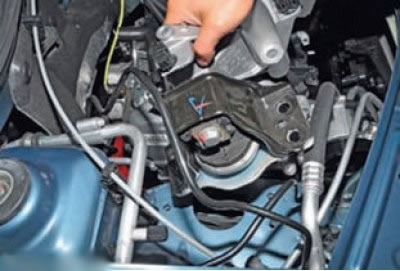
Remove the right engine mount assembly with the bracket.


Having unscrewed the bolt securing the support to the bracket, we separate the support and the bracket.
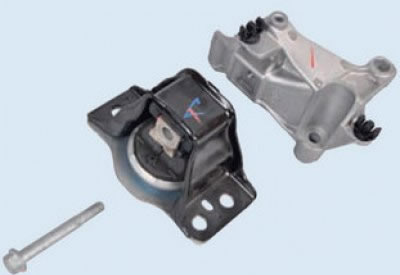


Having unscrewed the bolt securing the support to the bracket, we separate the support and the…


For cars with K7M engine


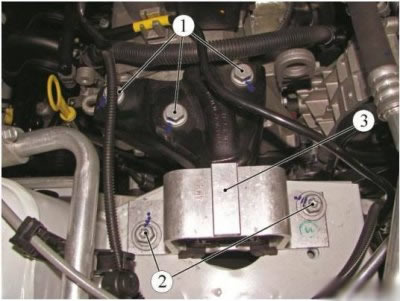
Figure 14-6 - Removing the right engine mount support K7M: 1 - bolt for fastening the bracket of…

Figure 14-6 - Removing the right engine mount support K7M: 1 - bolt for fastening the bracket of the right suspension support to the engine; 2 - bolt for fastening the right engine mount support to the body; 3 - right engine mount support


Mark the position of the right engine mount support on the body with a marker.

Loosen bolts 1, Fig. 14-6, securing the right suspension support bracket to the engine (replacement head 16, extension, ratchet).
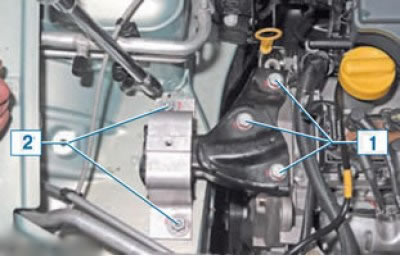
Loosen bolts 1, Fig. 14-6, securing the right suspension support bracket to the engine (replacement…


Loosen bolts 2 securing the right engine mount support to the body (replacement head 16, extension, ratchet).
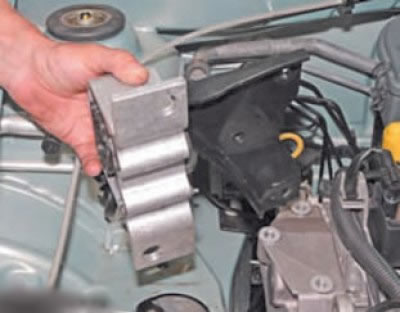


Loosen bolts 2 securing the right engine mount support to the body (replacement head 16, extension,…


... and remove the right support together with the bracket.
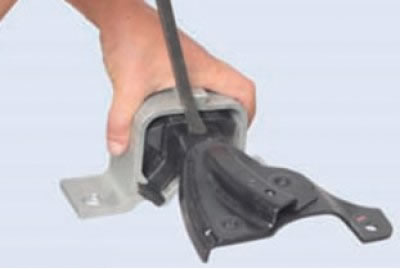
... and remove the right support together with the bracket.


Using a suitable tool, push out and separate the right support and its bracket.
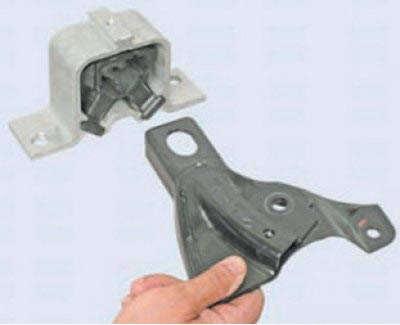
Using a suitable tool, push out and separate the right support and its bracket.


Installation


For cars with K4M engine


Install the right support 5 of the engine mount according to the marks on the body made during its removal, and secure it with bolts 3 and 4 securing the right support to the engine and body (replacement head 16, extension, ratchet).


Tighten to the specified torque:
  • bolts for fastening the bracket of the right suspension support to the engine 62 N·m (6.2 kgf·m);
  • bolts for fastening the right suspension support to the body 62 N·m (6.2 kgf·m) (replaceable head 16, extension, torque wrench).

Install fuel pipe 1 and pipe 2 of the gasoline vapor recovery system into the holders.

For cars with K7M engine


Install the right support 3, Figure 14-6, of the engine mount according to the marks on the body made during its removal, and secure it with bolts 1 and 2 securing the right support of the engine mount to the body (replacement head 16, extension, ratchet).

Tighten to the specified torque:
  • bolts for fastening the bracket of the right suspension support to the engine 62 N·m (6.2 kgf·m);
  • bolts for fastening the right suspension support to the body 62 N·m (6.2 kgf·m) (replaceable head 16, extension, torque wrench).

Operations for all vehicle configurations


If installed: Disconnect the crossmember hook from the lifting eye on the engine and remove the crossmember.

If installed: Remove the support from under the engine (wooden spacer).

Install engine protection.

Connect the ground wire terminal to the battery.


This article is available at russian, bulgarian, belarusian, ukrainian, serbian, croatian, romanian, polish, slovak, hungarian
This article has been reviewed: Daniil Markelov
Share with friends:
◀ Previous
Lada Largus 1: Engine repair
Next ▶

Left Powertrain Mount — Removal and Installation
Removal the cylinder head and replacing the cylinder head gasket
Adjusting clearances in the timing drive mechanism (K7M engine)
Replacing the cylinder head cover gasket
Engine flywheel — removal and installation
Rear Powertrain Mount — Removal and Installation
More articles with information from manuals for Lada:

• Powertrain Mounts — Replacement Lada Kalina Hatchback (2004-2013, VAZ-1119)
• Powertrain Mounts — Replacement Lada Granta 1 (2011-2023, VAZ-2190)
• Replacing the powertrain mounts Lada Priora 1 (2007-2018, VAZ-2170)
• Powertrain Mounts — replacement Lada Vesta 1 (2015-2023, VAZ-2180)
• Powertrain — removal Lada X-Ray 1 (2015-2022)
Link to this article in various formats
Reviews and comments of visitors
No comments yet


Add up two numbers: 22 + 37


Largus 1 (2012-2023) 
  • General information
  • Vehicle device
  • User manual
  • Maintenance
  • Power unit
  • Engine repair
  • Cooling and lubrication system
  • Supply system
  • Ignition system
  • Exhaust system
  • Spare parts catalog
  • Transmission
  • Clutch
  • Car gearbox
  • Drive shafts
  • Spare parts catalog
  • Chassis (running gear)
  • Suspension and wheels
  • Steering
  • Brake system
  • Spare parts catalog
  • Body and interior
  • Exterior (external elements)
  • Interior (internal elements)
  • Doors, locks and windows
  • Heating and ventilation
  • Spare parts catalog
  • Electrical equipment
  • Equipment and devices
  • Power devices
  • Lighting and signaling
  • Spare parts catalog
  • Electrical circuits
LadaMan.ru © 2018–2026 | Mobile version | About Lada | Sitemap: EN BG BY UA RS HR RO PL SK HU | Contacts with admin | | Add to bookmarks
Kalina Hatchback (2004-2013) | Kalina Sedan (2004-2013) | Granta 1 (2011-2023) | Priora 1 (2007-2018) | Vesta 1 (2015-2023) | Largus 1 (2012-2023) | X-Ray 1 (2015-2022) |
This site uses cookies to ensure everything runs smoothly.