
Car repair AvtoVAZ Car repair Renault Car repair Hyundai Car repair Ford Car repair Volkswagen Car repair Audi Car repair Chevrolet
English Русский
Български
Беларускі
Український
Српски
Hrvatski
Română
Polski
Slovenský
Magyar
articles sitemap contacts bookmark
LadaMan.ru


Kalina Granta Priora Vesta Largus XRAY
X-Ray 1 (2015-2022)

Checking and adjusting the clearance in the front wheel hub bearings (XRAY 1)

  • Main
  • XRAY
  • X-Ray 1
  • General information
  • Maintenance
  • Checking and adjusting the clearance in the front wheel hub bearings
0
We check the clearance in the front wheel hub bearings in accordance with the maintenance regulations every 15 thousand km.

We remove the front wheel.
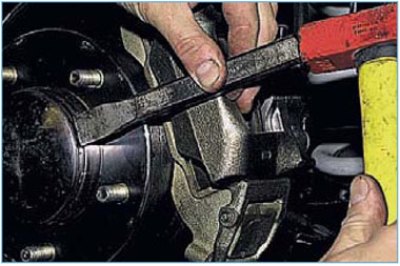
We remove the front wheel.


Using a chisel, separate the cap from the hub.

Remove the brake pads (see "Replacing the front brake pads").

We fix the dial indicator holder on the steering knuckle. We rest the indicator leg against the wheel hub as close to the adjusting nut as possible. We put the rings of the open-end wrenches (for example, "17") on the two studs and secure them with the wheel mounting nuts. Using the keys, turn and move the hub in the axial direction.
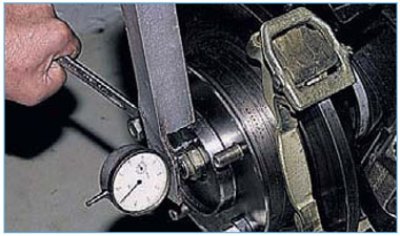
We fix the dial indicator holder on the steering knuckle. We rest the indicator leg against the…


We measure the amount of axial displacement (gap) of the hub using an indicator.

If the gap exceeds 0.15 mm, it must be adjusted.


For this...
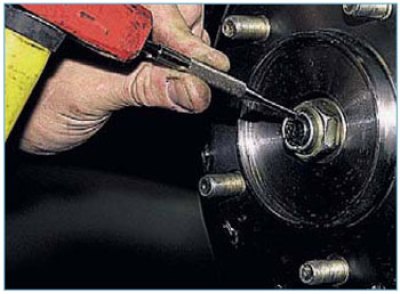
For this...


...we straighten the crushed flange of the adjusting nut with a punch.
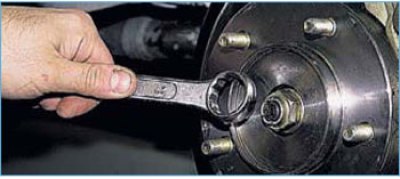
...we straighten the crushed flange of the adjusting nut with a punch.


Using a 27 mm open-end wrench, unscrew the adjusting nut of the hub bearings.

We install a new adjusting nut. Tighten the nut to a torque of 19.6 Nm (2.0 kgf·m), while turning the hub in both directions. Then we loosen the nut and tighten it again with a torque of 6.86 N·m (0.7 kgf·m). After that, we loosen the nut by 2025 degrees. We check the clearance in the bearings, it should be within 0.02-0.08 mm. If necessary, repeat the adjustment. After adjustment, we lock the nut by pressing its flange into the groove of the outer joint tail of the wheel drive.


This article is available at russian, bulgarian, belarusian, ukrainian, serbian, croatian, romanian, polish, slovak, hungarian
This article has been reviewed: Daniil Markelov
Share with friends:
◀ Previous
Lada X-Ray 1: Maintenance
Next ▶

Checking the condition of the front wheel brakes
Checking the fluid level in the power steering reservoir
Bleeding the clutch hydraulic drive, replacing the fluid
Checking the fluid level in the clutch hydraulic reservoir
Bleeding the hydraulic brake system, replacing the fluid
Checking the condition of the rear wheel brakes
Adjusting the parking brake
Checking the functionality and adjusting the drive of the rear brake…
Checking the condition and replacing the auxiliary drive belt
Checking the condition and replacing the power steering pump drive belt
More articles with information from manuals for Lada:

• Checking the technical condition of the front wheel drives Lada Kalina Hatchback (2004-2013, VAZ-1119)
• Checking the technical condition of the front wheel drives Lada Granta 1 (2011-2023, VAZ-2190)
• Checking and adjusting the front wheel alignment angles Lada Priora 1 (2007-2018, VAZ-2170)
• Adjusting the seat and steering wheel position Lada Vesta 1 (2015-2023, VAZ-2180)
• Adjusting the front wheel alignment angles Lada Largus 1 (2012-2023)
Link to this article in various formats
Reviews and comments of visitors
No comments yet


Add up two numbers: 11 + 26


X-Ray 1 (2015-2022) 
  • General information
  • User manual
  • Maintenance
  • Daily care
  • Troubleshooting
  • Power unit
  • Engine repair
  • Fuel system
  • Cooling system
  • Repair H4M engine
  • Transmission
  • Clutch and drive shafts
  • Transmission
  • Chassis (running gear)
  • Front suspension
  • Rear suspension
  • Brake system
  • Steering
  • Body and interior
  • Exterior (external elements)
  • Interior (internal elements)
  • Electrical equipment
  • Equipment and devices
  • Lighting and signaling
LadaMan.ru © 2018–2026 | Mobile version | About Lada | Sitemap: EN BG BY UA RS HR RO PL SK HU | Contacts with admin | | Add to bookmarks
Kalina Hatchback (2004-2013) | Kalina Sedan (2004-2013) | Granta 1 (2011-2023) | Priora 1 (2007-2018) | Vesta 1 (2015-2023) | Largus 1 (2012-2023) | X-Ray 1 (2015-2022) |
This site uses cookies to ensure everything runs smoothly.