
Car repair AvtoVAZ Car repair Renault Car repair Hyundai Car repair Ford Car repair Volkswagen Car repair Audi Car repair Chevrolet
English Русский
Български
Беларускі
Український
Српски
Hrvatski
Română
Polski
Slovenský
Magyar
articles sitemap contacts bookmark
LadaMan.ru


Kalina Granta Priora Vesta Largus XRAY
X-Ray 1 (2015-2022)

Checking the condition and replacing the auxiliary drive belt (XRAY 1)

  • Main
  • XRAY
  • X-Ray 1
  • General information
  • Maintenance
  • Checking the condition and replacing the auxiliary drive belt
0
In accordance with the maintenance regulations, we check the condition of the auxiliary drive belt every 10 thousand km.

To check the condition of the belt... ...by pulling it up... ...we remove the engine screen from the four studs.

To check the belt tension...
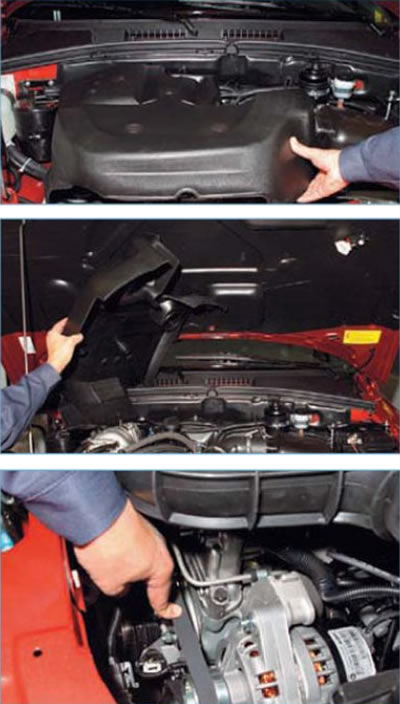
To check the belt tension...


...we press with our finger on the belt in the middle between the pulleys of the generator and the coolant pump.

With a pressing force of about 8.0 kgf, the belt deflection should be 12±1 mm.

To adjust the belt tension, remove the rubber hoses supplying air to the throttle assembly.
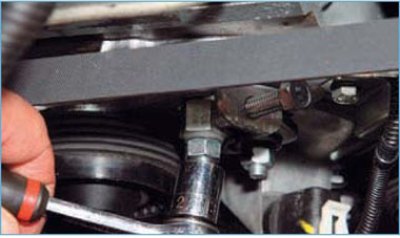
To adjust the belt tension, remove the rubber hoses supplying air to the throttle assembly.


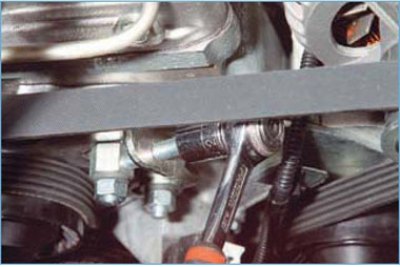
Using a 13 mm head, loosen the three nuts securing the tension roller bracket.
Using a 13 mm head, loosen the three nuts securing the tension roller bracket.


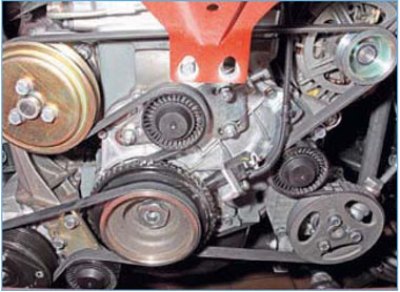
Location of accessory drive belt and tension roller bracket mounting nuts (for clarity, shown with the engine cooling system radiator removed).


Location of accessory drive belt and tension roller bracket mounting nuts (for clarity, shown with…


Using a 13 mm wrench or head, turn the adjusting bolt clockwise, tightening the belt.

Tighten the nuts securing the tension roller bracket. We start the engine, stop it and check the belt tension again.

Do not overtighten the belt! Excessive belt tension leads to premature failure of the belt and bearings of the generator, coolant pump and power steering pump.

We replace the auxiliary drive belt if cracks, tears, or separation of the rubber from the fabric base are detected. On a car with air conditioning, remove the air conditioning compressor drive belt (see "Checking the condition and replacing the air conditioning compressor drive belt").

Loosen the tension roller bracket mounting nuts (see above) and turn the adjusting bolt counterclockwise, loosening the belt tension.

We remove the belt from the tension roller...
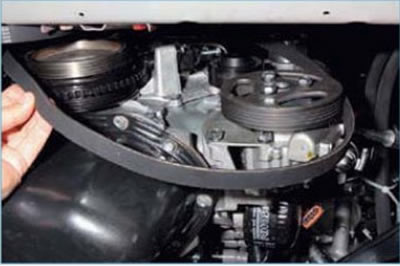
We remove the belt from the tension roller...


...and other pulleys.


Auxiliary Drive Belt Marking (five-strand, 1888 mm long).

We install the new belt in the reverse order, putting it first on the crankshaft pulley, and lastly on the tension roller. After installation, adjust the belt tension (see above).


This article is available at russian, bulgarian, belarusian, ukrainian, serbian, croatian, romanian, polish, slovak, hungarian
This article has been reviewed: Daniil Markelov
Share with friends:
◀ Previous
Lada X-Ray 1: Maintenance
Next ▶

Checking the functionality and adjusting the drive of the rear brake…
Adjusting the parking brake
Checking the condition of the rear wheel brakes
Checking and adjusting the clearance in the front wheel hub bearings
Checking the condition of the front wheel brakes
Checking the condition and replacing the power steering pump drive belt
Checking the condition and replacing spark plugs
Replacing the fuel filter
Replacing the air filter element
Replacing the replacement element of the outdoor air filter of the…
More articles with information from manuals for Lada:

• Timing belt drive engine 1.6i — checking the condition and adjusting… Lada Kalina Hatchback (2004-2013, VAZ-1119)
• Generator Drive Belt — Checking Condition Lada Granta 1 (2011-2023, VAZ-2190)
• Checking the alternator drive belt tension Lada Priora 1 (2007-2018, VAZ-2170)
• Auxiliary Drive Belt — replacement Lada Vesta 1 (2015-2023, VAZ-2180)
• Auxiliary Drive Belt — replacement Lada Largus 1 (2012-2023)
Link to this article in various formats
Reviews and comments of visitors
No comments yet


Add up two numbers: 28 + 11


X-Ray 1 (2015-2022) 
  • General information
  • User manual
  • Maintenance
  • Daily care
  • Troubleshooting
  • Power unit
  • Engine repair
  • Fuel system
  • Cooling system
  • Repair H4M engine
  • Transmission
  • Clutch and drive shafts
  • Transmission
  • Chassis (running gear)
  • Front suspension
  • Rear suspension
  • Brake system
  • Steering
  • Body and interior
  • Exterior (external elements)
  • Interior (internal elements)
  • Electrical equipment
  • Equipment and devices
  • Lighting and signaling
LadaMan.ru © 2018–2026 | Mobile version | About Lada | Sitemap: EN BG BY UA RS HR RO PL SK HU | Contacts with admin | | Add to bookmarks
Kalina Hatchback (2004-2013) | Kalina Sedan (2004-2013) | Granta 1 (2011-2023) | Priora 1 (2007-2018) | Vesta 1 (2015-2023) | Largus 1 (2012-2023) | X-Ray 1 (2015-2022) |
This site uses cookies to ensure everything runs smoothly.