



Removal
Operations are common for all vehicle configurations
Place the vehicle on a two-post lift, apply the parking brake, turn off the ignition and disconnect the battery ground terminal (spanner 10).
Remove the right front wheel. Raise the vehicle to a height convenient for performing the work.
Remove the right inner trim and the right side mudguard.
For cars with K7M engine without air conditioning and without power steering.
Cut belt 1, figure 3-1 (nippers).
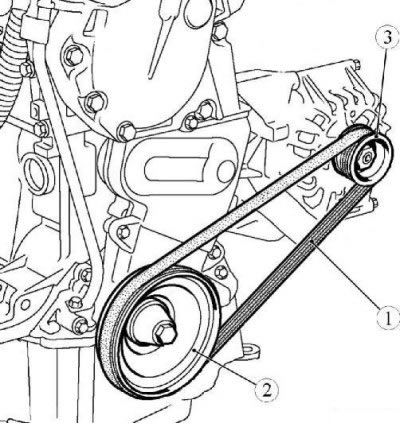
Figure 3-1 - Removing the auxiliary drive belt on a vehicle with a K7M engine without air conditioning and without power steering: 1 - auxiliary drive belt; 2 - crankshaft pulley; 3 - generator pulley
For cars with K7M engine without air conditioning with power steering
Loosen the adjusting bolt 1 by 3...4 turns, Figure 3-2 (replacement head 10, extension, ratchet wrench).
Loosen bolts 2 securing tension roller 3 and remove the tension roller (replaceable head 13, extension, ratchet wrench).
Remove the 4 auxiliary drive belt.
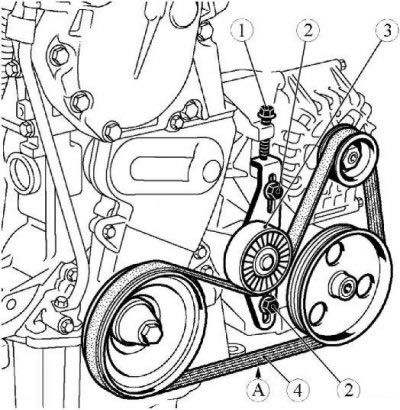
Figure 3-2 - Removing the auxiliary drive belt on a vehicle with a K7M engine without air conditioning and with power steering: 1 - adjusting bolt; 2 - tension roller mounting bolt; 3 - tension roller; 4 - auxiliary drive belt; A - measurement point
For vehicles with air conditioning and power steering
Turn the automatic tension roller 1, Figure 3-3, clockwise using the key 2 and loosen the belt tension (ring spanner 15).
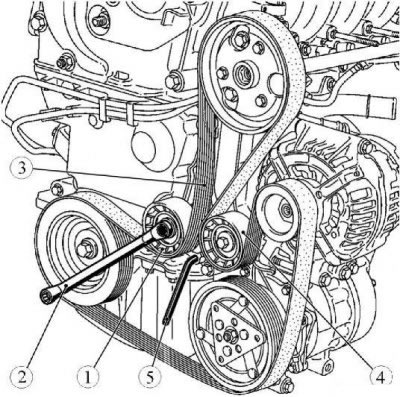
Figure 3-3 - Removing the accessory drive belt on a vehicle with air conditioning and power steering: 1 - automatic tension roller; 2 - ring spanner; 3 - auxiliary drive belt; 4 - idler pulley; 5 - Allen key 6
Lock the automatic tension roller with key 5 (allen key 6).
Remove the accessory drive belt 3.
Loosen the automatic tension roller mounting bolt and remove the automatic tension roller (replacement head 16, extension, ratchet wrench).
Loosen the idler pulley mounting bolt and remove the idler pulley 4 (replacement head 16, extension, ratchet wrench).
For cars with K4M engine without air conditioning with power steering
Turn the automatic tension roller 1, Figure 3-4, clockwise using the key 2 and loosen the belt tension (ring spanner 16).
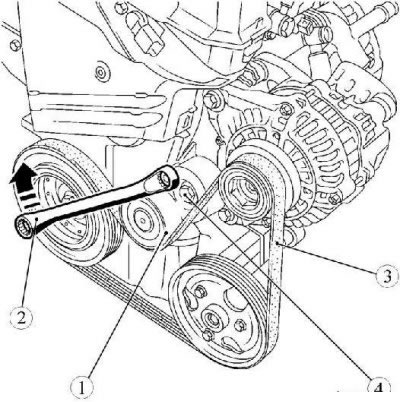
Figure 3-4 - Removing the auxiliary drive belt on a vehicle with a K4M engine without air conditioning and with power steering: 1 - automatic tension roller; 2 - ring spanner; 3 - auxiliary drive belt; 4 - automatic tension roller mounting bolt
Remove the accessory drive belt 3.
Loosen bolt 4 of the automatic tension roller fastening and remove the automatic tension roller (replacement head 16, extension, ratchet wrench).
Installation
For cars with K7M engine without air conditioning and without power steering.
Attention: The accessory drive belt must be replaced.
Install and secure the accessory drive belt installation tool on pulley 2, Figure 3-1, of the crankshaft (fixture 67.7834-9703).
Install new accessory drive belt 1 and turn the crankshaft pulley clockwise until the belt is fully seated on the crankshaft pulley (replacement head 18, extension, ratchet).
For cars with K7M engine without air conditioning with power steering
Attention. Parts subject to mandatory replacement:
- accessory drive belt;
- tension roller.
Install a new tension roller 3, Figure 3-2, and install, without tightening, the tension roller mounting bolts 2 (replacement head 10, extension, ratchet wrench).
Install the 4 auxiliary drive belt.
Tighten the belt using the adjusting bolt 1 (replacement head 10, extension, ratchet wrench).
Adjust the belt tension (device Mot. 1505 or "LADAHOPMA - PINAR"). Measure at point A. Oscillation frequency 204±5 Hz.
Rotate the crankshaft two turns clockwise to properly install the belt (replacement head 18, extension, ratchet).
Check the belt tension, adjust if necessary (device Mot. 1505 or "LADAHOPMA - PINAR").
Tighten the tension roller mounting bolts. Tightening torque 21 Nm (2.1 kgf·m) (replaceable head 16, torque wrench).
For vehicles with air conditioning and power steering
Attention. Parts subject to mandatory replacement:
- accessory drive belt;
- automatic tension roller;
- idler pulley.
Install a new automatic tensioner roller 1, Fig. 3-3,. The tightening torque of the automatic tensioner roller mounting bolt is 21 N·m (2.1 kgf·m) (replaceable head 16, torque wrench).
Install a new idler pulley 4. Tightening torque of the idler pulley mounting bolt 21 N·m (2.1 kgf·m) (replaceable head 16, torque wrench).
Install new accessory drive belt 3.
Remove Allen key 5.
Rotate the crankshaft two turns clockwise to properly install the belt (replacement head 18, extension, ratchet).
For cars with K4M engine with air conditioning and power steering
Attention. Parts subject to mandatory replacement:
- accessory drive belt;
- automatic tension roller;
- tension roller mounting bolt.
Install a new automatic tensioner roller 1, Figure 3-4, with a new mounting bolt. Tightening torque of bolt 4 for fastening the automatic tension roller: 40 Nm (4.0 kgf·m) (replaceable head 16, torque wrench).
Turn the automatic tension roller clockwise using key 2 (ring spanner 16).
Install new accessory drive belt 3.
Rotate the crankshaft two revolutions to properly install the belt (replacement head 16, extension, ratchet wrench).
Operations are common for all vehicle configurations
Install the right inner trim and the right side mudguard.
Install the right front wheel.
Lower the car, install the ground wire terminal on the battery (10 mm spanner).