



Equipment and Electrical Appliances Lada Kalina 1
 itemprop="image"
Features of the design of electrical equipment
The electrical equipment of the car is made according to a single-wire scheme: the negative terminals of the sources and consumers of electrical energy are connected to the "ground", the function of...
The electrical equipment of the car is made according to a single-wire scheme: the negative terminals of the sources and consumers of electrical energy are connected to the "ground", the function of...

Replacing fuses and relays in the mounting block
Most of the vehicle's electrical circuits are protected by fuses installed in the fuse box. The mounting block is located in the instrument panel on the left side at the bottom and is covered by a...
Most of the vehicle's electrical circuits are protected by fuses installed in the fuse box. The mounting block is located in the instrument panel on the left side at the bottom and is covered by a...

Replacing additional fuses and relays of the fuel injection system
To replace the auxiliary fuses and relays for the fuel injection system on your vehicle, you will need a flat-blade screwdriver. 1. Disconnect the wire from the negative terminal of the battery. 2....
To replace the auxiliary fuses and relays for the fuel injection system on your vehicle, you will need a flat-blade screwdriver. 1. Disconnect the wire from the negative terminal of the battery. 2....
Design features of the ignition switch (lock)
Lada Kalina cars use the ignition switch type 11180-6105006 with an anti-theft locking device, a lock for restarting the starter without first turning off the ignition and a coil for communicating...
Lada Kalina cars use the ignition switch type 11180-6105006 with an anti-theft locking device, a lock for restarting the starter without first turning off the ignition and a coil for communicating...

Removal, disassembly and installation of the ignition switch
To remove, disassemble and install the ignition switch (lock) on a car, you will need: a hammer, a chisel, a flat-blade screwdriver. 1. Disconnect the wire from the negative terminal of the battery....
To remove, disassemble and install the ignition switch (lock) on a car, you will need: a hammer, a chisel, a flat-blade screwdriver. 1. Disconnect the wire from the negative terminal of the battery....

Removal and installation the windshield wiper
On a car, the windshield wiper unit consists of a gear motor (electric motor with gearbox), levers and brushes. The cleaner's electric motor is excited by permanent magnets, has three brushes and two...
On a car, the windshield wiper unit consists of a gear motor (electric motor with gearbox), levers and brushes. The cleaner's electric motor is excited by permanent magnets, has three brushes and two...

Replacing the cigarette lighter light bulb
1. Remove the floor tunnel lining (see " Removal and installation of floor tunnel linings "). 2. Remove the cigarette lighter lamp socket cover... 3. ... remove the cigarette lighter light bulb...
1. Remove the floor tunnel lining (see " Removal and installation of floor tunnel linings "). 2. Remove the cigarette lighter lamp socket cover... 3. ... remove the cigarette lighter light bulb...

Replacing the cigarette lighter
To replace the cigarette lighter in your car, you will need a flat-blade screwdriver. 1. Remove the floor tunnel lining (see " Removal and installation of floor tunnel linings "). 2. Press the...
To replace the cigarette lighter in your car, you will need a flat-blade screwdriver. 1. Remove the floor tunnel lining (see " Removal and installation of floor tunnel linings "). 2. Press the...

Features of the design of the combination / instrument panel
All vehicle control instruments are combined into a cluster. It includes an electronic speedometer and tachometer, coolant temperature and fuel level indicators, control and signal lamps, and a trip...
All vehicle control instruments are combined into a cluster. It includes an electronic speedometer and tachometer, coolant temperature and fuel level indicators, control and signal lamps, and a trip...

Removal and installation the instrument cluster (panel)
To remove and install the instrument cluster (panel) on your vehicle, you will need a Phillips-head screwdriver. 1. Disconnect the wire from the negative terminal of the battery. 2. Remove the two...
To remove and install the instrument cluster (panel) on your vehicle, you will need a Phillips-head screwdriver. 1. Disconnect the wire from the negative terminal of the battery. 2. Remove the two...

Replacing control lamps and instrument cluster illumination lamps
To replace the control lamps and instrument cluster (panel) illumination lamps on your vehicle, you will need: tweezers, a socket wrench with a 6 mm head. 1. Disconnect the wire from the negative...
To replace the control lamps and instrument cluster (panel) illumination lamps on your vehicle, you will need: tweezers, a socket wrench with a 6 mm head. 1. Disconnect the wire from the negative...

Replacing the ambient air temperature sensor
1. Remove the front bumper cover (see " Removal and installation the front bumper "). 2. Overcoming the resistance of the clamps, remove the ambient air temperature sensor from the bracket... 3....
1. Remove the front bumper cover (see " Removal and installation the front bumper "). 2. Overcoming the resistance of the clamps, remove the ambient air temperature sensor from the bracket... 3....
Design of a standard alarm system (anti-theft system)
A standard alarm system is installed on cars (electronic anti-theft system) remote control, which includes the following functions: remote locking (unlock) door locks with simultaneous activation...
A standard alarm system is installed on cars (electronic anti-theft system) remote control, which includes the following functions: remote locking (unlock) door locks with simultaneous activation...

Control of standard alarm system
Figure 9.7. Remote control for the standard car alarm: 1 - lock button; 2 - unlock button; 3 - trunk lid release button Locking the doors and turning on the security mode using the remote control. To...
Figure 9.7. Remote control for the standard car alarm: 1 - lock button; 2 - unlock button; 3 - trunk lid release button Locking the doors and turning on the security mode using the remote control. To...

Removal and installation of the standard alarm control unit
For removing and installing the standard alarm control unit (electronic anti-theft system) on the car you will need: a Phillips-head screwdriver, a 10 mm socket wrench. 1. Disconnect the wire from...
For removing and installing the standard alarm control unit (electronic anti-theft system) on the car you will need: a Phillips-head screwdriver, a 10 mm socket wrench. 1. Disconnect the wire from...
Design features, device, description of the immobilizer
The cars are equipped with a standard immobilizer APS-6. This electronic device is designed to prevent unauthorized engine starting by breaking the electrical circuits of the engine control system....
The cars are equipped with a standard immobilizer APS-6. This electronic device is designed to prevent unauthorized engine starting by breaking the electrical circuits of the engine control system....
Immobilizer Key Training
To activate the anti-theft function on your vehicle, perform the immobilizer training procedure. After the entire training procedure has been completed: the anti-theft function will be activated in...
To activate the anti-theft function on your vehicle, perform the immobilizer training procedure. After the entire training procedure has been completed: the anti-theft function will be activated in...
Actions in case of loss of immobilizer keys
If you have lost the working immobilizer key, you need to purchase a new key blank and cut it to work with the ignition switch installed on the vehicle. Then perform the immobilizer learning...
If you have lost the working immobilizer key, you need to purchase a new key blank and cut it to work with the ignition switch installed on the vehicle. Then perform the immobilizer learning...

Replacing the immobilizer control unit
To replace the immobilizer control unit on your vehicle, you will need a Phillips-head screwdriver. 1. Disconnect the wire from the negative terminal of the battery. 2. Remove the instrument panel...
To replace the immobilizer control unit on your vehicle, you will need a Phillips-head screwdriver. 1. Disconnect the wire from the negative terminal of the battery. 2. Remove the instrument panel...
Electric Power Steering Control Unit
The vehicles are equipped with an electromechanical power steering. The electric power steering control unit is a non-repairable product; in case of malfunction, it is replaced as an assembly. When...
The vehicles are equipped with an electromechanical power steering. The electric power steering control unit is a non-repairable product; in case of malfunction, it is replaced as an assembly. When...
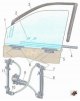
Design of electric windows of front doors
Figure 9.8. Front door electric window: 1 - front door glass; 2 - screw; 3 - upper seal; 4 - outer seal; 5 - protective plate of the lowering glass; 6 - lowering glass holder; 7 - mounting plate for...
Figure 9.8. Front door electric window: 1 - front door glass; 2 - screw; 3 - upper seal; 4 - outer seal; 5 - protective plate of the lowering glass; 6 - lowering glass holder; 7 - mounting plate for...

Removal and installation front door electric windows
To remove and install the electric windows of the front doors on a car, you will need: socket wrenches "8", "10". 1. Disconnect the wire from the negative terminal of the battery. 2. Remove the front...
To remove and install the electric windows of the front doors on a car, you will need: socket wrenches "8", "10". 1. Disconnect the wire from the negative terminal of the battery. 2. Remove the front...

Replacing the oil pressure drop indicator light sensor
To replace the oil pressure warning light sensor on your vehicle, you will need a 21 mm wrench. 1. Disconnect the connector with the wire from the terminal of the oil pressure warning lamp sensor......
To replace the oil pressure warning light sensor on your vehicle, you will need a 21 mm wrench. 1. Disconnect the connector with the wire from the terminal of the oil pressure warning lamp sensor......

Replacing the coolant temperature gauge sensor
To replace the coolant temperature sensor (coolant temperature gauge sensor) you will need a 21 key for your car. 1. Disconnect the coolant temperature gauge sensor connector with wire from the...
To replace the coolant temperature sensor (coolant temperature gauge sensor) you will need a 21 key for your car. 1. Disconnect the coolant temperature gauge sensor connector with wire from the...

Replacing the reverse light switch sensor
To replace the reversing light switch sensor on your vehicle, you will need a 22 mm socket wrench. 1. Disconnect the wire from the negative terminal of the battery. 2. Remove the left engine splash...
To replace the reversing light switch sensor on your vehicle, you will need a 22 mm socket wrench. 1. Disconnect the wire from the negative terminal of the battery. 2. Remove the left engine splash...

Replacing the brake light switch sensor
To replace the brake light switch sensor on your car, you will need a 19 mm wrench. 1. Disconnect the wire from the negative terminal of the battery. 2. Disconnect the wire connectors from the brake...
To replace the brake light switch sensor on your car, you will need a 19 mm wrench. 1. Disconnect the wire from the negative terminal of the battery. 2. Disconnect the wire connectors from the brake...

Replacing the Parking Brake Indicator Lamp Switch
1. Remove the parking brake lever trim (see " Removal and installation of floor tunnel linings "). 2. Remove the screw securing the parking brake indicator light switch. 3. Remove the parking brake...
1. Remove the parking brake lever trim (see " Removal and installation of floor tunnel linings "). 2. Remove the screw securing the parking brake indicator light switch. 3. Remove the parking brake...

Installation of antenna, radio and speakers
The cars have a place to install a radio instead of a storage box. For ease of installation, the box is equipped with connectors with power and speaker wires, as well as an antenna wire plug. The...
The cars have a place to install a radio instead of a storage box. For ease of installation, the box is equipped with connectors with power and speaker wires, as well as an antenna wire plug. The...

Engine control system diagram for Euro-2 toxicity standards
Engine management system connections for Euro-2 toxicity standards Lada Kalina / Lada Kalina (VAZ 1118) : 1 - spark plugs; 2 - injectors; 3 - ignition coil; 4 - controller; 5 - main relay; 6 - Main...
Engine management system connections for Euro-2 toxicity standards Lada Kalina / Lada Kalina (VAZ 1118) : 1 - spark plugs; 2 - injectors; 3 - ignition coil; 4 - controller; 5 - main relay; 6 - Main...

Car electrical equipment diagram
Car electrical equipment diagram : 1 - right headlight; 2 - underhood lamp switch; 3 - sound signal; 4 - starter; 5 - battery; 6 - generator; 7 - Windshield wiper motor; 8 - left headlight; 9 - Right...
Car electrical equipment diagram : 1 - right headlight; 2 - underhood lamp switch; 3 - sound signal; 4 - starter; 5 - battery; 6 - generator; 7 - Windshield wiper motor; 8 - left headlight; 9 - Right...

Engine control system diagram for Euro-3 toxicity standards
Engine management system connections for Euro-3 toxicity standards : 1 - spark plugs; 2 - injectors; 3 - ignition coil; 4 - controller; 5 - main relay; 6 - Main relay circuit fuse; 7 - Electric fan...
Engine management system connections for Euro-3 toxicity standards : 1 - spark plugs; 2 - injectors; 3 - ignition coil; 4 - controller; 5 - main relay; 6 - Main relay circuit fuse; 7 - Electric fan...
This section is available on russian, bulgarian, belarusian, ukrainian, serbian, croatian, romanian, polish, slovak, hungarian
More sections with information from manuals for Lada:
• Electrical equipment: Equipment and devices Lada Granta 1 (2011-2023, VAZ-2190)
• General information: Vehicle device Lada Priora 1 (2007-2018, VAZ-2170)
• Electrical equipment: Equipment and devices Lada Vesta 1 (2015-2023, VAZ-2180)
• General information: Vehicle device Lada Largus 1 (2012-2023)
• Electrical equipment: Equipment and devices Lada X-Ray 1 (2015-2022)
Link to this section in various formats
TEXTHTMLBB Code
- General information
- Vehicle device
- Operation and maintenance
- Faults en route
- Power unit
- Engine repair
- Cooling and lubrication system
- Exhaust system
- Supply system
- Ignition and control
- Transmission
- Clutch and drive shafts
- Car gearbox
- Chassis (running gear)
- Front suspension
- Rear suspension
- Steering
- Brake system
- Body and interior
- Exterior (external elements)
- Interior (internal elements)
- Doors, locks and windows
- Electrical equipment
- Equipment and devices
- Power devices
- Lighting and signaling
- Heating and ventilation
- General information
- Vehicle Details
- Maintenance
- Troubleshooting
- Power unit
- Engine repair
- Cooling system
- Supply system
- Control system
- Exhaust system
- Transmission
- Clutch
- Car gearbox
- Drive shafts
- Chassis (running gear)
- Wheels and tires
- Front suspension
- Rear suspension
- Steering
- Brake system
- Body and interior
- Exterior (external elements)
- Interior (internal elements)
- Doors, locks and windows
- Electrical equipment
- Equipment and devices
- Power devices
- Lighting and signaling
- Electrical circuits