
Recommendation. The gearbox weighs more than 30 kg, so work with an assistant or using an adjustable stand or lifting device.
Warning! Do not remove both drives at the same time or, if necessary, install a special mandrel instead of one of them to prevent the side gears from falling out of the differential box.
Removing
1. Remove the engine mudguard or crankcase protection (if installed).
2. Drain the oil from the gearbox (see «Gearbox - checking the level and changing the oil»).
3. Remove the battery shelf (see «Battery shelf - removal and installation»).
4. Remove the air filter (see «Air filter - removal and installation»).
5. Remove the starter (see «Starter - removal and installation»).
6. Disconnect the clutch release cable from the gearbox (see «Clutch cable - replacement»).
7. Disconnect the wiring harness pads from the reversing light switch, vehicle speed sensor and reverse gear lock solenoid (see «The switch of lanterns of a backing - removal and installation», «Vehicle speed sensor - check and replace» And «Reverse lock solenoid - check and replace»),
8. Disconnect the drive rod of the gearshift mechanism from the hinge (see «Gearshift drive - removal, disassembly, installation and adjustment»).
9. Disconnect the jet thrust from the gearbox housing (see «Jet thrust - removal and installation»).
10. We loosen the tightening of the nut securing the longitudinal brace to the transverse arm and disconnect the brace bracket from the body (see «Longitudinal stretching of the suspension - removal and installation»). So that the stretch does not interfere, we take it to the side and fix it with a tourniquet or wire.
11. Remove the front wheel drives (see «Front wheel drive - removal and installation»).
12. Using a 10 mm wrench, unscrew the three bolts securing the lower cover of the clutch housing.
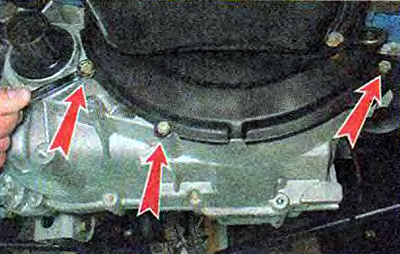
13. Remove the lower crankcase cover.
14. We install an adjustable stand under the engine and remove the left and rear supports of the power unit (see «Power unit mounts - replacement»).
We carry out further work with an assistant or install an adjustable stand under the gearbox.
15. Using a 19 mm socket wrench, unscrew three bolts, as well as one nut securing the gearbox to the engine.
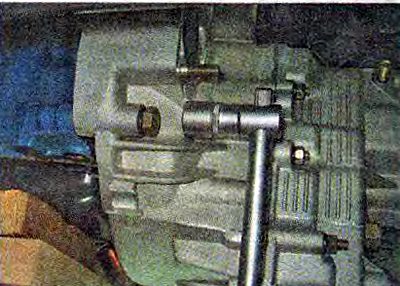
Comment. Upper gearbox mounting bolt on the right side of the engine (when viewed from the side of the gearbox) shorter than the others.
Warning! When removing the gearbox, do not rest its input shaft on the clutch diaphragm spring, this may damage the latter.
16. Shaking the gearbox from side to side, remove it from the guide bushings and carefully remove the input shaft from the hole in the driven disk and the clutch basket.
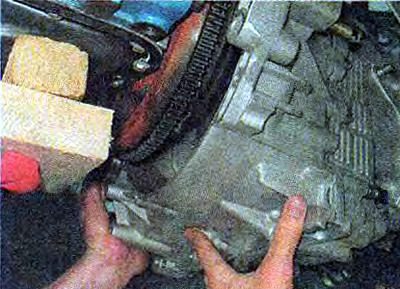
17. We take the gearbox away from the engine as much as possible, tilt it down with the clutch housing and, having passed it between the engine and the front suspension extension, carefully lower the gearbox to the floor.
Installation
We install the gearbox in the reverse order, having previously applied grease to the splines of the gearbox input shaft.