Car repair AvtoVAZ Car repair Renault Car repair Hyundai Car repair Ford Car repair Volkswagen Car repair Audi Car repair Chevrolet
English Русский
Български
Беларускі
Український
Српски
Hrvatski
Română
Polski
Slovenský
Magyar
articles sitemap contacts bookmark
LadaMan.ru


Kalina Granta Priora Vesta Largus XRAY
Kalina Sedan (2004-2013, VAZ-1118) Kalina Hatchback (2004-2013, VAZ-1119)

Reverse Gear Lock Solenoid — Checking and Replacing (Kalina 1119)

  • Main
  • Kalina
  • Kalina Hatchback
  • Transmission
  • Car gearbox
  • Reverse Gear Lock Solenoid — Checking and Replacing
0
Contents: Examination ⇣ Removal ⇣ Installation ⇣
To complete the work you will need:
  • inspection ditch or overpass;
  • multimeter.

Examination


1. Prepare the car for work (see "Preparing the car for maintenance and repair").

2. Remove the engine splash guard or engine crankcase protection (if installed).

3. Disconnect the wiring harness from the solenoid.
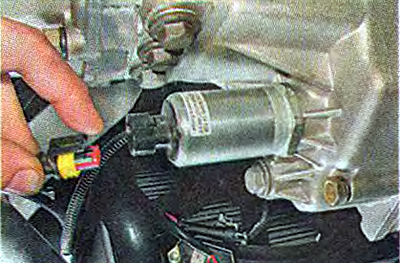
3. Disconnect the wiring harness from the solenoid.


4. Using a voltmeter, check the voltage at terminal 1 of the connector (which the red wire goes to). When the ignition is on, there should be a voltage of about 12 V at the terminal. If there is no voltage or it is less than 10 V, check the fuse F21 of the solenoid circuit (see "Mounting Block - Replacing Fuses and Relays" and "Checking the technical condition of electrical equipment").

5. Using an ohmmeter, measure the electrical resistance of the solenoid coil, which should be about 13 ohms.

6. If the solenoid resistance is normal, apply 12 V from the battery to its terminals. A characteristic click should be heard. We replace the faulty solenoid.

Recommendation. If the check does not reveal a fault and the lock does not disengage, the reverse gear lock switch should be checked (see "Reverse Gear Lock Switch - Checking and Replacing"). If the switch is working properly, you should unscrew the solenoid from the box (see below) and make sure that when 12 V is applied to its terminals, the solenoid core is fully retracted.


Advice: If the reverse gear lock stops disengaging while driving, you can unscrew the solenoid by 8-10 mm. Tightly wrap insulating tape on the visible part of the solenoid thread. When crimping this tape, turn the solenoid several times so that there is a distance of 6-7 mm between the solenoid flange and the gearbox housing. When getting to the parking or repair site, be careful - when engaging first gear, reverse gear may be erroneously engaged.


Removal


1. Drain the oil from the gearbox (see "Gearbox - Checking the level and changing the oil").

2. Using a 36 mm open-end wrench, loosen the solenoid.
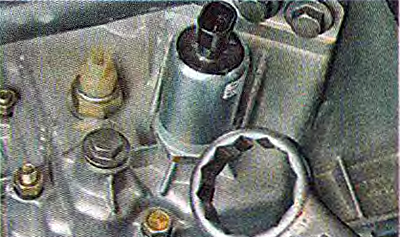
2. Using a 36 mm open-end wrench, loosen the solenoid.


3. If there is no such key, use a 13 mm open-end wrench to unscrew the plug of the reverse gear engagement fork lock (it prevents the solenoid from being turned away).
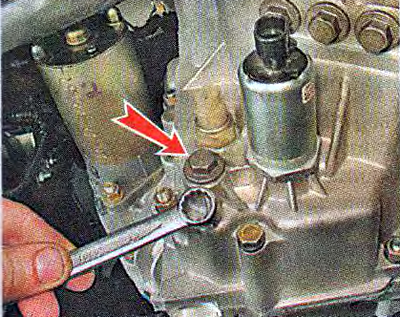
3. If there is no such key, use a 13 mm open-end wrench to unscrew the plug of the reverse gear…


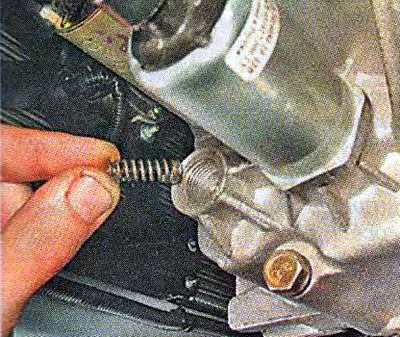
4. Remove the retainer spring.


4. Remove the retainer spring.


5. To avoid losing it, use a magnetic pointer to remove the retainer ball.
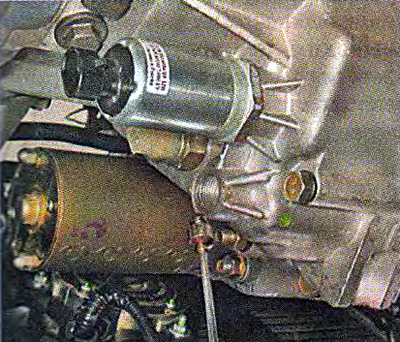
5. To avoid losing it, use a magnetic pointer to remove the retainer ball.


6. Using sliding pliers and a 36 mm open-end wrench, loosen the solenoid.
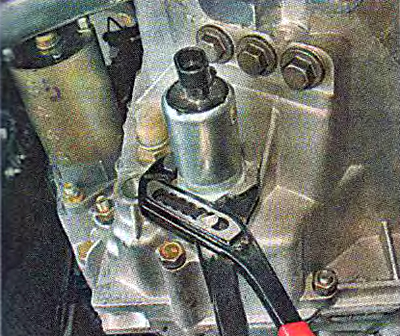
6. Using sliding pliers and a 36 mm open-end wrench, loosen the solenoid.


7. Unscrew the solenoid from the gearbox housing.
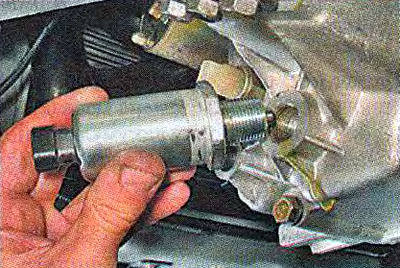
7. Unscrew the solenoid from the gearbox housing.


Installation


We install the new solenoid in the reverse order, having first applied sealant to its threaded part and removed any oil leaks from the gearbox housing.


This article is available at russian, bulgarian, belarusian, ukrainian, serbian, croatian, romanian, polish, slovak, hungarian
This article has been reviewed: Polina Kudryashova
Share with friends:
◀ Previous
Lada Kalina Hatchback: Car gearbox
Next ▶

Gear shift drive — removal, disassembly, installation and adjustment
Jet thrust — removal and installation
Gearbox — Checking the level and changing the oil
Checking the technical condition of the gearbox
Description of the gearbox design
Front Wheel Drive Seals — Replacement
Primary shaft seal — replacement
Gearbox — removal and installation
Wheel — replacement
More articles with information from manuals for Lada:

• Reverse Light Switch — Checking and Replacing Lada Granta 1 (2011-2023, VAZ-2190)
• Replacing the gear motor and heater flap position sensor Lada Priora 1 (2007-2018, VAZ-2170)
• Ignition Coil — Checking and Replacing Lada Vesta 1 (2015-2023, VAZ-2180)
• Checking the level and replacing the engine oil and filter Lada Largus 1 (2012-2023)
• Checking the condition and replacing the auxiliary drive belt Lada X-Ray 1 (2015-2022)
Link to this article in various formats
Reviews and comments of visitors
No comments yet


Add up two numbers: 36 + 44


Kalina Sedan (2004-2013) 
  • General information
  • Vehicle device
  • Operation and maintenance
  • Faults en route
  • Power unit
  • Engine repair
  • Cooling and lubrication system
  • Exhaust system
  • Supply system
  • Ignition and control
  • Transmission
  • Clutch and drive shafts
  • Car gearbox
  • Chassis (running gear)
  • Front suspension
  • Rear suspension
  • Steering
  • Brake system
  • Body and interior
  • Exterior (external elements)
  • Interior (internal elements)
  • Doors, locks and windows
  • Electrical equipment
  • Equipment and devices
  • Power devices
  • Lighting and signaling
  • Heating and ventilation
Kalina Hatchback (2004-2013) 
  • General information
  • Vehicle Details
  • Maintenance
  • Troubleshooting
  • Power unit
  • Engine repair
  • Cooling system
  • Supply system
  • Control system
  • Exhaust system
  • Transmission
  • Clutch
  • Car gearbox
  • Drive shafts
  • Chassis (running gear)
  • Wheels and tires
  • Front suspension
  • Rear suspension
  • Steering
  • Brake system
  • Body and interior
  • Exterior (external elements)
  • Interior (internal elements)
  • Doors, locks and windows
  • Electrical equipment
  • Equipment and devices
  • Power devices
  • Lighting and signaling
  • Electrical circuits
LadaMan.ru © 2018–2026 | Mobile version | About Lada | Sitemap: EN BG BY UA RS HR RO PL SK HU | Contacts with admin | | Add to bookmarks
Kalina Hatchback (2004-2013) | Kalina Sedan (2004-2013) | Granta 1 (2011-2023) | Priora 1 (2007-2018) | Vesta 1 (2015-2023) | Largus 1 (2012-2023) | X-Ray 1 (2015-2022) |
This site uses cookies to ensure everything runs smoothly.