Car repair AvtoVAZ Car repair Renault Car repair Hyundai Car repair Ford Car repair Volkswagen Car repair Audi Car repair Chevrolet
English Русский
Български
Беларускі
Український
Српски
Hrvatski
Română
Polski
Slovenský
Magyar
articles sitemap contacts bookmark
LadaMan.ru


Kalina Granta Priora Vesta Largus XRAY
Vesta 1 (2015-2023, VAZ-2180)

Evaporative Canister Purge Valve — Checking and Replacing (Vesta 2180)

  • Main
  • Vesta
  • Vesta 1
  • Power unit
  • Control system
  • Evaporative Canister Purge Valve — Checking and Replacing
0
Contents: Sequence of execution ⇣ Installation ⇣
The need to perform this work is determined during the inspection of the technical condition of the engine control system (see "Engine Management System - Troubleshooting"). The valve is installed in the engine compartment (on the mudguard of the right side member).

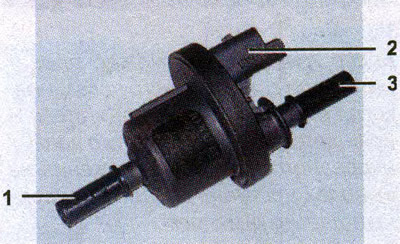
Evaporative Canister Purge Valve: 1 - branch pipe (lower) for connection to the adsorber; 2 -…

Evaporative Canister Purge Valve: 1 - branch pipe (lower) for connection to the adsorber; 2 - terminals for connecting the wiring harness; 3 - branch pipe (upper) for connection to the throttle assembly


To complete the work you will need a multimeter, two pieces of wire, and a rubber bulb.

Sequence of execution


1. Prepare the car for work (see "Preparing the car for maintenance and repair").

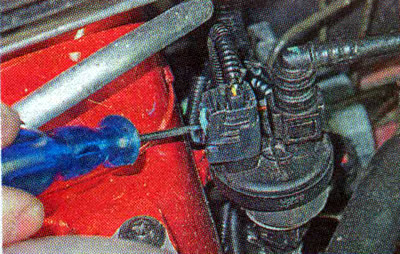
2. Move the locking stopper upward.

2. Move the locking stopper upward.


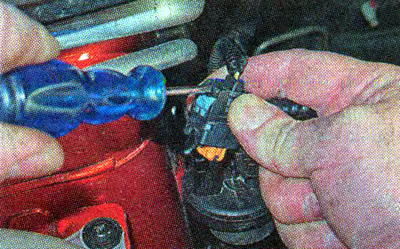
3. Press the lock and disconnect the wiring block from the adsorber purge valve.


3. Press the lock and disconnect the wiring block from the adsorber purge valve.


4. Visually check that the connector terminals are in good condition. If oxides are found on them, we treat the terminals with a cleaning agent and protector for electrical contacts.

5. Remove the valve from the body bracket.
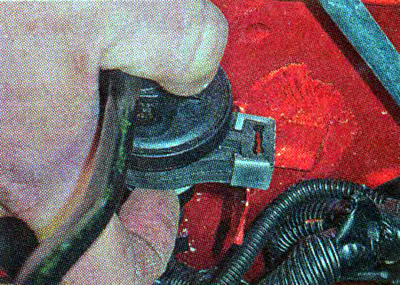
5. Remove the valve from the body bracket.


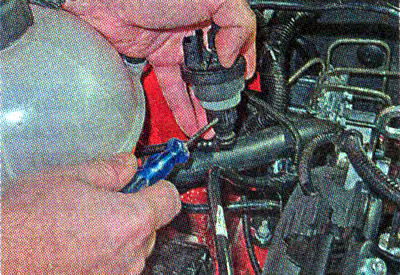
6. Press the lock and disconnect the tube connecting to the intake manifold.

6. Press the lock and disconnect the tube connecting to the intake manifold.


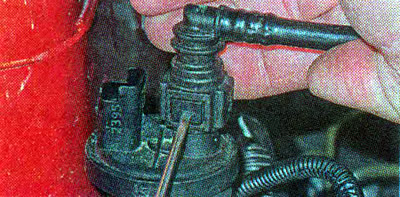
7. Similarly, disconnect the tube connecting to the adsorber from the valve branch pipe.


7. Similarly, disconnect the tube connecting to the adsorber from the valve branch pipe.


8. If necessary, remove the valve from the coupling.

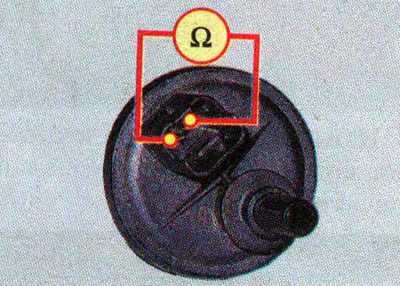
9. Using a multimeter, measure the electrical resistance of the valve winding, which should be within 20-30 Ohms.

9. Using a multimeter, measure the electrical resistance of the valve winding, which should be…


9. If a short circuit or break is detected in the valve winding, replace the valve.

Warning: To avoid short circuit, one terminal of the valve should be insulated with PVC tube during the following operation.


10. Apply 12 V voltage from the battery to the valve terminals.

Note: When voltage is applied to the terminals, the valve should open with a characteristic click.


11. By creating a vacuum in the valve with a rubber bulb, we repeat the test (see above).

12. Replace the faulty valve. We install the valve in the reverse order.

Installation


We install the valve in the reverse order of removal.


This article is available at russian, bulgarian, belarusian, ukrainian, serbian, croatian, romanian, polish, slovak, hungarian
This article has been reviewed: Kirill Dementyev
Share with friends:
◀ Previous
Lada Vesta 1: Control system
Next ▶

Injectors — checking and replacement
Throttle assembly — removal, gasket replacement and installation
Spark plugs — replacement
Ignition Coil — Checking and Replacing
Checking the technical condition of the engine management system
Crankshaft Position Sensor — Checking and Replacing
Camshaft Position Sensor — Checking and Replacing
Coolant Temperature Sensor — Checking and Replacing
Absolute pressure and air temperature sensor — replacement
Knock Sensor — Checking and Replacing
More articles with information from manuals for Lada:

• Evaporative Canister Purge Valve — Checking and Replacing Lada Kalina Hatchback (2004-2013, VAZ-1119)
• Evaporative Canister Purge Valve — Checking and Replacing Lada Granta 1 (2011-2023, VAZ-2190)
• Replacing valve stem seals Lada Priora 1 (2007-2018, VAZ-2170)
• Checking the level and replacing the engine oil and filter Lada Largus 1 (2012-2023)
• Engine Evaporative Canister Purge Valve — removal and installation Lada X-Ray 1 (2015-2022)
Link to this article in various formats
Reviews and comments of visitors
No comments yet


Add up two numbers: 12 + 46


Vesta 1 (2015-2023) 
  • General information
  • Governing bodies
  • User manual
  • Maintenance
  • Troubleshooting
  • Power unit
  • Engine repair
  • Control system
  • Supply system
  • Cooling system
  • Exhaust system
  • Transmission
  • Clutch
  • Mechanical gearbox
  • Automatic gearbox
  • Drive shafts
  • Chassis (running gear)
  • Wheels, tires and hubs
  • Front suspension
  • Rear suspension
  • Steering
  • Brake system
  • Body and interior
  • Exterior (external elements)
  • Doors, locks and windows
  • Heating and ventilation
  • Electrical equipment
  • Equipment and devices
  • Power devices
  • Breakers and switches
  • Lighting and signaling
  • Electrical circuits
LadaMan.ru © 2018–2026 | Mobile version | About Lada | Sitemap: EN BG BY UA RS HR RO PL SK HU | Contacts with admin | | Add to bookmarks
Kalina Hatchback (2004-2013) | Kalina Sedan (2004-2013) | Granta 1 (2011-2023) | Priora 1 (2007-2018) | Vesta 1 (2015-2023) | Largus 1 (2012-2023) | X-Ray 1 (2015-2022) |
This site uses cookies to ensure everything runs smoothly.