
Car repair AvtoVAZ Car repair Renault Car repair Hyundai Car repair Ford Car repair Volkswagen Car repair Audi Car repair Chevrolet
English Русский
Български
Беларускі
Український
Српски
Hrvatski
Română
Polski
Slovenský
Magyar
articles sitemap contacts bookmark
LadaMan.ru


Kalina Granta Priora Vesta Largus XRAY
Vesta 1 (2015-2023, VAZ-2180)

Coolant Temperature Sensor — Checking and Replacing (Vesta 2180)

  • Main
  • Vesta
  • Vesta 1
  • Power unit
  • Control system
  • Coolant Temperature Sensor — Checking and Replacing
0
Contents: Removal and inspection ⇣ Installation ⇣
The need to perform work can be determined by the fault code read through the diagnostic connector.

To complete the work you will need: a multimeter (in voltmeter mode, ohmmeter with a measurement range from 100 Ohm to 10 kOhm); thermometer (with a change limit of at least 100°C); a small heat-resistant container with a capacity of about 0.5 l for water; about 0.3 l of water heated to boiling point.

Recommendation. The thermometer can be replaced with a digital multimeter with a thermometer mode.


Removal and inspection


1. Prepare the car for work (see "Preparing the car for maintenance and repair").

2. Remove the intake system muffler (see "Air filter - removal and installation").

3. Release the wiring harness connector retainer...
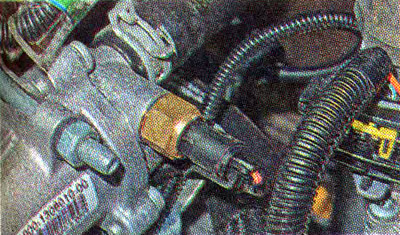
3. Release the wiring harness connector retainer...


...disconnect the block from the sensor.
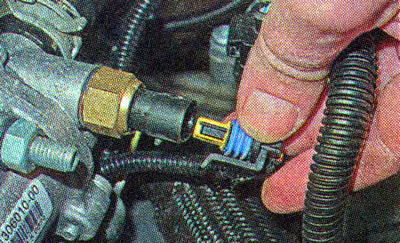
...disconnect the block from the sensor.


3. Connect the negative probe of the voltmeter to the engine ground.


4. Turn on the ignition and use a voltmeter to measure the voltage at terminal 1 of the wiring harness connector (the terminal designations are marked on the wiring harness block).

Note: The voltage at the terminal must be at least 7 2 V. If the voltage does not reach the connector or is less than 12 V, the battery is discharged, the power supply circuit is faulty, or the ECU is faulty.


Warning! After completing the voltage measurement, turn off the ignition.


Note: Some coolant will leak out during the following operation. To collect it, place a rag under the sensor.


5. Using a 19 mm open-end wrench, unscrew the temperature sensor and remove it from the thermostat housing. The connection between the sensor and the thermostat is sealed with a copper washer.
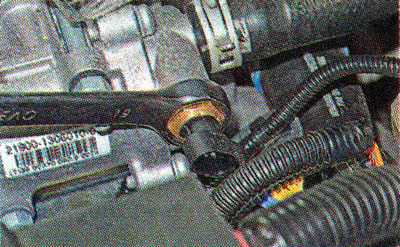
5. Using a 19 mm open-end wrench, unscrew the temperature sensor and remove it from the thermostat…


6. Connect the ohmmeter to the sensor terminals.

Note: To connect the multimeter, you can put pieces of PVC tube on the sensor terminals. Insert the device probes into them. This must be done carefully, since the sensor leads are very thin.

7. Fill the container with boiling water, immerse the working part of the sensor in the water and record the readings of the device at a temperature of about 100°C. As the water cools, measure the resistance of the sensor at a temperature of 90, 80, 70, 60, 50, 45, 40, 35, 30, 25 and 20°C.
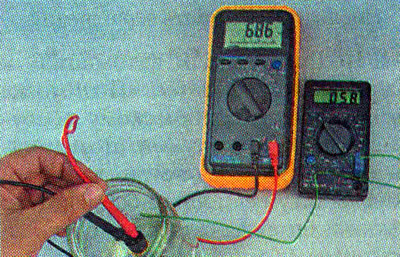


7. Fill the container with boiling water, immerse the working part of the sensor in the water and…


If conditions permit, readings can be taken at a lower temperature. The resistance of a good sensor should be close to the data specified in the table:

Coolant temperature,°CSensor resistance, Ohm
100177
90241
80332
70467
60667
50973
451188
401459
351802
302238
252796
203520
154450
105670
57280
09420

We replace the faulty sensor.

Installation


1. Install the sensor in the reverse order of removal.

2. Fill the engine cooling system with liquid.

3. Start the engine and make sure there are no coolant leaks from under the sensor. If necessary, tighten the sensor more tightly into the thermostat housing.

Recommendation. If this method does not eliminate the leak, you should reinstall the sensor, applying heat-resistant sealant to its threaded part or replace the copper washer.


This article is available at russian, bulgarian, belarusian, ukrainian, serbian, croatian, romanian, polish, slovak, hungarian
This article has been reviewed: Kirill Dementyev
Share with friends:
◀ Previous
Lada Vesta 1: Control system
Next ▶

Camshaft Position Sensor — Checking and Replacing
Crankshaft Position Sensor — Checking and Replacing
Evaporative Canister Purge Valve — Checking and Replacing
Injectors — checking and replacement
Throttle assembly — removal, gasket replacement and installation
Absolute pressure and air temperature sensor — replacement
Knock Sensor — Checking and Replacing
Oxygen Concentration Sensor — Checking and Replacing
Electronic gas pedal — check and replacement
Brake Pedal Position Sensor — Checking and Replacing
More articles with information from manuals for Lada:

• Coolant Temperature Gauge Sensor — Checking and Replacing Lada Kalina Hatchback (2004-2013, VAZ-1119)
• Coolant Temperature Sensor — Removal, Checking and Installation Lada Granta 1 (2011-2023, VAZ-2190)
• Replacing the coolant temperature gauge sensor Lada Priora 1 (2007-2018, VAZ-2170)
• Checking the level and replacing the engine oil and filter Lada Largus 1 (2012-2023)
• Checking the level and adding coolant Lada X-Ray 1 (2015-2022)
Link to this article in various formats
Reviews and comments of visitors
No comments yet


Add up two numbers: 31 + 29


Vesta 1 (2015-2023) 
  • General information
  • Governing bodies
  • User manual
  • Maintenance
  • Troubleshooting
  • Power unit
  • Engine repair
  • Control system
  • Supply system
  • Cooling system
  • Exhaust system
  • Transmission
  • Clutch
  • Mechanical gearbox
  • Automatic gearbox
  • Drive shafts
  • Chassis (running gear)
  • Wheels, tires and hubs
  • Front suspension
  • Rear suspension
  • Steering
  • Brake system
  • Body and interior
  • Exterior (external elements)
  • Doors, locks and windows
  • Heating and ventilation
  • Electrical equipment
  • Equipment and devices
  • Power devices
  • Breakers and switches
  • Lighting and signaling
  • Electrical circuits
LadaMan.ru © 2018–2026 | Mobile version | About Lada | Sitemap: EN BG BY UA RS HR RO PL SK HU | Contacts with admin | | Add to bookmarks
Kalina Hatchback (2004-2013) | Kalina Sedan (2004-2013) | Granta 1 (2011-2023) | Priora 1 (2007-2018) | Vesta 1 (2015-2023) | Largus 1 (2012-2023) | X-Ray 1 (2015-2022) |
This site uses cookies to ensure everything runs smoothly.