
Car repair AvtoVAZ Car repair Renault Car repair Hyundai Car repair Ford Car repair Volkswagen Car repair Audi Car repair Chevrolet
English Русский
Български
Беларускі
Український
Српски
Hrvatski
Română
Polski
Slovenský
Magyar
articles sitemap contacts bookmark
LadaMan.ru


Kalina Granta Priora Vesta Largus XRAY
Vesta 1 (2015-2023, VAZ-2180)

Electronic gas pedal — check and replacement (Vesta 2180)

  • Main
  • Vesta
  • Vesta 1
  • Power unit
  • Control system
  • Electronic gas pedal — check and replacement
0
Contents: Removal ⇣ Examination ⇣ Installation ⇣
The need to perform work can be determined by the fault code read through the diagnostic connector (see "Checking the technical condition of the engine management system").

The gas pedal position sensor cannot be repaired; in case of a malfunction, the electronic gas pedal is replaced as an assembly. The need to perform work is determined during the inspection of the technical condition of the engine control system (see "Checking the technical condition of the engine management system").

To complete the work you will need a multimeter.

Removal


1. Prepare the car for work and disconnect the wire terminal from the negative terminal of the battery (see "Preparing the car for maintenance and repair").

2. Press the clamps of the wiring harness connector and disconnect the connector from the gas pedal sensor.
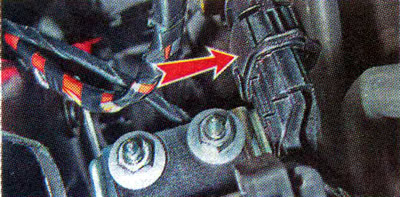
2. Press the clamps of the wiring harness connector and disconnect the connector from the gas pedal…


3. Using a 10 mm socket wrench, unscrew the three nuts securing the gas pedal.
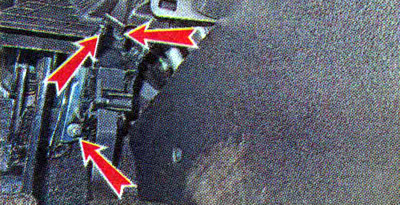
3. Using a 10 mm socket wrench, unscrew the three nuts securing the gas pedal.


4. Remove the pedal from the studs.


Examination


Using a multimeter in ohmmeter mode, you can check the condition of the moving contacts and conductive tracks of the gas pedal position sensors. To do this:

1. Connect one probe of the multimeter to terminal 4 and the other to terminal 2.
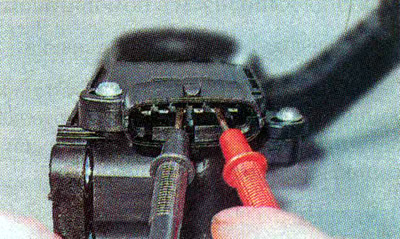
1. Connect one probe of the multimeter to terminal 4 and the other to terminal 2.


Note: For ease of testing, you can put pieces of PVC tubes on the terminals and insert the multimeter probes into them.


2. Slowly moving the gas pedal, we check the electrical resistance on the instrument, which should gradually decrease.
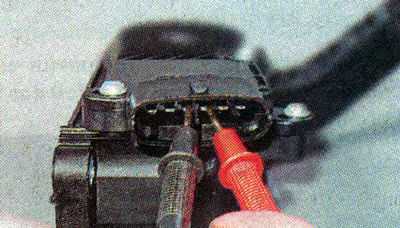
2. Slowly moving the gas pedal, we check the electrical resistance on the instrument, which should…


3. Repeat the test by connecting the multimeter to terminals 4 and 3.

4. Similarly, we check the conductive path of the other sensor, sequentially connecting the multimeter to terminals 1-6 and 6-5.
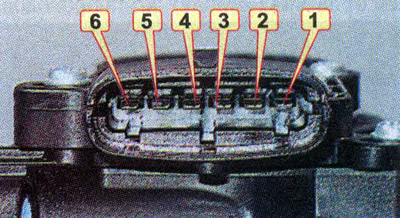
4. Similarly, we check the conductive path of the other sensor, sequentially connecting the…


If the resistance changes abruptly when checking any of the tracks, the sensor should be replaced.


Installation


We install the gas pedal in the reverse order. To avoid accidentally bending the terminals in the gas pedal sensor connector, connect the wiring block before installation. Then we put the gas pedal bracket on the studs. Tighten the pedal mounting nuts to a torque of 6–8 Nm.


This article is available at russian, bulgarian, belarusian, ukrainian, serbian, croatian, romanian, polish, slovak, hungarian
This article has been reviewed: Kirill Dementyev
Share with friends:
◀ Previous
Lada Vesta 1: Control system
Next ▶

Oxygen Concentration Sensor — Checking and Replacing
Knock Sensor — Checking and Replacing
Absolute pressure and air temperature sensor — replacement
Coolant Temperature Sensor — Checking and Replacing
Camshaft Position Sensor — Checking and Replacing
Brake Pedal Position Sensor — Checking and Replacing
Clutch Pedal Position Sensor — Checking and Replacing
Solenoid valve for variable intake manifold length system
More articles with information from manuals for Lada:

• Oil level — check Lada Kalina Hatchback (2004-2013, VAZ-1119)
• Electronic gas pedal — check and replacement Lada Granta 1 (2011-2023, VAZ-2190)
• Diagnostics of the electronic engine management system Lada Priora 1 (2007-2018, VAZ-2170)
• Electronic Engine Management System (EEMS) Lada Largus 1 (2012-2023)
• Pedal location area Lada X-Ray 1 (2015-2022)
Link to this article in various formats
Reviews and comments of visitors
No comments yet


Add up two numbers: 39 + 41


Vesta 1 (2015-2023) 
  • General information
  • Governing bodies
  • User manual
  • Maintenance
  • Troubleshooting
  • Power unit
  • Engine repair
  • Control system
  • Supply system
  • Cooling system
  • Exhaust system
  • Transmission
  • Clutch
  • Mechanical gearbox
  • Automatic gearbox
  • Drive shafts
  • Chassis (running gear)
  • Wheels, tires and hubs
  • Front suspension
  • Rear suspension
  • Steering
  • Brake system
  • Body and interior
  • Exterior (external elements)
  • Doors, locks and windows
  • Heating and ventilation
  • Electrical equipment
  • Equipment and devices
  • Power devices
  • Breakers and switches
  • Lighting and signaling
  • Electrical circuits
LadaMan.ru © 2018–2026 | Mobile version | About Lada | Sitemap: EN BG BY UA RS HR RO PL SK HU | Contacts with admin | | Add to bookmarks
Kalina Hatchback (2004-2013) | Kalina Sedan (2004-2013) | Granta 1 (2011-2023) | Priora 1 (2007-2018) | Vesta 1 (2015-2023) | Largus 1 (2012-2023) | X-Ray 1 (2015-2022) |
This site uses cookies to ensure everything runs smoothly.