



Before carrying out maintenance and repairs on a vehicle, it is necessary to perform several preparatory operations. Preparatory operations are complex, but your safety, the time spent on maintenance and repairs, and the quality of work depend on them.
1. Car wash. If possible, it is advisable to wash the outside of the car before starting work. Moreover, if the work is to be done in the rotor compartment, it should be washed, and in the case of suspension repair, the car should be washed from underneath.
Warning! When washing the engine compartment, avoid getting water on the pads, sensors and actuators of the fuel injection system. You should also avoid getting water into the generator and starter.
In any case, washing the engine compartment must be done with the mandatory disconnection of the wire from the negative terminal of the battery.
After washing, the above parts and units must be thoroughly dried by blowing with a stream of compressed air.
It is better to perform this operation at a non-automatic car wash. Here the car will be washed by hand, after first treating the outer surface of the body and the engine compartment with special cleaning compounds, removing dirt from the wheel arches and the underbody with a high-pressure water jet, followed by drying.
2. Vehicle installation:
a) placing the vehicle on a level horizontal surface. This could be a garage with a concrete floor or other solid and level surface, a horizontal area with a hard surface indoors or outdoors (asphalt, concrete, wood flooring). A hard and even surface allows, if necessary, to lift any part of the car with a jack and securely install it on a stand (see below p.3).
To perform work without hanging the wheels, it is enough:
- turn off the ignition;
- secure the vehicle with the parking brake to prevent it from moving on its own. If the parking brake is faulty, or before repairing the brake system, use wheel chocks to secure the vehicle.
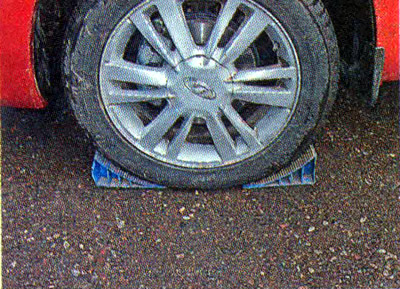
Warning!
- The gear should only be left engaged if the engine does not need to be started or the engine crankshaft cranked during operation. In any case, before starting the engine, press the clutch pedal all the way down and make sure that the gear shift lever is in neutral.
- Do not leave the ignition key in the car, as it is possible that the security system installed on the car (signaling) will spontaneously switch to security mode and lock the doors. If there is a need to leave the key in the ignition during work, first lower the window of one of the doors.
b) placing the vehicle on an inspection ditch or overpass. If some of the repair work has to be done from underneath the vehicle, then in many cases the ideal place to work is (from those available to a private car owner) there will be a garage with an inspection pit and a concrete floor. Before entering such a garage, the ditch should be covered with wooden or steel shields that can support a car. The remaining recommendations are the same as when installing the car on a flat horizontal surface (see above).
Some garage cooperatives have a repair overpass on their territory, welded from metal structures. Installing a jack or stands under a car on such an overpass is usually impossible without a special flooring made of boards. It is better to drive onto the overpass under the supervision of an assistant.
c) parking the vehicle on a slope or uneven ground. The need for this may arise when a car malfunction has to be repaired on the road and there is no possibility to find a more suitable place for repair (see paragraphs 2a and 26). Do not repair your vehicle on grass, loose gravel, sandy soil or rocks (for example, it is very difficult to find a nut that has fallen into thick grass). It is better to try to tow or roll the car to another location. Loose soil should also be avoided, especially if you are going to use a jack and stands. If a forced stop occurs on a slope, it is better to try to roll the car down the slope, otherwise it is necessary to place wheel chocks under the wheels, and it is advisable to place several of them under different wheels on the slope side. Otherwise, follow the same recommendations as when installing the car on a level surface (see above).
3. Raising the car on a jack and stands. This operation must be performed on a flat, horizontal surface with a hard surface. When working on soft or uneven ground, place strong flooring of at least 30x30 cm under the jack and all supports. Thick boards are suitable for making flooring.
Warning!
- The trolley jack can only be used on a solid surface, and the jack rollers must remain mobile.
- Jacking up a vehicle parked on a slope is only permitted to replace a faulty wheel, provided that the vehicle is securely secured against spontaneous movement.
- Before jacking up the vehicle, remove all passengers. Do not enter or load a vehicle while it is on a jack.
- Before performing repairs on a vehicle with a wheel suspended (or wheels) be sure to install reliable supports under the body's power elements.
- It should be taken into account that in hot weather, the asphalt heated by the sun becomes soft, it is pressed by the supports of the stands and the base of the jack, as a result of which the car installed on them may fall.
To lift the rear wheel of the car:
- follow all recommendations p. 2 (see above);
- place wheel chocks under the wheel located diagonally on the opposite side of the vehicle from the wheel being lifted.
- install the standard jack under the threshold. The upper platform of the jack must be installed under a special bracket welded to the threshold of the body.
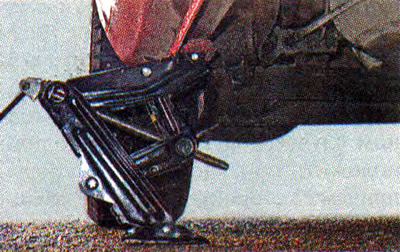
- raise the car by turning the jack handle (for many jobs it is enough for the wheel to just come off the base surface).
- install a support under the body's power elements (threshold, side member or cross member of the body). Lower the vehicle onto the jack stand by turning the jack handle.
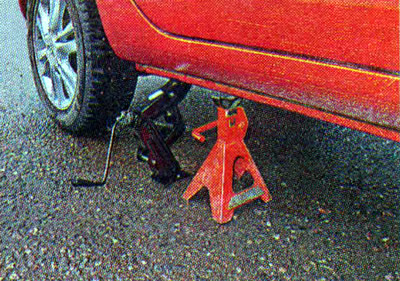
The rest of the car's wheels can be hung up in the same way.
4. Cleaning threaded connections. During long-term use of a vehicle, threaded connections tend to "stick" due to corrosion and become covered with a layer of rust. This is especially true for suspension parts, transmission, external elements of the braking system and steering. Therefore, before repair, all disassembled threaded and fastening connections should be cleaned with a wire brush and treated with penetrating lubricant in an aerosol can or, in extreme cases, moistened with kerosene. It is better if such work is done in advance (from several hours to a day), so that the lubricant has time to penetrate into the joint.
5. Disconnecting the battery from the vehicle's electrical network.
The need for such an operation may arise:
- when repairing electrical equipment to which voltage is constantly supplied both when the ignition is on and when it is off (generator, starter, ignition switch, engine management system, etc.);
- when performing any repairs if there is a high probability of a short circuit in the electrical equipment circuit;
- when parking a car for a long period (for example, in winter);
- when the battery discharges quickly while the vehicle is parked due to a large current leak through the electrical circuits (until the fault is corrected);
- when servicing the battery and in some other cases.
Warnings!
- Disconnect the battery only when necessary, as this will clear the fault codes and all settings generated by the engine management system from the ECU memory (which will make it difficult to check this system using diagnostic equipment at a service station).
- When removing the battery, always disconnect the negative terminal cable first, and when reconnecting the battery, always connect the positive terminal cable first.
- Never disconnect the battery while the engine is running. The resulting voltage surges will damage electronic equipment.
- If the vehicle is equipped with an alarm system and central locking, never leave the ignition key inside the vehicle when disconnecting the battery. Some security systems may cause the car doors to lock spontaneously when the battery is connected.
[Article copied from this portal: LadaMan.ru]
To disconnect the battery from the vehicle's electrical system, simply do the following:
- turn off the ignition;
- using a 10 mm open-end wrench, loosen the nut securing the negative battery terminal wire;
- remove the terminal from the negative terminal of the battery and move it to the side (so that it does not touch the output).
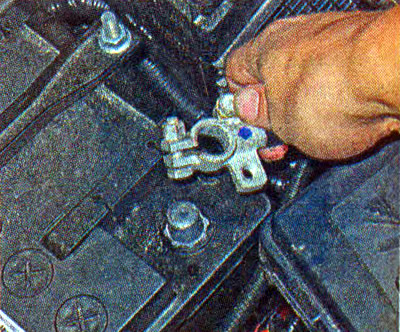
Note: If you cannot remove the terminal from the output (the closely located engine compartment bulkhead interferes), loosen the two connector bolts that secure the wire ends and press the side wires against the center wire. Don't forget to tighten the bolts afterwards.
We connect the terminal to the battery wires in the reverse order.
Warning: Before connecting the battery, make sure the ignition is off.