



Features of the battery design
The car is equipped with a lead starter battery with a capacity of 55 A•h. Batteries of this capacity are produced by many different manufacturers, but the characteristics of these batteries are similar.
Battery care
At least once every two weeks, remove dust and dirt from the surface of the monoblock and battery cover with a dry cloth. If electrolyte accidentally ends up on the battery cover, remove it with a clean cloth soaked in a 10% solution of ammonia or soda. Then wipe the surface of the battery cover dry.
Make sure that the caps are always tightly screwed into the necks of the battery cans. Check the gas outlet holes in the plugs at least once every two weeks for cleanliness, as clogging of these holes will cause an increase in gas pressure inside the battery, which may lead to damage.
To prevent oxidation of the battery terminals and cable ends, clean them regularly and lubricate them with petroleum jelly. Make sure that the wire tips and terminals are tightly connected.
Periodically check the reliability of the battery mount on the car and tighten it if necessary to avoid cracks in the monoblock.
The wires to the battery terminals must be connected with slack, since tension on the wires can cause the terminals in the cover to become loose and electrolyte to leak from the battery.
Checking the electrolyte level in the battery
Periodically, at least once every two weeks, check the electrolyte level in the battery cells.
The electrolyte level in all elements must be between the "MIN" and "MAX" marks located on the translucent battery case. If there are no marks, the electrolyte level should be 5-10 mm above the upper edge of the separators.
To restore the electrolyte level, add only distilled water to the battery. If it is determined that the low level is due to splashing, then add electrolyte of the same density as the one remaining in the battery cell. If the level is above normal, pump out the electrolyte using a rubber bulb with an ebonite tip.
Checking the battery charge level
If during operation difficulties with starting the engine arise, check the battery charge level by the density of the electrolyte or the voltage at its terminals in an unloaded state (Table 9.1). To check the density of the electrolyte, use a hydrometer or a commercially available float indicator of the electrolyte density. The voltage at the battery terminals can be measured with any DC voltmeter with a measurement limit of 20 V (a similar voltmeter is included in all commercially available auto testers).
If the battery charge level is 75% or lower, the battery must be removed from the vehicle and charged using a battery charger Removal and installation the battery
To remove and install the battery on a car you will need: keys "10", "13".
1. Open the hood.
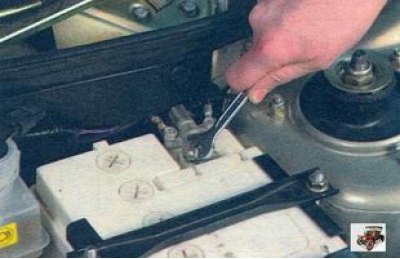
2. Loosen the tightening nut of the clamping bolt of the tip and remove the wire from the negative terminal of the battery.
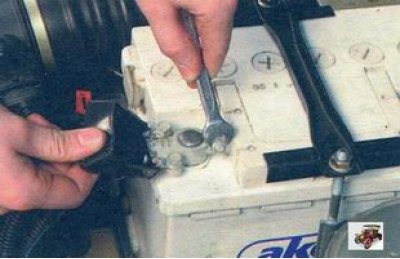
3. Move aside the rubber protective cover of the positive terminal, loosen the tightening nut of the clamping bolt of the tip and disconnect the wire from the positive terminal of the battery.
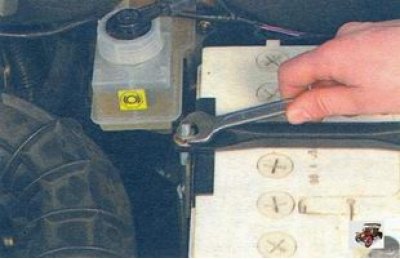
4. Loosen the tightening of the battery bar clamp nuts, unscrew one of the nuts and remove the mounting bar together with one of the clamps, disengaging the clamp from the loop.
5. Remove the battery.
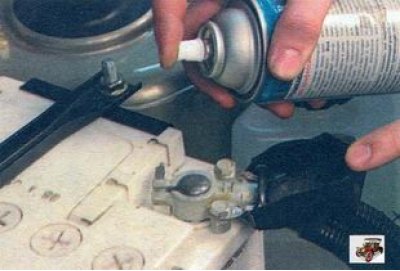
6. Install the battery on the vehicle in the reverse order of removal. Before connecting the wires, clean the battery terminals and the inside surfaces of the wire ends with fine-grain sandpaper. Connect the wires in the reverse order of removal, observing polarity. After connecting the wires to the terminals, apply a thin layer of Litol-24 grease or similar to the wire tips and exposed surfaces of the terminals (copper-containing conductive lubricants are most preferred).
Charging the battery
Carefully clean the battery removed from the vehicle, especially its upper part, check the electrolyte level (see above "Checking the electrolyte level in the battery") and, if necessary, bring it up to normal.
The battery is charged with a current of 5.5 A with the plugs removed. The battery is charged until abundant gas evolution begins and the voltage and density of the electrolyte remain constant for 3 hours. The density of the electrolyte of a charged battery at 25°C must correspond to the data in the table. 9.2 for each climatic region.
When charging the battery, periodically check the electrolyte temperature and do not allow it to rise above +40°C. When the temperature reaches +40°C, reduce the charging current by half or interrupt charging and cool the battery to +27°C.
Charging of the battery is stopped when abundant gas emission begins in all elements, and the voltage and density of the electrolyte during the last three measurements (carried out 1 hour after disconnecting the battery) will remain constant.
If at the end of charging the density of the electrolyte (determined taking into account the temperature correction) differs from that indicated in the table. 9.2, correct it. If the density is high, remove some of the electrolyte and add distilled water. If the density of the electrolyte is below the norm, then remove it from the element and add electrolyte of increased density (1.4 g/cm³.).
After adjusting the electrolyte density, continue charging the battery for another 30 minutes to mix the electrolyte. Then disconnect the battery and after 30 minutes measure the electrolyte level in all elements. If the electrolyte level is below the norm, add electrolyte with a density corresponding to the given climate zone (see table 9.2). If the electrolyte level is above normal, remove excess electrolyte with a rubber bulb.
Technical characteristics of the battery
| Battery type Nominal voltage, V Nominal capacity at 20-hour discharge mode and electrolyte temperature (27±2)°C at the beginning of discharge, A h Discharge current at 20-hour discharge mode, A Discharge current in starter mode and electrolyte temperature minus 18°C, A | 6ST-55P 12 55 2,75 255 |
Table 9.1. Parameters for checking the battery charge level
| Voltage at battery terminals, V Electrolyte density, g/cm³. Battery charge level, % | 12,65 1,27 100 | 12,45 1,23 75 | 12,24 1,20 50 | 12,06 1,17 25 | 11,80 1,12 0 |
Table 9.2. Electrolyte density at 25°C, g/cm³
| Climate region (average monthly air temperature in january),°C | Time of year | Fully charged battery | The battery is charged | |
| by 25% | by 50% | |||
| Very cold (from -50 to -30) Cold (from -30 to -15) Moderate (from -15 to -8) Warm humid (from 0 to +4) Hot dry (from +4 to +15) | Winter Summer All year round Same Same Same | 1,30 1,28 1,28 1,28 1,23 1,23 | 1,26 1,24 1,24 1,24 1,19 1,19 | 1,22 1,20 1,20 1,20 1,15 1,15 |
Possible malfunctions of the car battery, their causes and methods of elimination
| Cause of malfunction | Method of elimination |
| The battery discharges while operating the vehicle | |
| Alternator drive belt slippage Generator faulty Damage to insulation in electrical equipment system Connection of new consumers by the vehicle owner in excess of permissible limits Excessive contamination of the battery surface The electrolyte level in the battery is below the top edge of the plates Short circuit between battery plates The battery is not warmed up due to low ambient temperature (-20°C and below) | Adjust the alternator belt tension Check the generator Find the location of the current leak and repair the damage Turn off new electricity consumers Clean the surface of the battery Restore the normal electrolyte level in the battery Replace the battery Warm up the battery in a warm room to a temperature of +10-30°C and charge it |
| Electrolyte on the surface of the battery | |
| Increased electrolyte level in the battery, leading to splashing Electrolyte leaking through cracks in the battery case Boiling of electrolyte due to very high generator voltage Boiling of electrolyte and overheating of the battery due to sulfation of the plates | Set the normal electrolyte level in the battery Replace the battery Replace the generator voltage regulator Replace the battery |