
Car repair AvtoVAZ Car repair Renault Car repair Hyundai Car repair Ford Car repair Volkswagen Car repair Audi Car repair Chevrolet
English Русский
Български
Беларускі
Український
Српски
Hrvatski
Română
Polski
Slovenský
Magyar
articles sitemap contacts bookmark
LadaMan.ru


Kalina Granta Priora Vesta Largus XRAY
Kalina Sedan (2004-2013, VAZ-1118) Kalina Hatchback (2004-2013, VAZ-1119)

Differential repair (Kalina 1118)

  • Main
  • Kalina
  • Kalina Sedan
  • Transmission
  • Car gearbox
  • Differential repair
0
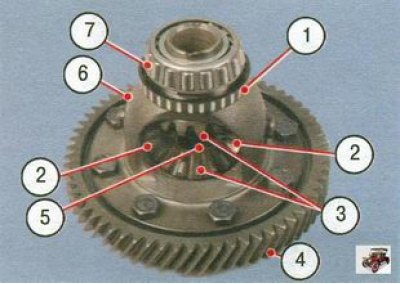
Figure 5.6. Differential: 1 - speed sensor setting ring; 2 - satellite; 3 - axle gear; 4 - driven…

Figure 5.6. Differential: 1 - speed sensor setting ring; 2 - satellite; 3 - axle gear; 4 - driven gear of the main transmission; 5 - satellite axis; 6 - differential housing; 7 - differential bearing


To repair the differential on a car, you will need: a 17 mm socket wrench (head), round-nose pliers or special pliers for removing retaining rings, a thin chisel, and a hammer.

1. Remove the differential (figure 5.6) from the gearbox (see "Disassembly and assembly of the gearbox and defect detection of its parts").
1. Remove the differential (figure 5.6) from the gearbox (see «Disassembly and assembly of the…


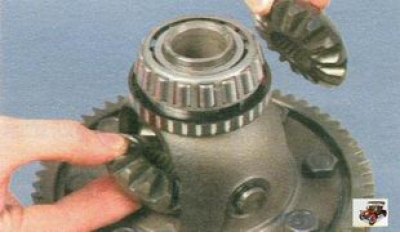
2. Turn the satellites 90° around the axis and remove the axle gears from the differential housing.
2. Turn the satellites 90° around the axis and remove the axle gears from the differential housing.


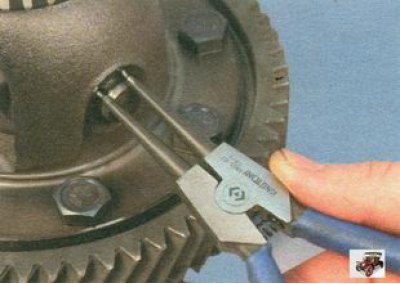
3. Remove the retaining ring from the satellite shaft.


3. Remove the retaining ring from the satellite shaft.


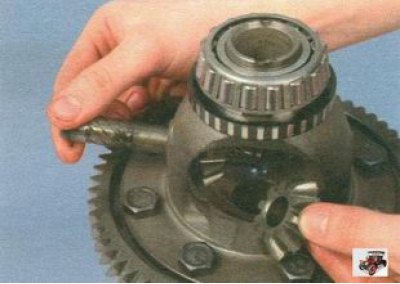
4. Remove the satellite axle and two satellites from the differential housing.
4. Remove the satellite axle and two satellites from the differential housing.


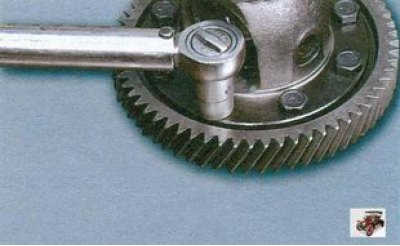
5. Unscrew the bolts securing the driven gear to the differential housing.

5. Unscrew the bolts securing the driven gear to the differential housing.
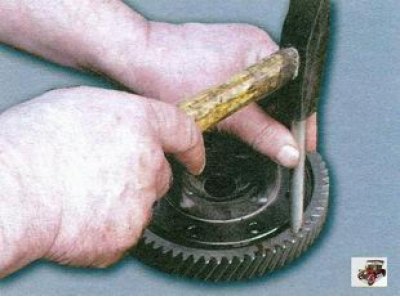

6. Insert a chisel into the gap between the end of the inner bearing ring and the differential housing and press the driven gear off the differential housing.


7. Inspect the working surfaces of the satellites, the satellite shafts, the axle gears and the spherical surfaces of the differential housing that come into contact with them. Remove minor irregularities with fine-grained sandpaper. Replace parts with significant defects.
7. Inspect the working surfaces of the satellites, the satellite shafts, the axle gears and the…


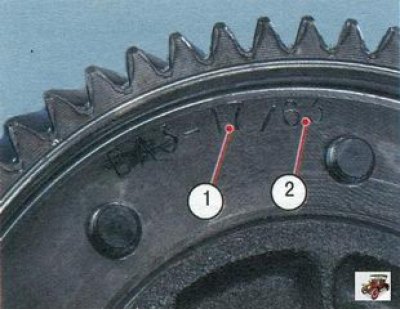
8. Check the condition of the driven gear of the gearbox. If there are chips, pitting or significant wear on the teeth, replace the driven gear. The vehicle can be equipped with final drive gears with different gear ratios. The number of teeth of the driving 1 and driven 2 gears is stamped on the driven gear.

Attention! At the vehicle manufacturing plant, the main transmission gears are selected in pairs based on noise and contact patch. Therefore, when replacing the driven gear, replace the drive gear as well (they are sold in pairs in auto shops). To check, count the number of teeth on the pinion gear.


9. Inspect the bearing seats on the differential housing. If these areas are significantly worn, replace the differential housing. If there is pitting (cavities) on the treadmills and rolling elements, traces of indentation of the rolling elements on the treadmills, or damage to the separators, the bearings must be replaced.


9. Inspect the bearing seats on the differential housing. If these areas are significantly worn,…


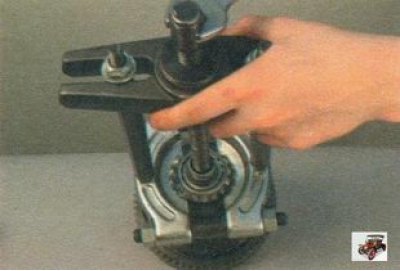
10. To replace the bearings, press them off the differential using a puller. In this case, the bearings are destroyed. Then...
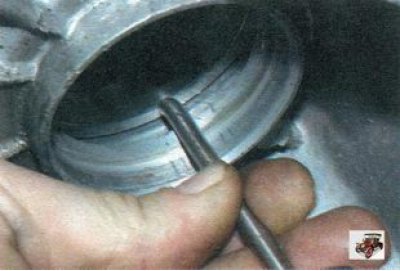
10. To replace the bearings, press them off the differential using a puller. In this case, the…


Original text is available on the website: ladaman.ru

11. ...press out the outer rings from the gearbox and clutch housings using a special puller. If you don't have a puller, first press out the axle shaft seals. Please note that this will damage the axle shaft seals and they will need to be replaced (see "Replacing gearbox seals"). From the outside of the gearbox housings, press out the bearing rings with a punch.
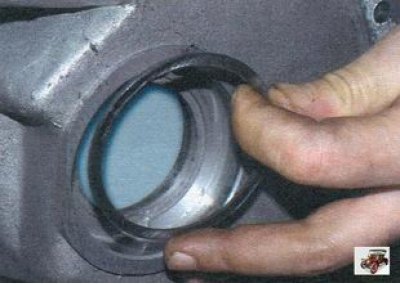
11. ...press out the outer rings from the gearbox and clutch housings using a special puller. If…


12. Please note that there may be an adjusting ring under the ring installed in the gearbox housing, which must be re-fitted before pressing in new rings (see "Selecting the differential bearing adjusting ring").
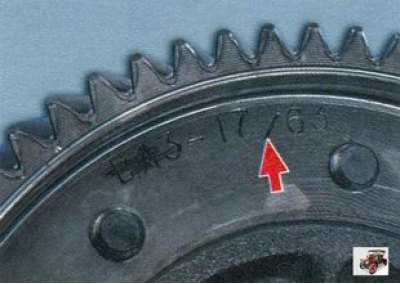


12. Please note that there may be an adjusting ring under the ring installed in the gearbox…


13. Assemble the differential in the reverse order of removal, after lubricating all parts with transmission oil. The driven gear must be installed with the teeth marking facing outward.


This article is available at russian, bulgarian, belarusian, ukrainian, serbian, croatian, romanian, polish, slovak, hungarian
This article has been reviewed: Daniil Markelov
Share with friends:
◀ Previous
Lada Kalina Sedan: Car gearbox
Next ▶

Gearbox synchronizer repair
Repair of the primary shaft of the gearbox
Repair of the secondary shaft of the gearbox
Disassembly and assembly of the gearbox and defect detection of its parts
Removal and installation the gearbox
Selecting the differential bearing adjusting ring
Replacement of axle bushings and repair of the ball joint of the gearshift…
Adjusting the gearbox control drive
Replacing the reverse gear lock solenoid
More articles with information from manuals for Lada:

• Operating and repair materials Lada Granta 1 (2011-2023, VAZ-2190)
• Differential repair Lada Priora 1 (2007-2018, VAZ-2170)
• Operating and repair materials Lada Vesta 1 (2015-2023, VAZ-2180)
• How to Repair Broken Threads Lada Largus 1 (2012-2023)
Link to this article in various formats
Reviews and comments of visitors
No comments yet


Add up two numbers: 37 + 32


Kalina Sedan (2004-2013) 
  • General information
  • Vehicle device
  • Operation and maintenance
  • Faults en route
  • Power unit
  • Engine repair
  • Cooling and lubrication system
  • Exhaust system
  • Supply system
  • Ignition and control
  • Transmission
  • Clutch and drive shafts
  • Car gearbox
  • Chassis (running gear)
  • Front suspension
  • Rear suspension
  • Steering
  • Brake system
  • Body and interior
  • Exterior (external elements)
  • Interior (internal elements)
  • Doors, locks and windows
  • Electrical equipment
  • Equipment and devices
  • Power devices
  • Lighting and signaling
  • Heating and ventilation
Kalina Hatchback (2004-2013) 
  • General information
  • Vehicle Details
  • Maintenance
  • Troubleshooting
  • Power unit
  • Engine repair
  • Cooling system
  • Supply system
  • Control system
  • Exhaust system
  • Transmission
  • Clutch
  • Car gearbox
  • Drive shafts
  • Chassis (running gear)
  • Wheels and tires
  • Front suspension
  • Rear suspension
  • Steering
  • Brake system
  • Body and interior
  • Exterior (external elements)
  • Interior (internal elements)
  • Doors, locks and windows
  • Electrical equipment
  • Equipment and devices
  • Power devices
  • Lighting and signaling
  • Electrical circuits
LadaMan.ru © 2018–2026 | Mobile version | About Lada | Sitemap: EN BG BY UA RS HR RO PL SK HU | Contacts with admin | | Add to bookmarks
Kalina Hatchback (2004-2013) | Kalina Sedan (2004-2013) | Granta 1 (2011-2023) | Priora 1 (2007-2018) | Vesta 1 (2015-2023) | Largus 1 (2012-2023) | X-Ray 1 (2015-2022) |
This site uses cookies to ensure everything runs smoothly.