Car repair AvtoVAZ Car repair Renault Car repair Hyundai Car repair Ford Car repair Volkswagen Car repair Audi Car repair Chevrolet
English Русский
Български
Беларускі
Український
Српски
Hrvatski
Română
Polski
Slovenský
Magyar
articles sitemap contacts bookmark
LadaMan.ru


Kalina Granta Priora Vesta Largus XRAY
Kalina Sedan (2004-2013, VAZ-1118) Kalina Hatchback (2004-2013, VAZ-1119)

Gearbox synchronizer repair (Kalina 1118)

  • Main
  • Kalina
  • Kalina Sedan
  • Transmission
  • Car gearbox
  • Gearbox synchronizer repair
0
To repair the gearbox synchronizer on a car, you will need: a flat-blade screwdriver, pliers with thin jaws.

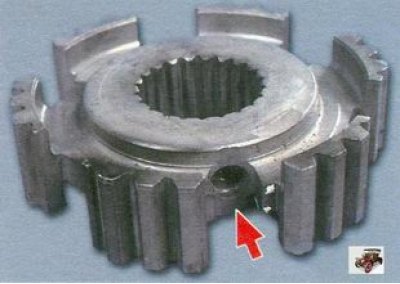
1. Remove the synchronizer from the secondary shaft (see "Repair of the secondary shaft of the gearbox").
1. Remove the synchronizer from the secondary shaft (see «Repair of the secondary shaft of the…


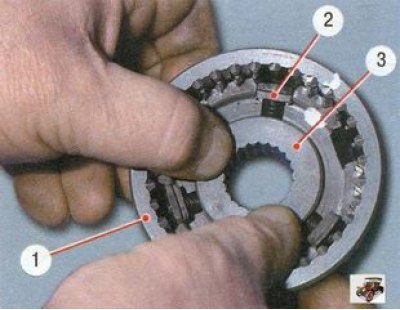
2. Before disassembling the synchronizer, mark the position of the clutch 3 relative to the hub 1. Carefully disassemble the gearbox synchronizer by removing the clutch from the hub. Make sure that the spring-loaded crackers 2 with balls do not fly apart in different directions.
2. Before disassembling the synchronizer, mark the position of the clutch 3 relative to the hub 1.…


3. Inspect the synchronizer parts. Chips and nicks on the splines of the hub and coupling are not allowed (pay special attention to the ends of the coupling teeth). Damage or signs of seizing on crackers, balls and springs are not allowed. Replace defective parts or the gearbox synchronizer assembly.


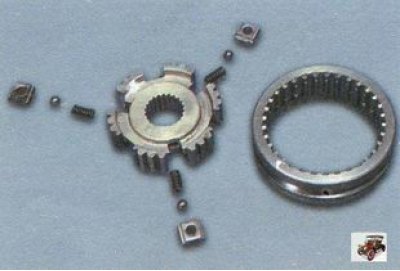
4. Install the coupling on the hub in accordance with the previously made marks.
4. Install the coupling on the hub in accordance with the previously made marks.

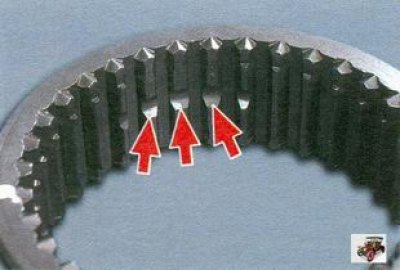
5. The three large grooves on the splines of the synchronizer clutch must match the grooves in the hub for the locks (with holes).
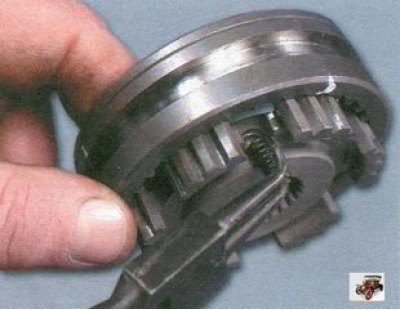
5. The three large grooves on the splines of the synchronizer clutch must match the grooves in the…


6. Lubricate the retainer spring with Litol-24 grease and insert it into the hole in the hub groove.
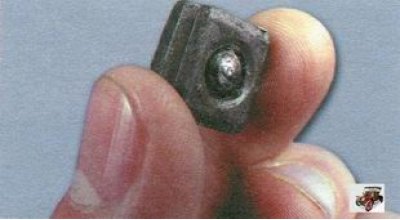


6. Lubricate the retainer spring with Litol-24 grease and insert it into the hole in the hub groove.


7. Lubricate the cracker with Litol-24 grease and insert the ball into its hole.

Main material on the website [LADAman]
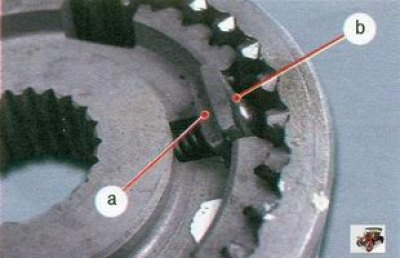
7. Lubricate the cracker with Litol-24 grease and insert the ball into its hole.


8. While compressing the spring, insert the cracker with the ball into the groove of the hub. Grooves a on the cracker there should be an outward, spherical (large) surface b - facing the synchronizer clutch.
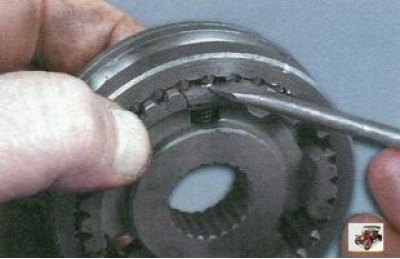
8. While compressing the spring, insert the cracker with the ball into the groove of the hub.…


9. Push the cracker so that the ball enters the grooves on the splines of the synchronizer clutch.
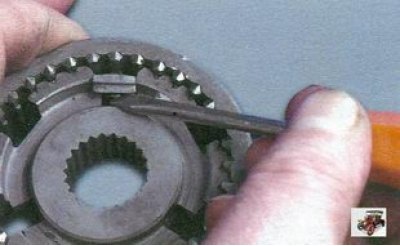


9. Push the cracker so that the ball enters the grooves on the splines of the synchronizer clutch.


10. Adjust the spring with a screwdriver so that it fits into the cracker hole. Install the remaining fasteners in the same manner.


This article is available at russian, bulgarian, belarusian, ukrainian, serbian, croatian, romanian, polish, slovak, hungarian
This article has been reviewed: Daniil Markelov
Share with friends:
◀ Previous
Lada Kalina Sedan: Car gearbox
Next ▶

Repair of the primary shaft of the gearbox
Repair of the secondary shaft of the gearbox
Disassembly and assembly of the gearbox and defect detection of its parts
Removal and installation the gearbox
Replacing gearbox seals
Differential repair
Selecting the differential bearing adjusting ring
Replacement of axle bushings and repair of the ball joint of the gearshift…
Adjusting the gearbox control drive
Replacing the reverse gear lock solenoid
More articles with information from manuals for Lada:

• Operating and repair materials Lada Granta 1 (2011-2023, VAZ-2190)
• Synchronizer repair Lada Priora 1 (2007-2018, VAZ-2170)
• Operating and repair materials Lada Vesta 1 (2015-2023, VAZ-2180)
• How to Repair Broken Threads Lada Largus 1 (2012-2023)
• Troubleshooting the gearbox Lada X-Ray 1 (2015-2022)
Link to this article in various formats
Reviews and comments of visitors
No comments yet


Add up two numbers: 24 + 13


Kalina Sedan (2004-2013) 
  • General information
  • Vehicle device
  • Operation and maintenance
  • Faults en route
  • Power unit
  • Engine repair
  • Cooling and lubrication system
  • Exhaust system
  • Supply system
  • Ignition and control
  • Transmission
  • Clutch and drive shafts
  • Car gearbox
  • Chassis (running gear)
  • Front suspension
  • Rear suspension
  • Steering
  • Brake system
  • Body and interior
  • Exterior (external elements)
  • Interior (internal elements)
  • Doors, locks and windows
  • Electrical equipment
  • Equipment and devices
  • Power devices
  • Lighting and signaling
  • Heating and ventilation
Kalina Hatchback (2004-2013) 
  • General information
  • Vehicle Details
  • Maintenance
  • Troubleshooting
  • Power unit
  • Engine repair
  • Cooling system
  • Supply system
  • Control system
  • Exhaust system
  • Transmission
  • Clutch
  • Car gearbox
  • Drive shafts
  • Chassis (running gear)
  • Wheels and tires
  • Front suspension
  • Rear suspension
  • Steering
  • Brake system
  • Body and interior
  • Exterior (external elements)
  • Interior (internal elements)
  • Doors, locks and windows
  • Electrical equipment
  • Equipment and devices
  • Power devices
  • Lighting and signaling
  • Electrical circuits
LadaMan.ru © 2018–2026 | Mobile version | About Lada | Sitemap: EN BG BY UA RS HR RO PL SK HU | Contacts with admin | | Add to bookmarks
Kalina Hatchback (2004-2013) | Kalina Sedan (2004-2013) | Granta 1 (2011-2023) | Priora 1 (2007-2018) | Vesta 1 (2015-2023) | Largus 1 (2012-2023) | X-Ray 1 (2015-2022) |
This site uses cookies to ensure everything runs smoothly.