
Car repair AvtoVAZ Car repair Renault Car repair Hyundai Car repair Ford Car repair Volkswagen Car repair Audi Car repair Chevrolet
English Русский
Български
Беларускі
Український
Српски
Hrvatski
Română
Polski
Slovenský
Magyar
articles sitemap contacts bookmark
LadaMan.ru


Kalina Granta Priora Vesta Largus XRAY
Vesta 1 (2015-2023, VAZ-2180)

Accessory Drive Belt — check (Vesta 2180)

  • Main
  • Vesta
  • Vesta 1
  • Power unit
  • Engine repair
  • Accessory Drive Belt — check
0
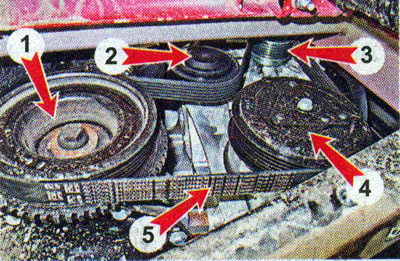
The engine is equipped with one auxiliary drive belt. The basic configuration uses the 6PK 1039 belt. It drives the generator and the air conditioning compressor. The belt tension is provided by means of a tension roller.

Engine accessory drive belt: 1 - engine crankshaft pulley; 2 - tension roller; 3 - generator…

Engine accessory drive belt: 1 - engine crankshaft pulley; 2 - tension roller; 3 - generator pulley; 4 - air conditioning compressor pulley; 5 - auxiliary drive belt


If the belt begins to slip on the pulleys due to wear or oiling, it must be replaced.

Note: It is advisable to use a special measuring device to check the belt tension. A mechanical device determines the applied force at a certain value of belt deflection, while an electronic device measures the frequency of belt oscillations in the area between the pulleys. It should be taken into account that without such devices it is impossible to accurately check the tension of the auxiliary drive belts. With practical experience, you can determine with satisfactory accuracy whether the belt is loose or too tight without using a device. In this case, the accuracy of tension adjustment will depend only on the skills of the performer.


All work related to checking and servicing the accessory drive belt must be carried out in accordance with the maintenance plan (see "Maintenance plan"). In addition, the belt should be checked if signs of insufficient tension appear: a loud squeal when pressing the gas pedal sharply or when turning on powerful energy consumers and the air conditioner.

To restore normal operation of a belt that has been contaminated with oil, you can try treating it with a special cleaner for drive belts. A heavily oiled belt should be replaced.

A faulty tensioner also needs to be replaced. The condition of the tension roller bearing can be assessed by the noise on the running engine using a technical stethoscope. This operation is indicated when checking the technical condition of the engine (see "Engine - technical condition check"). A worn bearing will produce increased noise.

Sequence of execution


1. Prepare the vehicle for work and install it on an inspection ditch or overpass (see "Preparing the car for maintenance and repair"). We switch the gearbox to neutral position.

2. Remove the right front wheel (see "Wheel replacement").

3. Remove the right front mudguard (see "Front mudguard - removal and installation").

4. Using a 17 mm wrench, rotate the crankshaft by the pulley mounting bolt and inspect the auxiliary drive belt from both sides.
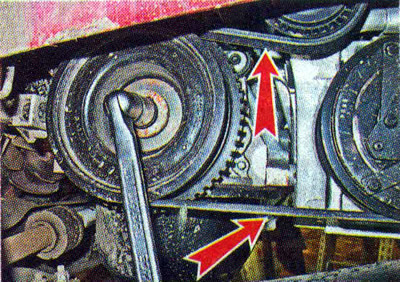
4. Using a 17 mm wrench, rotate the crankshaft by the pulley mounting bolt and inspect the…


Recommendation. The belt must be replaced if cracks, cuts, delamination, protruding cord or peeling rubber are found on its inner or outer side.
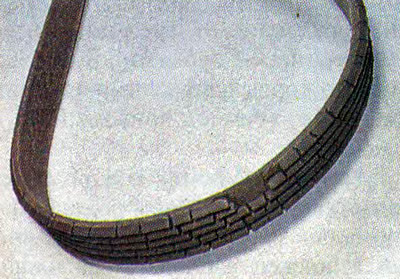


Recommendation. The belt must be replaced if cracks, cuts, delamination, protruding cord or peeling…


Oiling the belt will reduce its service life. The oil leak must be fixed as soon as possible, and the oily belt must be replaced.

5. Using a special device, check the belt tension.

Note: If you do not have a device, you can check the belt tension by pressing it with a force of 98 N (10 kgf) exactly in the middle between the compressor pulley and the engine crankshaft pulley. If it is difficult to estimate the force created by the hand, you can use a household spring balance with a maximum permissible load of 10 kg. A correctly adjusted belt should bend by 6-8 mm.
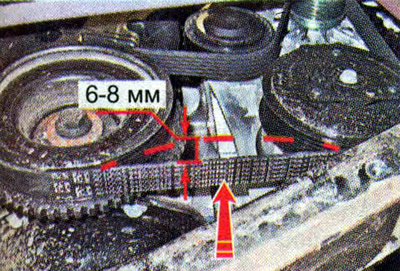

Note: If you do not have a device, you can check the belt tension by pressing it with a force of 98…


If the belt deflection is not within the norm, then adjust the belt tension (see "Auxiliary Drive Belt - Replacement"). A loose belt may slip when the load on the auxiliary unit increases or when the crankshaft speed increases sharply. When the belt slips, it begins to wear out rapidly. When the belt is overtightened, its service life is reduced and the load on the auxiliary unit bearings increases.

6. After completing the check, install the removed parts in the reverse order.


This article is available at russian, bulgarian, belarusian, ukrainian, serbian, croatian, romanian, polish, slovak, hungarian
This article has been reviewed: Kirill Dementyev
Share with friends:
◀ Previous
Lada Vesta 1: Engine repair
Next ▶

Engine Mudguard — Removal and Installation
Engine trim panel — removal and installation
Engine Oil and Oil Filter — replacement
Engine oil level — check
Engine oil consumption — check
Auxiliary Drive Belt — replacement
Timing Belt — Checking Condition
Timing Belt — replacement
Timing Belt Rollers — replacement
Cylinder Head Cover — Removal, Cleaning Oil Deflector and Installation
More articles with information from manuals for Lada:

• Timing belt drive engine 1.6i — checking the condition and adjusting… Lada Kalina Hatchback (2004-2013, VAZ-1119)
• Timing belt drive with automatic tensioner — condition check Lada Granta 1 (2011-2023, VAZ-2190)
• Checking the alternator drive belt tension Lada Priora 1 (2007-2018, VAZ-2170)
• Auxiliary Drive Belt — replacement Lada Largus 1 (2012-2023)
• Checking the condition and replacing the auxiliary drive belt Lada X-Ray 1 (2015-2022)
Link to this article in various formats
Reviews and comments of visitors
No comments yet


Add up two numbers: 24 + 46


Vesta 1 (2015-2023) 
  • General information
  • Governing bodies
  • User manual
  • Maintenance
  • Troubleshooting
  • Power unit
  • Engine repair
  • Control system
  • Supply system
  • Cooling system
  • Exhaust system
  • Transmission
  • Clutch
  • Mechanical gearbox
  • Automatic gearbox
  • Drive shafts
  • Chassis (running gear)
  • Wheels, tires and hubs
  • Front suspension
  • Rear suspension
  • Steering
  • Brake system
  • Body and interior
  • Exterior (external elements)
  • Doors, locks and windows
  • Heating and ventilation
  • Electrical equipment
  • Equipment and devices
  • Power devices
  • Breakers and switches
  • Lighting and signaling
  • Electrical circuits
LadaMan.ru © 2018–2026 | Mobile version | About Lada | Sitemap: EN BG BY UA RS HR RO PL SK HU | Contacts with admin | | Add to bookmarks
Kalina Hatchback (2004-2013) | Kalina Sedan (2004-2013) | Granta 1 (2011-2023) | Priora 1 (2007-2018) | Vesta 1 (2015-2023) | Largus 1 (2012-2023) | X-Ray 1 (2015-2022) |
This site uses cookies to ensure everything runs smoothly.