
Car repair AvtoVAZ Car repair Renault Car repair Hyundai Car repair Ford Car repair Volkswagen Car repair Audi Car repair Chevrolet
English Русский
Български
Беларускі
Український
Српски
Hrvatski
Română
Polski
Slovenský
Magyar
articles sitemap contacts bookmark
LadaMan.ru


Kalina Granta Priora Vesta Largus XRAY
Vesta 1 (2015-2023, VAZ-2180)

Timing Belt — Checking Condition (Vesta 2180)

  • Main
  • Vesta
  • Vesta 1
  • Power unit
  • Engine repair
  • Timing Belt — Checking Condition
0
The engine camshafts are driven by a toothed belt. The drive is carried out from the crankshaft. The belt drive is equipped with a tensioner that automatically maintains the belt tension within the optimal range. If the belt breaks, the engine cannot operate. If the belt tension is weakened, its teeth are damaged or cut, the valve timing may be disrupted and even serious engine damage may occur. Therefore, during the operation of the vehicle, it is necessary to monitor the condition of the timing belt and replace it in a timely manner. The timing belt condition is checked in accordance with the maintenance plan - every 90,000 km (see "Maintenance plan"), On a car with high mileage, the condition of the belt should be checked twice as often.

Recommendation. If, when the engine is running, a loud noise from a rotating bearing is heard in the area of the upper front timing belt cover, when checking the belt, you should also check the condition of the tension and guide rollers (see "Timing Belt Rollers - Checking and Replacing") and the coolant pump (see "Coolant Pump - Replacement").


The work is labor-intensive and requires special equipment and skills. Access to some mounting bolts is difficult due to the tight layout in the engine bay. To remove the timing belt cover, you need to remove the right engine mount, and to do this, the engine must be partially suspended. Therefore, if you are not confident in yourself, have this work done at a specialized service station.

Sequence of execution


1. Prepare the car for work (see "Preparing the car for maintenance and repair").


2. Remove the decorative engine cover (see "Engine trim panel - removal and installation").

3. Remove the right support of the power unit (see "Powertrain Mounts - Removal and Installation").

4. Using a 5 mm Allen key, unscrew the five bolts securing the front upper timing belt cover (for clarity, shown with the cover removed).
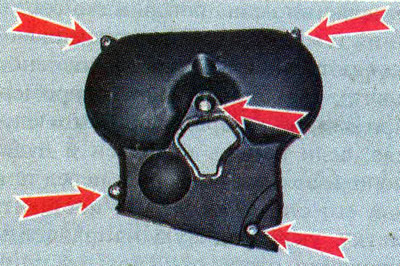
4. Using a 5 mm Allen key, unscrew the five bolts securing the front upper timing belt cover (for…


Note: Access to the bolt located at the bottom front is limited. Access can be improved by jacking up the right side of the engine. The bolt should be loosened using a compact ratchet wrench.
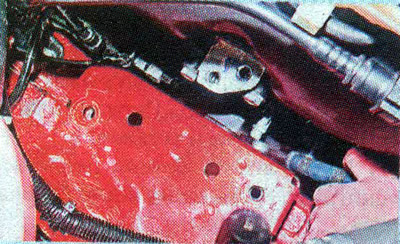

Note: Access to the bolt located at the bottom front is limited. Access can be improved by jacking…


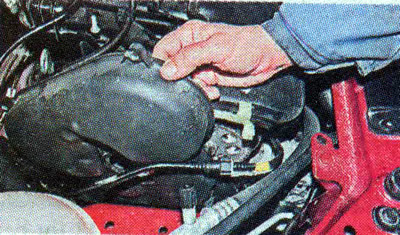
5. Remove the cover from the engine.

5. Remove the cover from the engine.

6. Using a 17 mm socket wrench, rotate the crankshaft by the pulley mounting bolt...
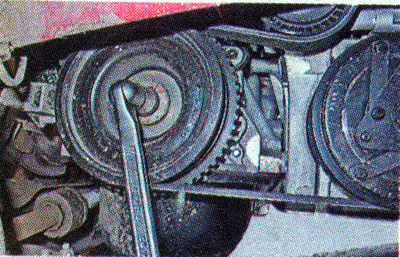


6. Using a 17 mm socket wrench, rotate the crankshaft by the pulley mounting bolt...


...we visually check the condition of the timing belt.
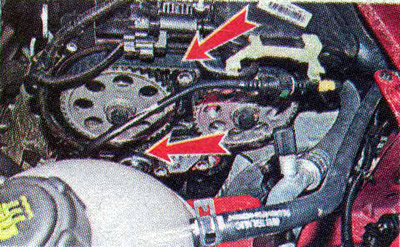
...we visually check the condition of the timing belt.


The belt must be clean - no dirt or oil on its surface. A belt with tears, cracks, delamination, cut and worn teeth, abrasions down to the cord must be replaced (see below, "Timing Belt - Replacement").

7. Check the belt tension using the marks on the tension roller (with normal belt tension, protrusion 1 should be located opposite groove 2).
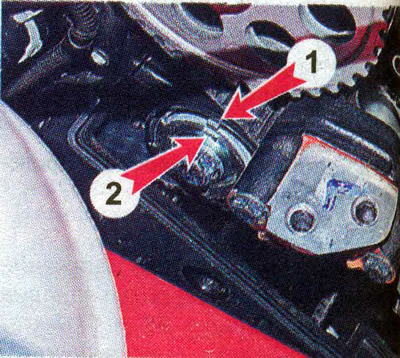
7. Check the belt tension using the marks on the tension roller (with normal belt tension,…


Otherwise, it is necessary to check the tensioner adjustment or replace the timing belt together with the tension roller (see below).

8. After inspection, we install the cover and the parts removed from the car back in place.


This article is available at russian, bulgarian, belarusian, ukrainian, serbian, croatian, romanian, polish, slovak, hungarian
This article has been reviewed: Kirill Dementyev
Share with friends:
◀ Previous
Lada Vesta 1: Engine repair
Next ▶

Auxiliary Drive Belt — replacement
Accessory Drive Belt — check
Engine Mudguard — Removal and Installation
Engine trim panel — removal and installation
Engine Oil and Oil Filter — replacement
Timing Belt — replacement
Timing Belt Rollers — replacement
Cylinder Head Cover — Removal, Cleaning Oil Deflector and Installation
Camshaft Seals — replacement
Hydraulic tappets — removal and installation
More articles with information from manuals for Lada:

• Timing Belt — Checking Condition Lada Kalina Hatchback (2004-2013, VAZ-1119)
• Timing Belt — Checking Condition Lada Granta 1 (2011-2023, VAZ-2190)
• Checking the timing belt tension Lada Priora 1 (2007-2018, VAZ-2170)
• Timing Belt Defects Lada Largus 1 (2012-2023)
• Checking the condition of the auxiliary drive belt Lada X-Ray 1 (2015-2022)
Link to this article in various formats
Reviews and comments of visitors
No comments yet


Add up two numbers: 39 + 27


Vesta 1 (2015-2023) 
  • General information
  • Governing bodies
  • User manual
  • Maintenance
  • Troubleshooting
  • Power unit
  • Engine repair
  • Control system
  • Supply system
  • Cooling system
  • Exhaust system
  • Transmission
  • Clutch
  • Mechanical gearbox
  • Automatic gearbox
  • Drive shafts
  • Chassis (running gear)
  • Wheels, tires and hubs
  • Front suspension
  • Rear suspension
  • Steering
  • Brake system
  • Body and interior
  • Exterior (external elements)
  • Doors, locks and windows
  • Heating and ventilation
  • Electrical equipment
  • Equipment and devices
  • Power devices
  • Breakers and switches
  • Lighting and signaling
  • Electrical circuits
LadaMan.ru © 2018–2026 | Mobile version | About Lada | Sitemap: EN BG BY UA RS HR RO PL SK HU | Contacts with admin | | Add to bookmarks
Kalina Hatchback (2004-2013) | Kalina Sedan (2004-2013) | Granta 1 (2011-2023) | Priora 1 (2007-2018) | Vesta 1 (2015-2023) | Largus 1 (2012-2023) | X-Ray 1 (2015-2022) |
This site uses cookies to ensure everything runs smoothly.