
Car repair AvtoVAZ Car repair Renault Car repair Hyundai Car repair Ford Car repair Volkswagen Car repair Audi Car repair Chevrolet
English Русский
Български
Беларускі
Український
Српски
Hrvatski
Română
Polski
Slovenský
Magyar
articles sitemap contacts bookmark
LadaMan.ru


Kalina Granta Priora Vesta Largus XRAY
Vesta 1 (2015-2023, VAZ-2180)

Cylinder Head Cover — Removal, Cleaning Oil Deflector and Installation (Vesta 2180)

  • Main
  • Vesta
  • Vesta 1
  • Power unit
  • Engine repair
  • Cylinder Head Cover — Removal, Cleaning Oil Deflector and Installation
0
Contents: Removal ⇣ Flushing ⇣ Installation ⇣

Removal


1. Remove the air filter (see "Air filter - removal and installation").

2. Remove the decorative engine cover (see "Engine trim panel - removal and installation").

3. Remove the ignition coils (see "Ignition Coil - Checking and Replacing").

4. Remove the intake module (see "Intake module - removal, replacement of gaskets, installation").

5. Using a TORX E8 socket wrench, unscrew the 15 bolts securing the cylinder head cover and remove the cover.
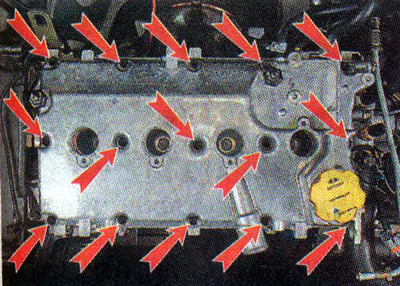
5. Using a TORX E8 socket wrench, unscrew the 15 bolts securing the cylinder head cover and remove…


6. Remove the cover.

Note: If necessary, use a 10 mm wrench to loosen the mounting bolt and remove the bracket for mounting the injector wiring harness pads and ignition coils from the cylinder head cover. Also, if necessary, loosen the clamps and disconnect the hoses from the cover.


Flushing


1. Unscrew the six bolts securing the oil deflector.
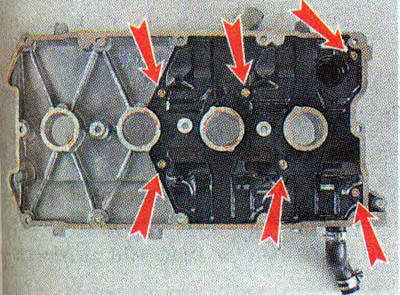
1. Unscrew the six bolts securing the oil deflector.


2. Using a slotted screwdriver, press the oil filler neck fasteners.
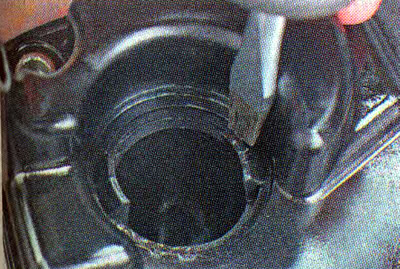


2. Using a slotted screwdriver, press the oil filler neck fasteners.


3. Remove the oil deflector from the cylinder head cover.
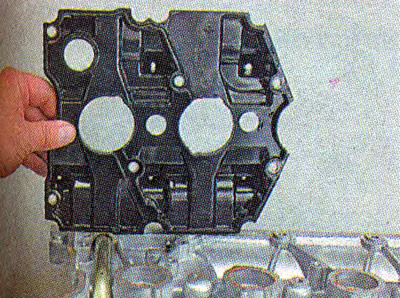
3. Remove the oil deflector from the cylinder head cover.


4. By rocking it from side to side, remove the oil filler neck.
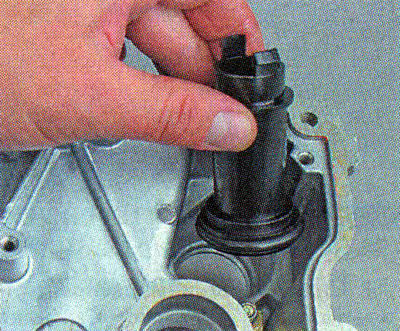
4. By rocking it from side to side, remove the oil filler neck.


5. Wash the removed parts in kerosene and wipe with a clean cloth.

6. Assemble the cylinder head cover in reverse order. Tighten the bolts with a torque of 1.9–4.6 Nm (0.2–0.5 kgfm)

Recommendation. Be sure to install lock washers under the bolt heads.


Installation


1. Clean the mating surfaces of the cover and bearing housing from any remaining sealant and degrease them with white spirit.
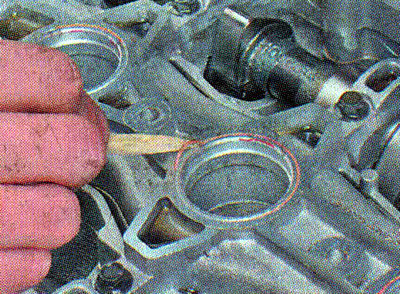
1. Clean the mating surfaces of the cover and bearing housing from any remaining sealant and…


2. Apply a thin layer of heat-resistant sealant Loctite-574 or similar to the mating surface of the bearing housing in accordance with the diagram shown in the photograph.
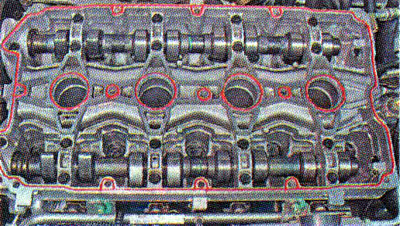
2. Apply a thin layer of heat-resistant sealant Loctite-574 or similar to the mating surface of the…


Warning! When repairing an engine, do not use sealant with a high silicone content (silicon compounds), vapors of which can enter the cylinders through the crankcase ventilation system and then into the exhaust tract. You should use a sealant that is specifically labeled as safe for use with the oxygen sensor.


3. Put the cover back in place. We tighten the cover fastening bolts in the direction from the middle to the edges until the cover is pressed against the bearing housing. Finally, tighten the bolts to a torque of 1.9–4.6 Nm (0.2–0.5 kgfm).

4. Install the parts in the reverse order of removal.


This article is available at russian, bulgarian, belarusian, ukrainian, serbian, croatian, romanian, polish, slovak, hungarian
This article has been reviewed: Kirill Dementyev
Share with friends:
◀ Previous
Lada Vesta 1: Engine repair
Next ▶

Timing Belt Rollers — replacement
Timing Belt — replacement
Timing Belt — Checking Condition
Auxiliary Drive Belt — replacement
Accessory Drive Belt — check
Camshaft Seals — replacement
Hydraulic tappets — removal and installation
Valve stem seals — replacement
Cylinder head — removal and installation
Cylinder head — check
More articles with information from manuals for Lada:

• Cylinder Head Cover — Removal, Cleaning Oil Deflector and Installation Lada Kalina Hatchback (2004-2013, VAZ-1119)
• Cylinder Head Cover Gasket — Replacement Lada Granta 1 (2011-2023, VAZ-2190)
• Replacing the cylinder head cover gasket Lada Priora 1 (2007-2018, VAZ-2170)
• Replacing the cylinder head cover gasket Lada Largus 1 (2012-2023)
• Disassembling the engine cylinder head Lada X-Ray 1 (2015-2022)
Link to this article in various formats
Reviews and comments of visitors
No comments yet


Add up two numbers: 10 + 12


Vesta 1 (2015-2023) 
  • General information
  • Governing bodies
  • User manual
  • Maintenance
  • Troubleshooting
  • Power unit
  • Engine repair
  • Control system
  • Supply system
  • Cooling system
  • Exhaust system
  • Transmission
  • Clutch
  • Mechanical gearbox
  • Automatic gearbox
  • Drive shafts
  • Chassis (running gear)
  • Wheels, tires and hubs
  • Front suspension
  • Rear suspension
  • Steering
  • Brake system
  • Body and interior
  • Exterior (external elements)
  • Doors, locks and windows
  • Heating and ventilation
  • Electrical equipment
  • Equipment and devices
  • Power devices
  • Breakers and switches
  • Lighting and signaling
  • Electrical circuits
LadaMan.ru © 2018–2026 | Mobile version | About Lada | Sitemap: EN BG BY UA RS HR RO PL SK HU | Contacts with admin | | Add to bookmarks
Kalina Hatchback (2004-2013) | Kalina Sedan (2004-2013) | Granta 1 (2011-2023) | Priora 1 (2007-2018) | Vesta 1 (2015-2023) | Largus 1 (2012-2023) | X-Ray 1 (2015-2022) |
This site uses cookies to ensure everything runs smoothly.