
Car repair AvtoVAZ Car repair Renault Car repair Hyundai Car repair Ford Car repair Volkswagen Car repair Audi Car repair Chevrolet
English Русский
Български
Беларускі
Український
Српски
Hrvatski
Română
Polski
Slovenský
Magyar
articles sitemap contacts bookmark
LadaMan.ru


Kalina Granta Priora Vesta Largus XRAY
Vesta 1 (2015-2023, VAZ-2180)

Cylinder head — check (Vesta 2180)

  • Main
  • Vesta
  • Vesta 1
  • Power unit
  • Engine repair
  • Cylinder head — check
0
To complete the work you will need a special template or a wide metalworking ruler; set of flat feeler gauges.

Examination


1. Remove the cylinder head (see "Cylinder head - removal and installation"),

2. We clean the cylinder head and bearing housing from dirt and carbon deposits, wash it from oil deposits, and remove carbon deposits from the walls of the combustion chambers with a metal brush.

3. Carefully inspect the cylinder head and bearing housing. There should be no cracks on them. There should be no burrs or traces of metal drag on the working surfaces of the camshaft supports, bearing housings and walls of the hydraulic tappet mounting holes. The valve guides and seats must fit tightly in the head body, without any signs of displacement during the operation of the timing system. The valves and their seats must not have cracks or signs of burning.

4. Check the flatness of the cylinder head using a special template.

Note: If there is no template, then you can check the lower mating plane of the head with sufficient accuracy using a wide metalworking ruler. We apply the ruler with its edge diagonally to the plane of the head. We make sure that there is no gap between the edge of the ruler and the plane of the head. The gap can be observed both in the middle part of the plane and at its edges. We measure the gap along both diagonals using a set of flat feeler gauges.
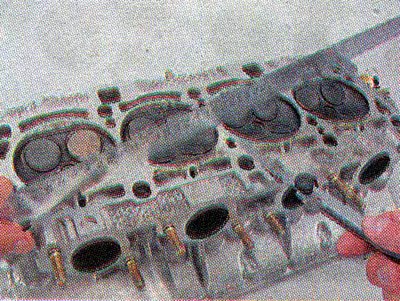

Note: If there is no template, then you can check the lower mating plane of the head with…


[For more details, see the page LADAMAN]


The maximum allowable gap is 0.1 mm.

If the gap is greater than the permissible value, the head must have its mating surface milled or replaced.

Warning! The cylinder head should only be replaced together with the bearing housing.


5. Check the tightness of the cylinder head. To do this, we plug the window on the end surface of the head that supplies coolant to the thermostat (you can install the thermostat pipe by placing a gasket cut from sheet rubber underneath it). We turn the head over and fill its internal cavities for coolant with kerosene.
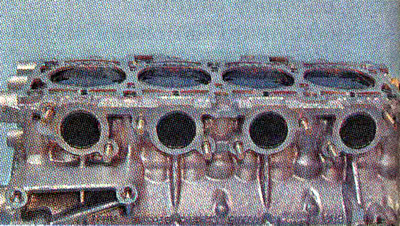
5. Check the tightness of the cylinder head. To do this, we plug the window on the end surface of…


6. Make sure there is no kerosene leak from the cylinder head.
Recommendation. If a leak is detected, or if there are cavities on the mating surface, you can try to repair the cylinder head using cold welding or replace it.


7. To check the tightness of the cylinder head valves, place it on a horizontal surface with the mating surface facing up.

8. Fill the combustion chambers of the cylinder head with kerosene and wait a few minutes. If the kerosene level in any chamber drops, then one or both valves are leaking.

Recommendation. Valve leaks can be eliminated by grinding if there are no cracks, pits or mechanical damage on the valve plate and seat.


This article is available at russian, bulgarian, belarusian, ukrainian, serbian, croatian, romanian, polish, slovak, hungarian
This article has been reviewed: Kirill Dementyev
Share with friends:
◀ Previous
Lada Vesta 1: Engine repair
Next ▶

Cylinder head — removal and installation
Valve stem seals — replacement
Hydraulic tappets — removal and installation
Camshaft Seals — replacement
Cylinder Head Cover — Removal, Cleaning Oil Deflector and Installation
Valves — lapping
Front Crankshaft Oil Seal — replacement
Flywheel — removal and installation
Rear Crankshaft Oil Seal — replacement
Engine Oil Pan — Removal, Gasket Replacement and Installation
More articles with information from manuals for Lada:

• Cylinder Head Cover — Removal, Cleaning Oil Deflector and Installation Lada Kalina Hatchback (2004-2013, VAZ-1119)
• Cylinder Head Cover Gasket — Replacement Lada Granta 1 (2011-2023, VAZ-2190)
• Replacing the cylinder head cover gasket Lada Priora 1 (2007-2018, VAZ-2170)
• Replacing the cylinder head cover gasket Lada Largus 1 (2012-2023)
• Disassembling the engine cylinder head Lada X-Ray 1 (2015-2022)
Link to this article in various formats
Reviews and comments of visitors
No comments yet


Add up two numbers: 49 + 38


Vesta 1 (2015-2023) 
  • General information
  • Governing bodies
  • User manual
  • Maintenance
  • Troubleshooting
  • Power unit
  • Engine repair
  • Control system
  • Supply system
  • Cooling system
  • Exhaust system
  • Transmission
  • Clutch
  • Mechanical gearbox
  • Automatic gearbox
  • Drive shafts
  • Chassis (running gear)
  • Wheels, tires and hubs
  • Front suspension
  • Rear suspension
  • Steering
  • Brake system
  • Body and interior
  • Exterior (external elements)
  • Doors, locks and windows
  • Heating and ventilation
  • Electrical equipment
  • Equipment and devices
  • Power devices
  • Breakers and switches
  • Lighting and signaling
  • Electrical circuits
LadaMan.ru © 2018–2026 | Mobile version | About Lada | Sitemap: EN BG BY UA RS HR RO PL SK HU | Contacts with admin | | Add to bookmarks
Kalina Hatchback (2004-2013) | Kalina Sedan (2004-2013) | Granta 1 (2011-2023) | Priora 1 (2007-2018) | Vesta 1 (2015-2023) | Largus 1 (2012-2023) | X-Ray 1 (2015-2022) |
This site uses cookies to ensure everything runs smoothly.