
Car repair AvtoVAZ Car repair Renault Car repair Hyundai Car repair Ford Car repair Volkswagen Car repair Audi Car repair Chevrolet
English Русский
Български
Беларускі
Український
Српски
Hrvatski
Română
Polski
Slovenský
Magyar
articles sitemap contacts bookmark
LadaMan.ru


Kalina Granta Priora Vesta Largus XRAY
Vesta 1 (2015-2023, VAZ-2180)

Front Crankshaft Oil Seal — replacement (Vesta 2180)

  • Main
  • Vesta
  • Vesta 1
  • Power unit
  • Engine repair
  • Front Crankshaft Oil Seal — replacement
0
Contents: Removal ⇣ Installation ⇣

Removal


1. Remove the timing belt (see "Timing Belt - Replacement").

2. Remove the toothed pulley from the crankshaft.
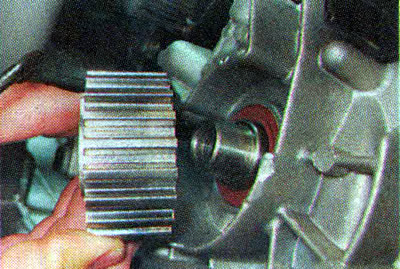
2. Remove the toothed pulley from the crankshaft.


3. To avoid losing the key and damaging the new seal, use pliers to remove the key from the groove.
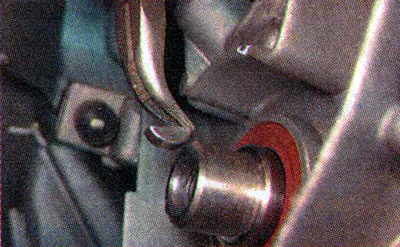
3. To avoid losing the key and damaging the new seal, use pliers to remove the key from the groove.


Warning: When removing the oil seal, do not scratch the working surface of the crankshaft.


4. Remove the seal from the mounting hole using a special hook or, by screwing a screw into it, using pliers.

Installation


1. Apply clean engine oil to the working edge of the new oil seal and press it in through a mandrel or a piece of pipe with a diameter of about 40 mm so that the outer edge of the oil seal is flush with the edge of its mounting hole.
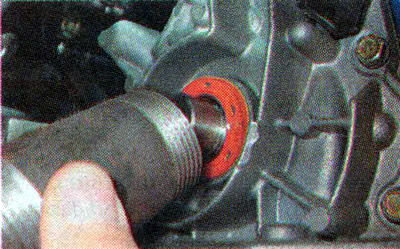
1. Apply clean engine oil to the working edge of the new oil seal and press it in through a mandrel…


2. Insert the key into the groove of the crankshaft.


3. Install the toothed pulley on the shaft.

Warning! When installing the pulley, make sure that the key does not fall out of the groove.


4. Install the timing belt and crankshaft pulley in the reverse order of removal (see "Timing Belt - Replacement").

5. Further assembly is carried out in the reverse order of disassembly.


This article is available at russian, bulgarian, belarusian, ukrainian, serbian, croatian, romanian, polish, slovak, hungarian
This article has been reviewed: Kirill Dementyev
Share with friends:
◀ Previous
Lada Vesta 1: Engine repair
Next ▶

Valves — lapping
Cylinder head — check
Cylinder head — removal and installation
Valve stem seals — replacement
Hydraulic tappets — removal and installation
Flywheel — removal and installation
Rear Crankshaft Oil Seal — replacement
Engine Oil Pan — Removal, Gasket Replacement and Installation
Oil intake — removal and installation
Oil pump — removal, inspection and installation
More articles with information from manuals for Lada:

• Front Crankshaft Oil Seal — Replacement Lada Kalina Hatchback (2004-2013, VAZ-1119)
• Front Crankshaft Oil Seal — Replacement Lada Granta 1 (2011-2023, VAZ-2190)
• Replacing the front crankshaft oil seal Lada Priora 1 (2007-2018, VAZ-2170)
• Front crankshaft oil seal — replacement Lada Largus 1 (2012-2023)
• Front Shield Seal — removal and installation Lada X-Ray 1 (2015-2022)
Link to this article in various formats
Reviews and comments of visitors
No comments yet


Add up two numbers: 47 + 10


Vesta 1 (2015-2023) 
  • General information
  • Governing bodies
  • User manual
  • Maintenance
  • Troubleshooting
  • Power unit
  • Engine repair
  • Control system
  • Supply system
  • Cooling system
  • Exhaust system
  • Transmission
  • Clutch
  • Mechanical gearbox
  • Automatic gearbox
  • Drive shafts
  • Chassis (running gear)
  • Wheels, tires and hubs
  • Front suspension
  • Rear suspension
  • Steering
  • Brake system
  • Body and interior
  • Exterior (external elements)
  • Doors, locks and windows
  • Heating and ventilation
  • Electrical equipment
  • Equipment and devices
  • Power devices
  • Breakers and switches
  • Lighting and signaling
  • Electrical circuits
LadaMan.ru © 2018–2026 | Mobile version | About Lada | Sitemap: EN BG BY UA RS HR RO PL SK HU | Contacts with admin | | Add to bookmarks
Kalina Hatchback (2004-2013) | Kalina Sedan (2004-2013) | Granta 1 (2011-2023) | Priora 1 (2007-2018) | Vesta 1 (2015-2023) | Largus 1 (2012-2023) | X-Ray 1 (2015-2022) |
This site uses cookies to ensure everything runs smoothly.