
Car repair AvtoVAZ Car repair Renault Car repair Hyundai Car repair Ford Car repair Volkswagen Car repair Audi Car repair Chevrolet
English Русский
Български
Беларускі
Український
Српски
Hrvatski
Română
Polski
Slovenský
Magyar
articles sitemap contacts bookmark
LadaMan.ru


Kalina Granta Priora Vesta Largus XRAY
Vesta 1 (2015-2023, VAZ-2180)

Intake module — removal, replacement of gaskets, installation (Vesta 2180)

  • Main
  • Vesta
  • Vesta 1
  • Power unit
  • Supply system
  • Intake module — removal, replacement of gaskets, installation
0
Contents: Removal ⇣ Installation ⇣
Recommendation. The work is labor-intensive. In addition, the tight layout in the engine compartment makes it difficult to perform some operations. Access to the front intake module mount can be improved by installing a trolley jack under the engine and removing the left and rear powertrain mounts. When performing work, the engine can be moved to a more convenient position, opening up more convenient access to fasteners.


To carry out the work, you will need an inspection pit or overpass.

Removal


1. Prepare the vehicle for work and install it on an inspection ditch or overpass (see "Preparing the car for maintenance and repair").

2. Disconnect the wire terminal from the negative terminal of the battery (see "Battery - Removal and Installation").

3. Relieve the fuel pressure (see "Fuel Line - Pressure Relief"), remove the fuel pipe holder from the intake module and move the pipe to the side.
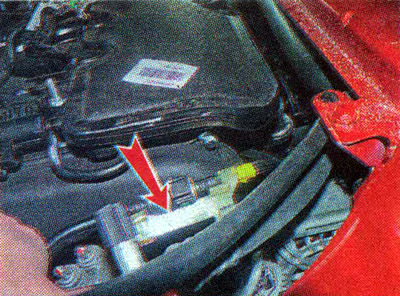
3. Relieve the fuel pressure (see «Fuel Line - Pressure Relief»), remove the fuel pipe holder from…


4. Disconnect the wiring harness connectors from the ignition coils (see "Ignition Coil - Checking and Replacing") and move the tourniquet to the side.

5. Disconnect the wiring harness connector from the camshaft position sensor (see "Camshaft Position Sensor - Checking and Replacing") and move the tourniquet to the side.


6. Disconnect the wiring harness blocks from the electromagnetic valve of the intake manifold length change system, as well as the connecting blocks (see "Intake manifold length change solenoid valve - check and replace" and "Fuel rail - removal and installation").

7. After loosening the clamp, remove the brake booster hose from the intake module pipe.
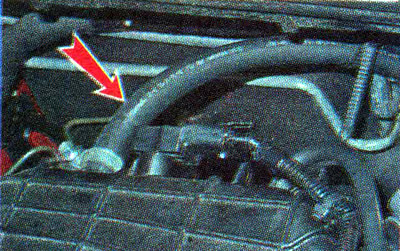
7. After loosening the clamp, remove the brake booster hose from the intake module pipe.


8. Remove the air filter air intake (see "Air filter - removal and installation") and remove the air supply hose from the throttle assembly pipe (see "Throttle assembly - removal, gasket replacement and installation").

9. Remove the engine splash guard.

10. Loosen the clamp securing the engine crankcase ventilation hose and remove the hose from the cylinder head pipe.
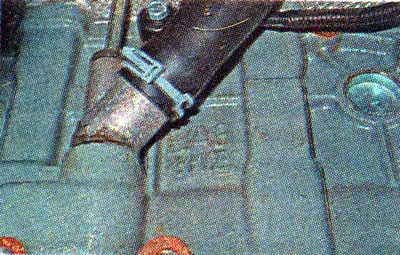
10. Loosen the clamp securing the engine crankcase ventilation hose and remove the hose from the…


11. Using a short Phillips screwdriver, unscrew screw 1 securing the oil level indicator guide tube.
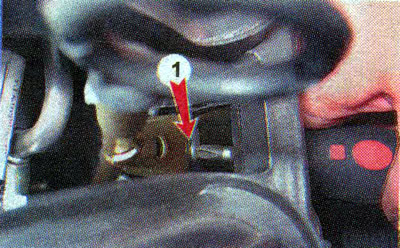


11. Using a short Phillips screwdriver, unscrew screw 1 securing the oil level indicator guide tube.


12. Remove the guide tube together with the oil level indicator from the engine cylinder block and remove it.

13. Using a 10 mm wrench, unscrew the two nuts securing the intake module to the cylinder head cover and the three bolts securing the ignition coils of the first, second and third cylinders.

14. Remove the ignition coils of the first, second and third cylinders (see "Ignition Coil - Checking and Replacing").

15. Using a 13 mm socket wrench, unscrew the three nuts and two bolts securing the intake module to the side surface of the engine cylinder head.
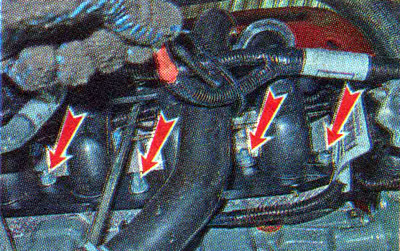
15. Using a 13 mm socket wrench, unscrew the three nuts and two bolts securing the intake module to…


16. Disconnect the additional muffler from the inlet pipe (see "Additional muffler - replacement").

17. Place a support under the engine and disconnect the rear support of the power unit from the body (see "Powertrain Mounts - Replacement").


18. Tilt the engine back.

19. Remove the intake module from the engine.

20. Remove the rubber sealing rings from the grooves of the intake module flange.
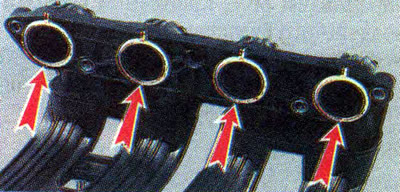
20. Remove the rubber sealing rings from the grooves of the intake module flange.


Installation


We install the intake module in the reverse order. We replace damaged sealing rings of the intake module.


This article is available at russian, bulgarian, belarusian, ukrainian, serbian, croatian, romanian, polish, slovak, hungarian
This article has been reviewed: Kirill Dementyev
Share with friends:
◀ Previous
Lada Vesta 1: Supply system
Next ▶

Air filter — removal and installation
Air filter — replacing the filter element
Power supply system — technical condition check
Description of the power supply system design
Basic data for monitoring, adjustment and maintenance
Fuel Line — Pressure Relief
Fuel rail — removal and installation
Fuel module — removal and installation
Fuel Module — Fuel Gauge Sensor Replacement
Fuel Module — Fuel Pressure Regulator Replacement
More articles with information from manuals for Lada:

• Intake module — removal and installation Lada Kalina Hatchback (2004-2013, VAZ-1119)
• Lighting control module and low beam headlight corrector Lada Granta 1 (2011-2023, VAZ-2190)
• Replacing the intake manifold sealing rings Lada Priora 1 (2007-2018, VAZ-2170)
• Intake noise muffler (K4M) — removal and installation Lada Largus 1 (2012-2023)
• Engine Intake Module — removal and installation Lada X-Ray 1 (2015-2022)
Link to this article in various formats
Reviews and comments of visitors
No comments yet


Add up two numbers: 36 + 22


Vesta 1 (2015-2023) 
  • General information
  • Governing bodies
  • User manual
  • Maintenance
  • Troubleshooting
  • Power unit
  • Engine repair
  • Control system
  • Supply system
  • Cooling system
  • Exhaust system
  • Transmission
  • Clutch
  • Mechanical gearbox
  • Automatic gearbox
  • Drive shafts
  • Chassis (running gear)
  • Wheels, tires and hubs
  • Front suspension
  • Rear suspension
  • Steering
  • Brake system
  • Body and interior
  • Exterior (external elements)
  • Doors, locks and windows
  • Heating and ventilation
  • Electrical equipment
  • Equipment and devices
  • Power devices
  • Breakers and switches
  • Lighting and signaling
  • Electrical circuits
LadaMan.ru © 2018–2026 | Mobile version | About Lada | Sitemap: EN BG BY UA RS HR RO PL SK HU | Contacts with admin | | Add to bookmarks
Kalina Hatchback (2004-2013) | Kalina Sedan (2004-2013) | Granta 1 (2011-2023) | Priora 1 (2007-2018) | Vesta 1 (2015-2023) | Largus 1 (2012-2023) | X-Ray 1 (2015-2022) |
This site uses cookies to ensure everything runs smoothly.