
Car repair AvtoVAZ Car repair Renault Car repair Hyundai Car repair Ford Car repair Volkswagen Car repair Audi Car repair Chevrolet
English Русский
Български
Беларускі
Український
Српски
Hrvatski
Română
Polski
Slovenský
Magyar
articles sitemap contacts bookmark
LadaMan.ru


Kalina Granta Priora Vesta Largus XRAY
Kalina Sedan (2004-2013, VAZ-1118) Kalina Hatchback (2004-2013, VAZ-1119)

Camshafts — Removal and Installation (Kalina 1119)

  • Main
  • Kalina
  • Kalina Hatchback
  • Power unit
  • Engine repair
  • Camshafts — Removal and Installation
0
Contents: Removal ⇣ Installation ⇣

Removal


1. Remove the camshaft pulleys (see "Camshaft Seals - Replacement").

2. Remove the tension and guide rollers (see "Timing Belt Tensioner and Guide Rollers - Checking and Replacing").

3. Using a 10 mm socket wrench, unscrew the six bolts securing the rear timing belt cover.
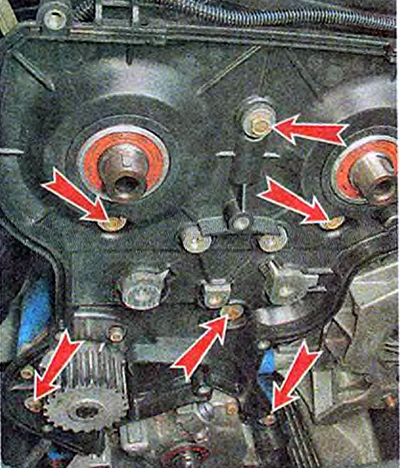
3. Using a 10 mm socket wrench, unscrew the six bolts securing the rear timing belt cover.


4. Remove the cover.
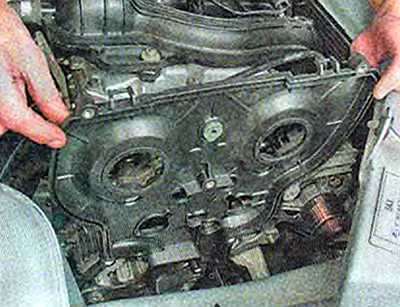
4. Remove the cover.


5. Remove the cylinder head cover (see "Cylinder head cover - removal, cleaning of oil deflector, installation").

6. To avoid damage, remove the oil pressure sensor (see "Oil Pressure Sensor - Replacement"), or disconnect the wire tip from it.

7. Using an 8 mm socket wrench, evenly, in half-turns, unscrew the 20 camshaft bearing housing mounting bolts.
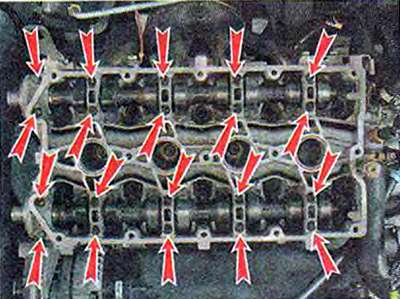
Data taken from the specified website [www.ladaman.ru]


7. Using an 8 mm socket wrench, evenly, in half-turns, unscrew the 20 camshaft bearing housing…


8. Remove the camshaft bearing housing.
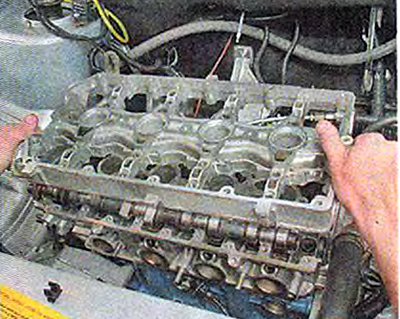
8. Remove the camshaft bearing housing.


9. Remove the intake camshaft 1 and the exhaust camshaft 2.
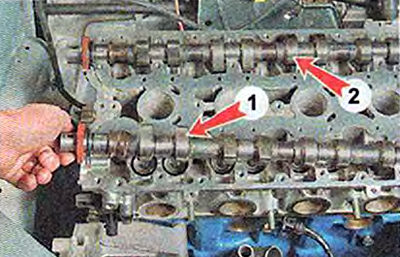
9. Remove the intake camshaft 1 and the exhaust camshaft 2.


10. Remove two plugs of technological holes from the mounting holes in the cylinder head (near the rear ends of the camshafts).
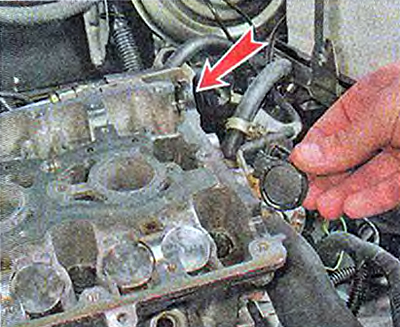
10. Remove two plugs of technological holes from the mounting holes in the cylinder head (near the…


11. Remove the keys and seals from the shafts.


12. Inspect the shafts. There should be no signs of severe wear, scratches, cracks, or traces of metal galling on the shaft journals and cams.

Installation


1. Lubricate the bearing journals and camshafts with clean engine oil.

2. Place the camshafts into the cylinder head. The shafts are not interchangeable and are marked.

The exhaust valve shaft is marked 1006014.
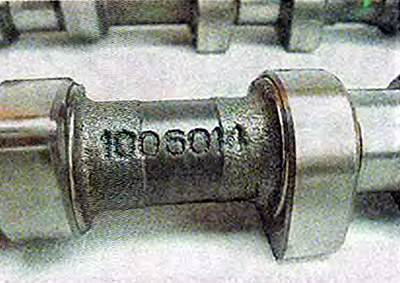
The exhaust valve shaft is marked 1006014.


Intake valve shaft marked 1006015.
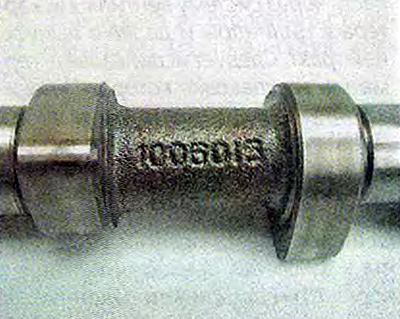
Intake valve shaft marked 1006015.


In addition, the intake valve shaft has an additional belt.
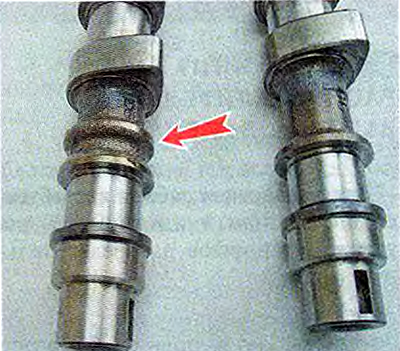
In addition, the intake valve shaft has an additional belt.


Attention!
  • When repairing an engine, do not use a sealant with a high silicone content (silicon compounds), vapors of which can enter the cylinders through the crankcase ventilation system and then into the exhaust tract. Use a sealant that is specifically labeled as safe for use with the oxygen sensor.
  • Do not apply too much sealant to the mating surfaces of the bearing housing. When tightening the mounting bolts, the sealant squeezed into the internal cavities of the engine can clog the oil channels.

3. Apply a thin layer of Loctite-574 sealant to the lower surface of the bearing housing around the spark plug well holes, and also...
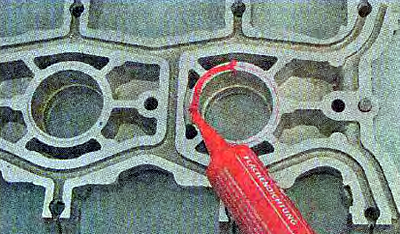


3. Apply a thin layer of Loctite-574 sealant to the lower surface of the bearing housing around the…


...and onto the plane of the cylinder head according to the following diagram:
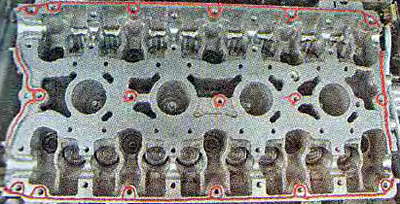
...and onto the plane of the cylinder head according to the following diagram:


4. Install the camshafts into the cylinder head with the keyways facing up.

5. Install the bearing housing on the cylinder head and evenly tighten its mounting bolts until the bearing housing touches the cylinder head. Finally, tighten the bearing housing mounting bolts in pairs, with a torque of 8.0-10.0 Nm (0.8-1.0 kgf·m) in the sequence shown in the photo (see below).

6. Use a rag to remove excess sealant squeezed out of the gap between the cylinder head and the bearing housing cover.

7. Press in the camshaft seals (see "Camshaft Seals - Replacement").

8. Press two plugs into the cylinder head.

9. Further assembly is carried out in the reverse order of disassembly.
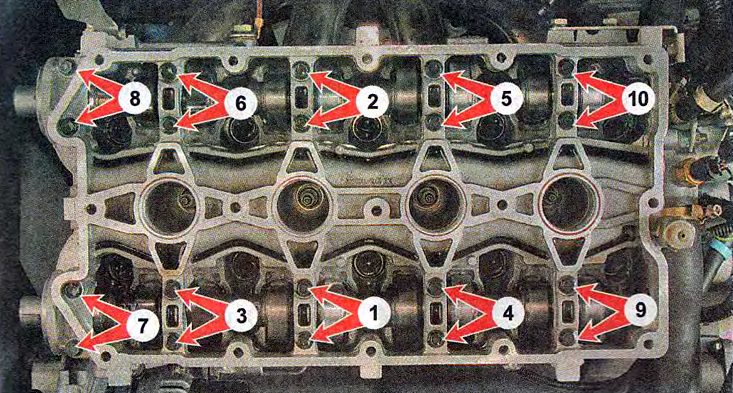


Sequence of tightening the bearing housing bolts

Sequence of tightening the bearing housing bolts


This article is available at russian, bulgarian, belarusian, ukrainian, serbian, croatian, romanian, polish, slovak, hungarian
This article has been reviewed: Polina Kudryashova
Share with friends:
◀ Previous
Lada Kalina Hatchback: Engine repair
Next ▶

Camshaft Seals — Replacement
Cylinder Head Cover — Removal, Cleaning Oil Deflector and Installation
Timing Belt Tensioner and Guide Rollers — Checking and Replacing
Timing Belt — Replacement
Timing Belt — Checking Condition
Hydraulic tappets — removal and installation
Valve stem seals — replacement
Cylinder head — removal and installation
Cylinder head — checking and grinding valves
Front Crankshaft Oil Seal — Replacement
More articles with information from manuals for Lada:

• Removal, inspection and installation of camshafts Lada Priora 1 (2007-2018, VAZ-2170)
Link to this article in various formats
Reviews and comments of visitors
No comments yet


Add up two numbers: 49 + 44


Kalina Sedan (2004-2013) 
  • General information
  • Vehicle device
  • Operation and maintenance
  • Faults en route
  • Power unit
  • Engine repair
  • Cooling and lubrication system
  • Exhaust system
  • Supply system
  • Ignition and control
  • Transmission
  • Clutch and drive shafts
  • Car gearbox
  • Chassis (running gear)
  • Front suspension
  • Rear suspension
  • Steering
  • Brake system
  • Body and interior
  • Exterior (external elements)
  • Interior (internal elements)
  • Doors, locks and windows
  • Electrical equipment
  • Equipment and devices
  • Power devices
  • Lighting and signaling
  • Heating and ventilation
Kalina Hatchback (2004-2013) 
  • General information
  • Vehicle Details
  • Maintenance
  • Troubleshooting
  • Power unit
  • Engine repair
  • Cooling system
  • Supply system
  • Control system
  • Exhaust system
  • Transmission
  • Clutch
  • Car gearbox
  • Drive shafts
  • Chassis (running gear)
  • Wheels and tires
  • Front suspension
  • Rear suspension
  • Steering
  • Brake system
  • Body and interior
  • Exterior (external elements)
  • Interior (internal elements)
  • Doors, locks and windows
  • Electrical equipment
  • Equipment and devices
  • Power devices
  • Lighting and signaling
  • Electrical circuits
LadaMan.ru © 2018–2026 | Mobile version | About Lada | Sitemap: EN BG BY UA RS HR RO PL SK HU | Contacts with admin | | Add to bookmarks
Kalina Hatchback (2004-2013) | Kalina Sedan (2004-2013) | Granta 1 (2011-2023) | Priora 1 (2007-2018) | Vesta 1 (2015-2023) | Largus 1 (2012-2023) | X-Ray 1 (2015-2022) |
This site uses cookies to ensure everything runs smoothly.