
Car repair AvtoVAZ Car repair Renault Car repair Hyundai Car repair Ford Car repair Volkswagen Car repair Audi Car repair Chevrolet
English Русский
Български
Беларускі
Український
Српски
Hrvatski
Română
Polski
Slovenský
Magyar
articles sitemap contacts bookmark
LadaMan.ru


Kalina Granta Priora Vesta Largus XRAY
Priora 1 (2007-2018, VAZ-2170)

Removal, inspection and installation of camshafts (Priora 2170)

  • Main
  • Priora
  • Priora 1
  • Power unit
  • Engine repair
  • Removal, inspection and installation of camshafts
0
Camshafts are replaced in the following cases:
  • pressure drop in the engine lubrication system. The cause of this malfunction is often increased wear of the camshaft journals and seats in the camshaft bearing housings. When the sockets are worn out, the cylinder head assembly is replaced, since the sockets are processed together with the bearing housing installed on the head;
  • valve knocking with serviceable hydraulic tappets (see "Checking and replacing hydraulic tappets") in the valve mechanism. It is caused by increased wear of the camshaft cams due to the use of low-quality engine oil or damage to the oil filter.

You will need: the same tools as for replacing valve stem seals, except for those required for replacing them (tools are used only for preparatory operations), as well as a micrometer and bore gauge.

1. Remove the camshafts from the engine (see "Replacing the valve stem seals").
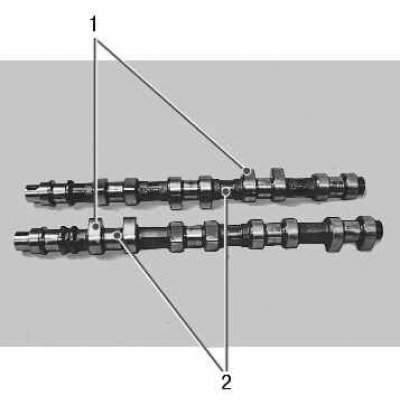
2. Inspect the camshafts. On the working surfaces of journals 2, no burrs, nicks, scratches, or…


2. Inspect the camshafts. On the working surfaces of journals 2, no burrs, nicks, scratches, or aluminum drag from the bearing seats in the housings and block head are allowed. On the working surfaces of cams 1, scoring and wear exceeding 0.5 mm, as well as wear of cams in the form of faceting, are not allowed. Replace the shaft with any detected defects.


3. In workshops equipped with special devices and tools, it is possible to check the radial runout of the camshaft journals (it should not exceed 0.02 mm).

4. Measure the diameters of the shaft bearing journals. They should be 23.915–23.931 mm.
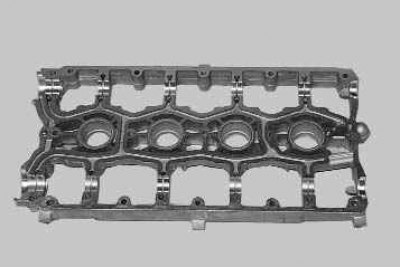
5. Inspect the bearing housing…
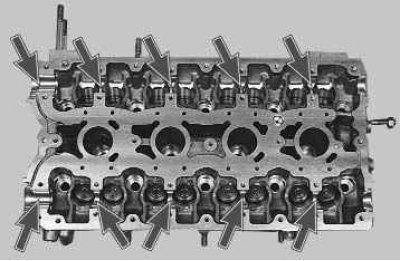

5. Inspect the bearing housing…

6. …and the camshaft supports in the cylinder head. Cracks on the body are not allowed. No marks,…


6. …and the camshaft supports in the cylinder head. Cracks on the body are not allowed. No marks, scratches, burrs or excessive wear are allowed on the working surfaces of the journal supports.

7. Install the camshaft bearing housing onto the cylinder head and tighten its mounting bolts to the recommended torque (see appendix 1). Measure the inside diameters of the camshaft housing bearings. They should be 24.000–24.025 mm.

8. Calculate the gaps between the shaft journals and supports based on the difference in size. For new parts, the gaps should be 0.069–0.11 mm. If after operation the gaps exceed 0.2 mm, replace the camshafts. If, even after replacing the shafts, the clearances exceed the maximum permissible value, replace the cylinder head assembly with the camshaft bearing housing.


9. Install the camshafts and all removed parts in the reverse order of removal.
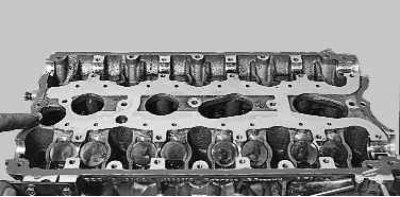
Note: Apply a 2 mm bead of Loctite 574 type sealant to the cylinder head surface mating with the…


Note: Apply a 2 mm bead of Loctite 574 type sealant to the cylinder head surface mating with the camshaft bearing housing.


This article is available at russian, bulgarian, belarusian, ukrainian, serbian, croatian, romanian, polish, slovak, hungarian
This article has been reviewed: Vladislav Voloshin
Share with friends:
◀ Previous
Lada Priora 1: Engine repair
Next ▶

Removal, inspection and installation of the flywheel
Replacing the catalytic converter gasket
Replacing the intake manifold sealing rings
Replacing the oil pan gasket
Replacing the rear crankshaft oil seal
Checking and replacing hydraulic tappets
Possible malfunctions of hydraulic tappets
Disassembly, repair and assembly of the cylinder head
Lapping valves
Removal and installation the engine
More articles with information from manuals for Lada:

• Camshafts — Removal and Installation Lada Kalina Hatchback (2004-2013, VAZ-1119)
Link to this article in various formats
Reviews and comments of visitors
No comments yet


Add up two numbers: 32 + 28


Priora 1 (2007-2018) 
  • General information
  • Vehicle device
  • User manual
  • Faults en route
  • Maintenance
  • Power unit
  • Engine repair
  • Cooling and lubrication system
  • Supply system
  • Exhaust system
  • Transmission
  • Clutch
  • Car gearbox
  • Drive shafts
  • Chassis (running gear)
  • Car suspension
  • Steering
  • Brake system
  • Body and interior
  • Exterior (external elements)
  • Interior (internal elements)
  • Doors, locks and windows
  • Electrical equipment
  • Equipment and devices
  • Power devices
  • Lighting and signaling
  • Cooling and heating
  • Electrical circuits
LadaMan.ru © 2018–2026 | Mobile version | About Lada | Sitemap: EN BG BY UA RS HR RO PL SK HU | Contacts with admin | | Add to bookmarks
Kalina Hatchback (2004-2013) | Kalina Sedan (2004-2013) | Granta 1 (2011-2023) | Priora 1 (2007-2018) | Vesta 1 (2015-2023) | Largus 1 (2012-2023) | X-Ray 1 (2015-2022) |
This site uses cookies to ensure everything runs smoothly.