
Car repair AvtoVAZ Car repair Renault Car repair Hyundai Car repair Ford Car repair Volkswagen Car repair Audi Car repair Chevrolet
English Русский
Български
Беларускі
Український
Српски
Hrvatski
Română
Polski
Slovenský
Magyar
articles sitemap contacts bookmark
LadaMan.ru


Kalina Granta Priora Vesta Largus XRAY
Kalina Sedan (2004-2013, VAZ-1118) Kalina Hatchback (2004-2013, VAZ-1119)

Windscreen wiper — removal and installation (Kalina 1119)

  • Main
  • Kalina
  • Kalina Hatchback
  • Electrical equipment
  • Equipment and devices
  • Windscreen wiper — removal and installation
0
Contents: Removal ⇣ Installation ⇣

Removal


1. Prepare the car for work and disconnect the terminal from the negative terminal of the battery (see "Preparing the car for maintenance and repair").

2. Using a screwdriver, remove the plug from the windshield wiper arm.
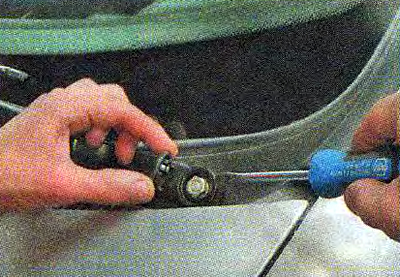
2. Using a screwdriver, remove the plug from the windshield wiper arm.


3. Using a 13 mm socket wrench, unscrew the windshield wiper arm mounting nut and remove the arm.
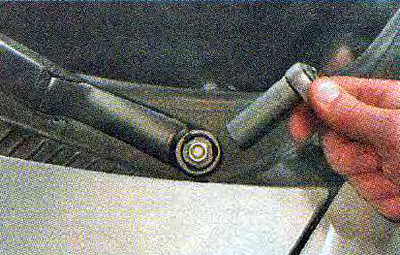
3. Using a 13 mm socket wrench, unscrew the windshield wiper arm mounting nut and remove the arm.


Advice: If the lever fits tightly on the shaft splines, then to avoid bending the shaft, screw the nut onto the thread and use sliding pliers to press the lever off the shaft.
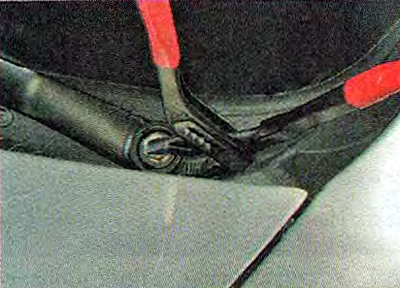

Advice: If the lever fits tightly on the shaft splines, then to avoid bending the shaft, screw the…


4. Remove the second wiper arm in the same way.


5. Remove the air intake grille (see "Air intake grille - removal and installation").

6. Release the holder of the connecting block of the windshield wiper motor-reducer.
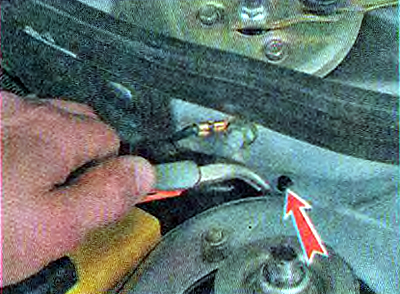
6. Release the holder of the connecting block of the windshield wiper motor-reducer.


7. Disconnect the windshield wiper wiring harness connector from the vehicle's electrical system.
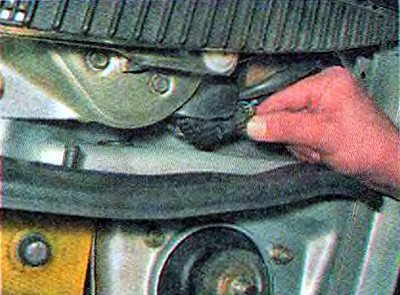
7. Disconnect the windshield wiper wiring harness connector from the vehicle's electrical system.


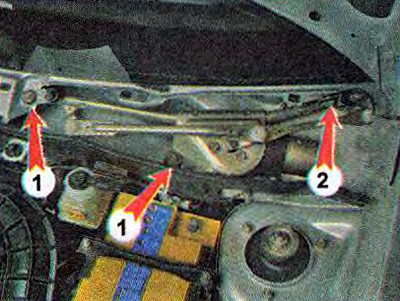
8. Using a 10 mm socket wrench, unscrew the two bolts 1 and nut 2 securing the windshield wiper.

8. Using a 10 mm socket wrench, unscrew the two bolts 1 and nut 2 securing the windshield wiper.

9. Carefully remove the windshield wiper from the air intake box.
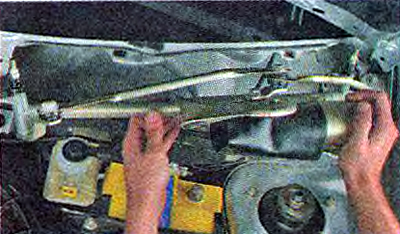


9. Carefully remove the windshield wiper from the air intake box.


Installation


We install the windshield wiper in the reverse order.

Recommendation. If the wiper is new or has been repaired, the arms should be installed last. Before installing the levers, connect the windshield wiper to the vehicle's electrical system and turn on the intermittent mode. Once the wiper has completed a full cycle and stopped, turn it off. And only after this, set the levers in the lower position of the glass. If you cannot set the levers so that the windshield wiper operates correctly, you should reposition the crank on the motor-reducer shaft (see below, "Windscreen wiper - motor-reducer replacement".


This article is available at russian, bulgarian, belarusian, ukrainian, serbian, croatian, romanian, polish, slovak, hungarian
This article has been reviewed: Polina Kudryashova
Share with friends:
◀ Previous
Lada Kalina Hatchback: Equipment and devices
Next ▶

Windscreen wipers and washers — general information
Ambient Air Temperature Sensor — Replacement
Oil Pressure Sensor — Replacement
Coolant Temperature Gauge Sensor — Checking and Replacing
Low Brake Fluid Sensor — Checking and Replacing
Windshield Wiper — Motor Gear Replacement
Rear Window Wiper — Removal and Installation
Windscreen Washer Pumps — Removal and Installation
Windscreen washer reservoir — removal and installation
Windscreen washer nozzles — replacement
More articles with information from manuals for Lada:

• Windscreen wiper switch Lada Granta 1 (2011-2023, VAZ-2190)
• Windshield wiper design features Lada Priora 1 (2007-2018, VAZ-2170)
• Windscreen wiper blades — replacement Lada Vesta 1 (2015-2023, VAZ-2180)
• Windscreen Wiper — Removing Arms and Motor Lada Largus 1 (2012-2023)
• Windscreen wiper — removal and installation Lada X-Ray 1 (2015-2022)
Link to this article in various formats
Reviews and comments of visitors
No comments yet


Add up two numbers: 38 + 40


Kalina Sedan (2004-2013) 
  • General information
  • Vehicle device
  • Operation and maintenance
  • Faults en route
  • Power unit
  • Engine repair
  • Cooling and lubrication system
  • Exhaust system
  • Supply system
  • Ignition and control
  • Transmission
  • Clutch and drive shafts
  • Car gearbox
  • Chassis (running gear)
  • Front suspension
  • Rear suspension
  • Steering
  • Brake system
  • Body and interior
  • Exterior (external elements)
  • Interior (internal elements)
  • Doors, locks and windows
  • Electrical equipment
  • Equipment and devices
  • Power devices
  • Lighting and signaling
  • Heating and ventilation
Kalina Hatchback (2004-2013) 
  • General information
  • Vehicle Details
  • Maintenance
  • Troubleshooting
  • Power unit
  • Engine repair
  • Cooling system
  • Supply system
  • Control system
  • Exhaust system
  • Transmission
  • Clutch
  • Car gearbox
  • Drive shafts
  • Chassis (running gear)
  • Wheels and tires
  • Front suspension
  • Rear suspension
  • Steering
  • Brake system
  • Body and interior
  • Exterior (external elements)
  • Interior (internal elements)
  • Doors, locks and windows
  • Electrical equipment
  • Equipment and devices
  • Power devices
  • Lighting and signaling
  • Electrical circuits
LadaMan.ru © 2018–2026 | Mobile version | About Lada | Sitemap: EN BG BY UA RS HR RO PL SK HU | Contacts with admin | | Add to bookmarks
Kalina Hatchback (2004-2013) | Kalina Sedan (2004-2013) | Granta 1 (2011-2023) | Priora 1 (2007-2018) | Vesta 1 (2015-2023) | Largus 1 (2012-2023) | X-Ray 1 (2015-2022) |
This site uses cookies to ensure everything runs smoothly.