
Car repair AvtoVAZ Car repair Renault Car repair Hyundai Car repair Ford Car repair Volkswagen Car repair Audi Car repair Chevrolet
English Русский
Български
Беларускі
Український
Српски
Hrvatski
Română
Polski
Slovenský
Magyar
articles sitemap contacts bookmark
LadaMan.ru


Kalina Granta Priora Vesta Largus XRAY
Largus 1 (2012-2023)

Windscreen Wiper — Removing Arms and Motor (Largus 1)

  • Main
  • Largus
  • Largus 1
  • Electrical equipment
  • Equipment and devices
  • Windscreen Wiper — Removing Arms and Motor
0
Contents: Removal the levers ⇣ Windshield wiper motor replacement ⇣ Installation ⇣
For part numbers of this unit, see here.

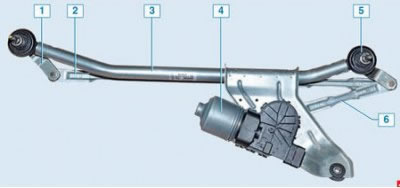
Windshield Cleaner: 1 – leash with brush lever shaft; 2 - long pull; 3 – bracket; 4 – gear motor; 5…

Windshield Cleaner: 1 – leash with brush lever shaft; 2 - long pull; 3 – bracket; 4 – gear motor; 5 – wiper mounting cushion; 6 - short pull


Removal the levers


Note: The original position of the wiper blade tips is marked with transparent triangles on the black mask layer around the perimeter of the glass. This is necessary to ensure that the wipers operate in the required area of the windshield after installation.
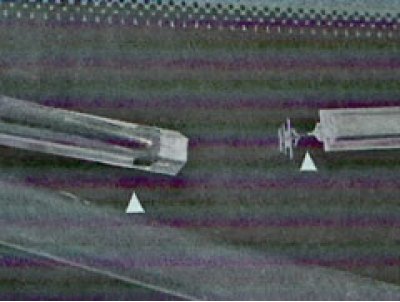

Note: The original position of the wiper blade tips is marked with transparent triangles on the…


Place the vehicle on a work stand, open the hood, install the support, and disconnect the ground wire terminal from the battery.

Lift the decorative caps of the nuts 2 securing the arms 1 of the windshield wiper, unscrew the nuts and remove the arms (spanner 13).
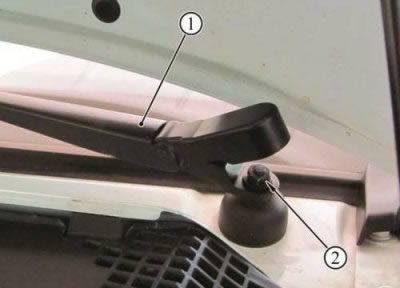


Figure 15-1 - Fastening the wiper arms: 1 - windshield wiper arms; 2 - Windscreen wiper arm…

Figure 15-1 - Fastening the wiper arms: 1 - windshield wiper arms; 2 - Windscreen wiper arm mounting nut


Installation is carried out in reverse order according to the installed marks.

Removing the windshield wiper trapezoid assembly with the gear motor

Remove the seal 1 of the engine compartment, Fig. 15-2. Remove the fasteners 2, right 3 and left 4 of the windshield frame trim, remove the air intake grilles (flat head screwdriver).
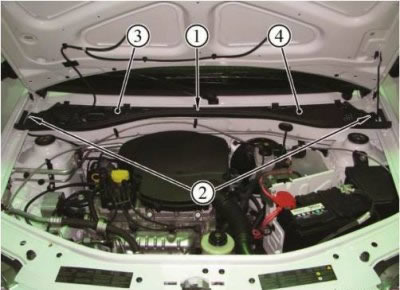
Figure 15-2 - Removing the windshield frame trim: 1 - engine compartment seal; 2 - air intake niche…

Figure 15-2 - Removing the windshield frame trim: 1 - engine compartment seal; 2 - air intake niche grille fasteners; 3 - right windshield frame trim; 4 - left windshield frame trim


Remove caps 1 of nuts, figure 15-3, fastening the wiper arm axles to the body, unscrew nuts 2 (spanner 24).
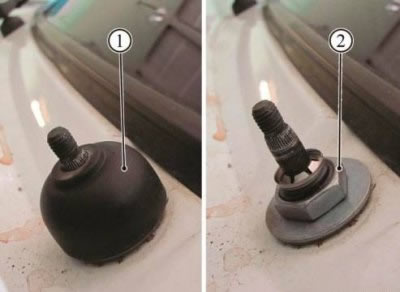


Figure 15-3 - Windshield wiper mechanism mounting: 1 - nut cap; 2 - nut for fastening the wiper arm…

Figure 15-3 - Windshield wiper mechanism mounting: 1 - nut cap; 2 - nut for fastening the wiper arm axles to the body


Loosen bolt 2, figure 15-4, securing the windshield wiper motor bracket, disconnect connector 1 from the windshield wiper motor (replacement head 10, extension, ratchet).
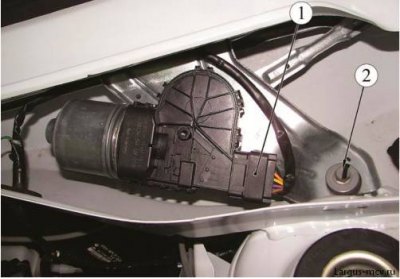
Figure 15-4 - Windshield wiper mechanism mounting: 1 - block of the wiring harness of the front to…

Figure 15-4 - Windshield wiper mechanism mounting: 1 - block of the wiring harness of the front to the electric motor of the windshield wiper; 2 - windshield wiper motor bracket mounting bolt


Remove the windshield wiper mechanism from the air intake recess.
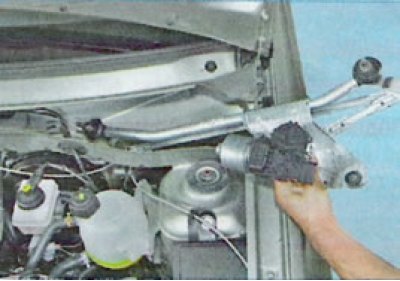
Remove the windshield wiper mechanism from the air intake recess.


The design of the windshield wiper trapezoid is non-detachable. If there is increased play in its joints or if the levers are damaged, replace the trapezoid assembly. Replace the gear motor if necessary.


Windshield wiper motor replacement
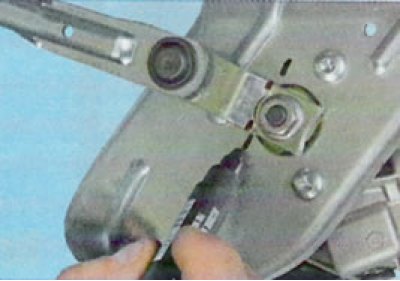


Windshield wiper motor replacement


Mark the position of the crank relative to the bracket.
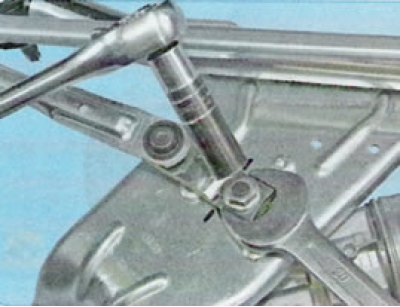
Mark the position of the crank relative to the bracket.


Loosen the crank mounting nut. To reduce the load on the plastic gear teeth of the gearbox, hold the crank from turning with an open-end wrench.
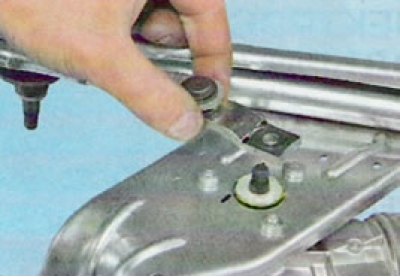
Loosen the crank mounting nut. To reduce the load on the plastic gear teeth of the gearbox, hold…


Remove the crank from the shaft splines.
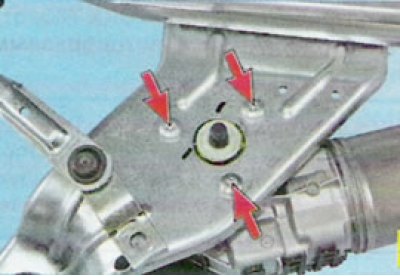
Remove the crank from the shaft splines.


Remove the three bolts securing the gear motor to the bracket...
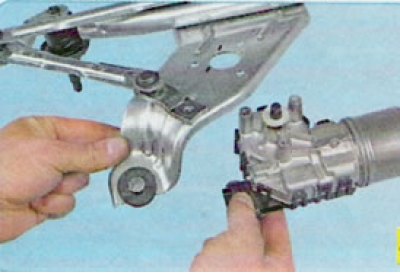


Remove the three bolts securing the gear motor to the bracket...


...and remove the gear motor.

Installation


Install the windshield wiper in the reverse order of removal.
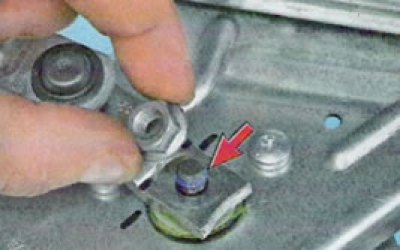
Install the windshield wiper in the reverse order of removal.


Before tightening the crankshaft mounting nut, apply anaerobic locking sealant to the threaded portion of the shaft.


This article is available at russian, bulgarian, belarusian, ukrainian, serbian, croatian, romanian, polish, slovak, hungarian
This article has been reviewed: Daniil Markelov
Share with friends:
◀ Previous
Lada Largus 1: Equipment and devices
Next ▶

Removal the front and rear window washers
Disassembling the electric outside rearview mirror
Instrument cluster — removal and installation
General description of the vehicle's electrical equipment
Removal the rear windshield wiper of the luggage compartment door
Fuses — location, rating and purpose
Central console with instruments — removal and installation
Replacing the radiator fan motor
Removal the driver's airbag (SRS, Airbag)
More articles with information from manuals for Lada:

• Windscreen wiper — removal and installation Lada Kalina Hatchback (2004-2013, VAZ-1119)
• Windscreen wiper — motor-reducer replacement Lada Granta 1 (2011-2023, VAZ-2190)
• Windshield wiper design features Lada Priora 1 (2007-2018, VAZ-2170)
• Windscreen wiper blades — replacement Lada Vesta 1 (2015-2023, VAZ-2180)
• Windscreen wiper — removal and installation Lada X-Ray 1 (2015-2022)
Link to this article in various formats
Reviews and comments of visitors
No comments yet


Add up two numbers: 17 + 31


Largus 1 (2012-2023) 
  • General information
  • Vehicle device
  • User manual
  • Maintenance
  • Power unit
  • Engine repair
  • Cooling and lubrication system
  • Supply system
  • Ignition system
  • Exhaust system
  • Spare parts catalog
  • Transmission
  • Clutch
  • Car gearbox
  • Drive shafts
  • Spare parts catalog
  • Chassis (running gear)
  • Suspension and wheels
  • Steering
  • Brake system
  • Spare parts catalog
  • Body and interior
  • Exterior (external elements)
  • Interior (internal elements)
  • Doors, locks and windows
  • Heating and ventilation
  • Spare parts catalog
  • Electrical equipment
  • Equipment and devices
  • Power devices
  • Lighting and signaling
  • Spare parts catalog
  • Electrical circuits
LadaMan.ru © 2018–2026 | Mobile version | About Lada | Sitemap: EN BG BY UA RS HR RO PL SK HU | Contacts with admin | | Add to bookmarks
Kalina Hatchback (2004-2013) | Kalina Sedan (2004-2013) | Granta 1 (2011-2023) | Priora 1 (2007-2018) | Vesta 1 (2015-2023) | Largus 1 (2012-2023) | X-Ray 1 (2015-2022) |
This site uses cookies to ensure everything runs smoothly.