Car repair AvtoVAZ Car repair Renault Car repair Hyundai Car repair Ford Car repair Volkswagen Car repair Audi Car repair Chevrolet
English Русский
Български
Беларускі
Український
Српски
Hrvatski
Română
Polski
Slovenský
Magyar
articles sitemap contacts bookmark
LadaMan.ru


Kalina Granta Priora Vesta Largus XRAY
Kalina Sedan (2004-2013, VAZ-1118) Kalina Hatchback (2004-2013, VAZ-1119)

Removal and installation the throttle assembly (Kalina 1118)

  • Main
  • Kalina
  • Kalina Sedan
  • Power unit
  • Supply system
  • Removal and installation the throttle assembly
0
Signs of a throttle valve that does not close completely may include increased idle speed and fuel consumption. If the throttle valve does not open fully, the engine does not develop full power, the engine response is insufficient, and jerks and dips occur in the engine operation when the car is moving.

If these faults occur, first try adjusting the throttle actuator or replacing the cable (see "Adjusting and replacing the throttle cable"). If this does not produce a positive result, replace the throttle assembly.

To remove and install the throttle assembly on a car, you will need: a 13 mm socket wrench (head), a Phillips-head screwdriver.

1. Drain the coolant from the engine cooling system (see "Replacing the coolant").

2. Disconnect the wire from the negative terminal of the battery.

3. After pressing the clamps, disconnect the wiring harness connectors from the TPS (throttle position sensor)...
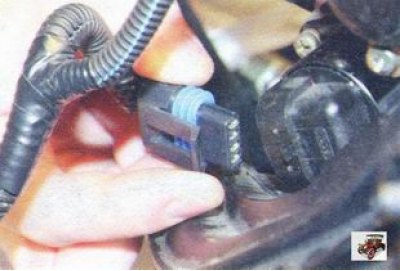
3. After pressing the clamps, disconnect the wiring harness connectors from the TPS (throttle…


4. ...and IAC (idle speed control).

4. ...and IAC (idle speed control).


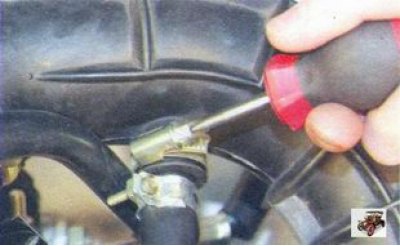
5. Loosen the clamp securing the large branch hose of the crankcase ventilation system and disconnect the hose from the air supply pipe.


5. Loosen the clamp securing the large branch hose of the crankcase ventilation system and…


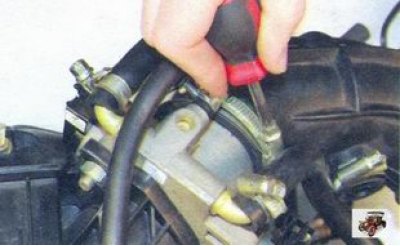
6. Loosen the clamp securing the air supply pipe to the throttle assembly and disconnect the pipe.
6. Loosen the clamp securing the air supply pipe to the throttle assembly and disconnect the pipe.


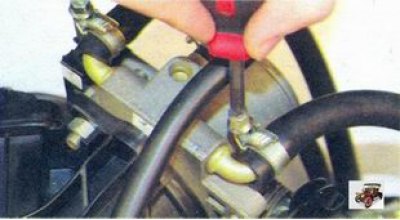
7. Loosen the clamps securing the coolant drain and supply hoses and remove the hoses from the throttle assembly fittings. Please note that a small amount of coolant will flow out of the hose. Therefore, place a container or a rag under the hose.
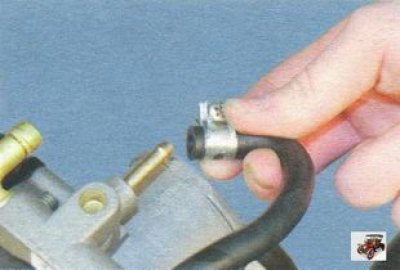
7. Loosen the clamps securing the coolant drain and supply hoses and remove the hoses from the…


8. After loosening the fastening clamps, disconnect the small branch hose of the crankcase ventilation system from the throttle assembly fittings...
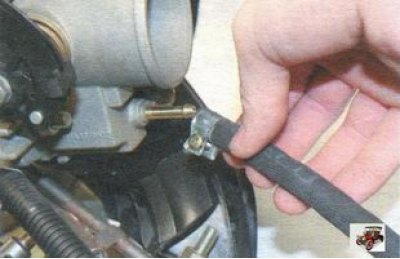


8. After loosening the fastening clamps, disconnect the small branch hose of the crankcase…


9. ...and the purge hose of the adsorber.

10. Disconnect the throttle actuator cable from the throttle assembly sector (see "Adjusting and replacing the throttle cable").
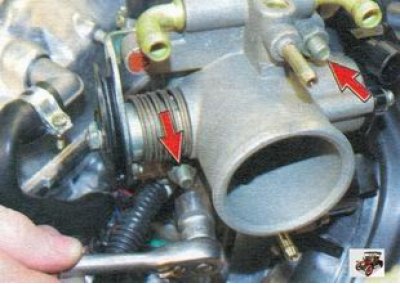
10. Disconnect the throttle actuator cable from the throttle assembly sector (see «Adjusting and…


11. Unscrew the two nuts securing the throttle assembly...
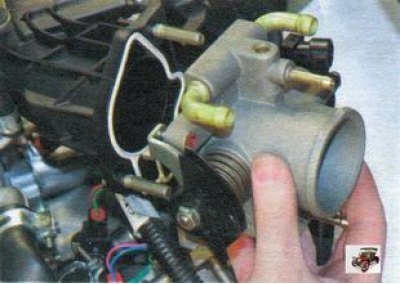
11. Unscrew the two nuts securing the throttle assembly...


12. ...and remove the throttle assembly from the intake module studs.

13. Remove the gasket from the intake module.


13. Remove the gasket from the intake module.


[Material was taken from the website LADAMAN]

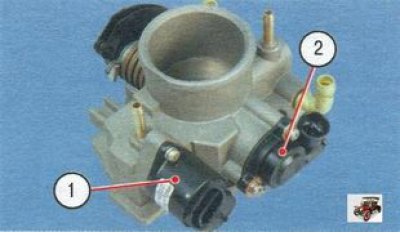
14. If, when replacing the throttle assembly, the idle speed control valve 1 and throttle position sensor 2 are not installed on the new throttle assembly, transfer them from the old throttle assembly. To do this, unscrew two screws that secure them.

15. Clean the contaminated throttle assembly with carburetor cleaning fluid, after removing the TPS from it (throttle position sensor) and IAC (idle speed control). Also clean the dirty idle air control valve and throttle position sensor (it is prohibited to use solvents for cleaning).

16. Install the throttle assembly and all removed parts on the vehicle in the reverse order of removal.

17. Adjust the throttle actuator (see "Adjusting and replacing the throttle cable").


This article is available at russian, bulgarian, belarusian, ukrainian, serbian, croatian, romanian, polish, slovak, hungarian
This article has been reviewed: Daniil Markelov
Share with friends:
◀ Previous
Lada Kalina Sedan: Supply system
Next ▶

Replacing the fuel tank and its filler pipe
Fuel pump repair
Removal, installation and replacement of the fuel pump
Replacing the fuel filter
Removal and installation the air filter
Replacing the idle speed control valve
Removal and installation the intake module
Removal and installation the fuel rail
Checking and replacing injectors
Adjusting and replacing the throttle cable
More articles with information from manuals for Lada:

• Throttle assembly — removal, inspection, cleaning and installation Lada Granta 1 (2011-2023, VAZ-2190)
• Checking and adjusting the throttle cable Lada Priora 1 (2007-2018, VAZ-2170)
• Throttle assembly — removal, gasket replacement and installation Lada Vesta 1 (2015-2023, VAZ-2180)
• Throttle assembly (pipe) — removal and installation Lada Largus 1 (2012-2023)
Link to this article in various formats
Reviews and comments of visitors
No comments yet


Add up two numbers: 25 + 41


Kalina Sedan (2004-2013) 
  • General information
  • Vehicle device
  • Operation and maintenance
  • Faults en route
  • Power unit
  • Engine repair
  • Cooling and lubrication system
  • Exhaust system
  • Supply system
  • Ignition and control
  • Transmission
  • Clutch and drive shafts
  • Car gearbox
  • Chassis (running gear)
  • Front suspension
  • Rear suspension
  • Steering
  • Brake system
  • Body and interior
  • Exterior (external elements)
  • Interior (internal elements)
  • Doors, locks and windows
  • Electrical equipment
  • Equipment and devices
  • Power devices
  • Lighting and signaling
  • Heating and ventilation
Kalina Hatchback (2004-2013) 
  • General information
  • Vehicle Details
  • Maintenance
  • Troubleshooting
  • Power unit
  • Engine repair
  • Cooling system
  • Supply system
  • Control system
  • Exhaust system
  • Transmission
  • Clutch
  • Car gearbox
  • Drive shafts
  • Chassis (running gear)
  • Wheels and tires
  • Front suspension
  • Rear suspension
  • Steering
  • Brake system
  • Body and interior
  • Exterior (external elements)
  • Interior (internal elements)
  • Doors, locks and windows
  • Electrical equipment
  • Equipment and devices
  • Power devices
  • Lighting and signaling
  • Electrical circuits
LadaMan.ru © 2018–2026 | Mobile version | About Lada | Sitemap: EN BG BY UA RS HR RO PL SK HU | Contacts with admin | | Add to bookmarks
Kalina Hatchback (2004-2013) | Kalina Sedan (2004-2013) | Granta 1 (2011-2023) | Priora 1 (2007-2018) | Vesta 1 (2015-2023) | Largus 1 (2012-2023) | X-Ray 1 (2015-2022) |
This site uses cookies to ensure everything runs smoothly.