
Car repair AvtoVAZ Car repair Renault Car repair Hyundai Car repair Ford Car repair Volkswagen Car repair Audi Car repair Chevrolet
English Русский
Български
Беларускі
Український
Српски
Hrvatski
Română
Polski
Slovenský
Magyar
articles sitemap contacts bookmark
LadaMan.ru


Kalina Granta Priora Vesta Largus XRAY
Kalina Sedan (2004-2013, VAZ-1118) Kalina Hatchback (2004-2013, VAZ-1119)

Replacing the front brake pads (Kalina 1118)

  • Main
  • Kalina
  • Kalina Sedan
  • Chassis (running gear)
  • Brake system
  • Replacing the front brake pads
0
Note: The minimum permissible thickness of the brake pad friction linings is 1.5 mm.


To replace the front brake pads on your car, you will need: a flat-blade screwdriver, a chisel, a hammer, and 13 and 17 mm wrenches.

1. Disconnect the wire from the negative terminal of the battery.

2. Apply the parking brake and place chocks under the rear wheels. Remove the front wheel, clean the brake mechanism from dirt and remove the rubber seal from the bracket together with the hose.

3. If the brake fluid level in the brake master cylinder reservoir is at or approaching the "MAX" mark, pump out some of the brake fluid from the brake reservoir. Otherwise, it will spill over when installing new brake pads.
3. If the brake fluid level in the brake master cylinder reservoir is at or approaching the «MAX»…


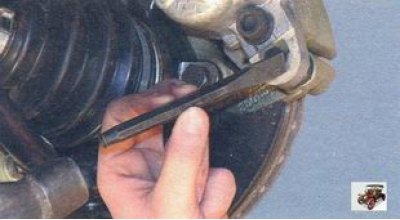
4. Bend back the corner of the lock washer of the lower bolt with a screwdriver or knock off the corner with a chisel.
4. Bend back the corner of the lock washer of the lower bolt with a screwdriver or knock off the…


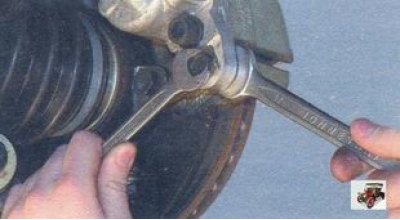
5. Unscrew the lower bolt securing the bracket housing, holding the guide pin by the hexagon with a wrench.


5. Unscrew the lower bolt securing the bracket housing, holding the guide pin by the hexagon with a…


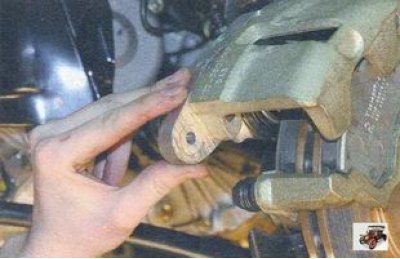
6. Rotate the caliper body upwards around the upper guide pin axis and remove the front brake pads.

7. Check the thickness and condition of the brake pad friction linings.

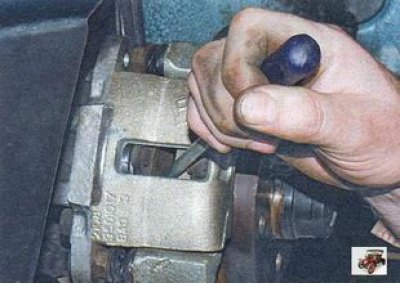
8. Clean the brake parts, especially the brake pad seats, from dirt and rust. Do this carefully so as not to damage the brake cylinder protective boot.
(Original posted on the website: LADAMAN.ru)

8. Clean the brake parts, especially the brake pad seats, from dirt and rust. Do this carefully so…


9. When installing new brake pads, press the piston into the brake cylinder. To do this, install the worn brake pads back into place (instead of the internal one it is desirable to install only the base) and lift the bracket body. Using a screwdriver or crowbar, press the inner brake pad and rest it on the brake disc to gently push the piston into the brake cylinder.


9. When installing new brake pads, press the piston into the brake cylinder. To do this, install…


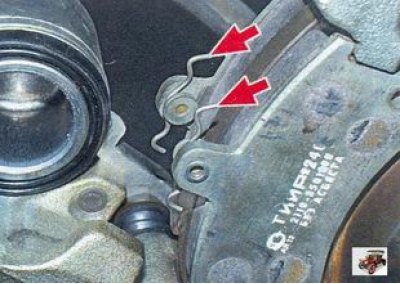
10. Install new brake pads on the vehicle. The pressure springs must be installed parallel to the top edge of the brake shoes.

11. Turn the bracket body upward and tighten the upper mounting bolt, holding the guide pin by the hexagon with a wrench.

12. Bend the tab of the lock washer. Install the wheel and lower the car to the ground, then press the brake pedal several times to set the piston to the working position. Check the brake fluid level in the brake reservoir and top up to the required level if necessary.


This article is available at russian, bulgarian, belarusian, ukrainian, serbian, croatian, romanian, polish, slovak, hungarian
This article has been reviewed: Daniil Markelov
Share with friends:
◀ Previous
Lada Kalina Sedan: Brake system
Next ▶

Removal and installation the master brake cylinder
Removal and installation the brake master cylinder reservoir
Removal and installation the brake booster
Replacing brake fluid
Bleeding the brake system
Removal, installation and replacement of the front brake disc
Removal and installation the front slave cylinder
Removal and installation the rear wheel brake drum
Removal and installation rear brake pads
Replacing the rear brake slave cylinder
More articles with information from manuals for Lada:

• Front brake pads — replacement Lada Granta 1 (2011-2023, VAZ-2190)
• Replacing the brake pads of the front wheel brake mechanism Lada Priora 1 (2007-2018, VAZ-2170)
• Front brake pads — replacement Lada Vesta 1 (2015-2023, VAZ-2180)
• Front brake pads — removal and installation Lada Largus 1 (2012-2023)
• Front brake pads — removal and installation Lada X-Ray 1 (2015-2022)
Link to this article in various formats
Reviews and comments of visitors
No comments yet


Add up two numbers: 13 + 48


Kalina Sedan (2004-2013) 
  • General information
  • Vehicle device
  • Operation and maintenance
  • Faults en route
  • Power unit
  • Engine repair
  • Cooling and lubrication system
  • Exhaust system
  • Supply system
  • Ignition and control
  • Transmission
  • Clutch and drive shafts
  • Car gearbox
  • Chassis (running gear)
  • Front suspension
  • Rear suspension
  • Steering
  • Brake system
  • Body and interior
  • Exterior (external elements)
  • Interior (internal elements)
  • Doors, locks and windows
  • Electrical equipment
  • Equipment and devices
  • Power devices
  • Lighting and signaling
  • Heating and ventilation
Kalina Hatchback (2004-2013) 
  • General information
  • Vehicle Details
  • Maintenance
  • Troubleshooting
  • Power unit
  • Engine repair
  • Cooling system
  • Supply system
  • Control system
  • Exhaust system
  • Transmission
  • Clutch
  • Car gearbox
  • Drive shafts
  • Chassis (running gear)
  • Wheels and tires
  • Front suspension
  • Rear suspension
  • Steering
  • Brake system
  • Body and interior
  • Exterior (external elements)
  • Interior (internal elements)
  • Doors, locks and windows
  • Electrical equipment
  • Equipment and devices
  • Power devices
  • Lighting and signaling
  • Electrical circuits
LadaMan.ru © 2018–2026 | Mobile version | About Lada | Sitemap: EN BG BY UA RS HR RO PL SK HU | Contacts with admin | | Add to bookmarks
Kalina Hatchback (2004-2013) | Kalina Sedan (2004-2013) | Granta 1 (2011-2023) | Priora 1 (2007-2018) | Vesta 1 (2015-2023) | Largus 1 (2012-2023) | X-Ray 1 (2015-2022) |
This site uses cookies to ensure everything runs smoothly.