
Attention. Replace brake pads as a set on wheels of one axle. Installation of brake pads of different manufacturers or different types on the wheels of the same axle is not allowed.
You can check the thickness of the brake pads through the hole in the caliper. If it is less than indicated in the table below, replace the pads.
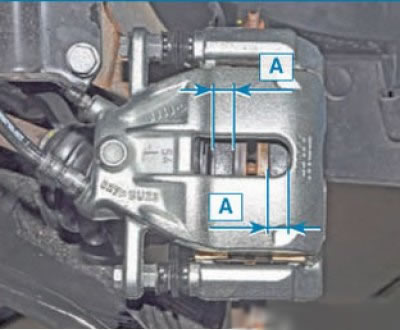
If dimension A is less than 6 mm, then the pads must be replaced.
The parameters of the brake pads are shown in Table 8-1.
Table 8-1
| Parameter | R90 | F90 | |
| Engine model | K7M | K4M | K7M, K4M |
| Nominal brake pad thickness (including backing), mm | 18,0 | 17,7 | 17,7 |
| Minimum allowable brake pad thickness (including backing), mm | 6,0 | 6,0 | 6,0 |
For catalog numbers of brake pads and other elements of the front brake mechanism, see Here (depending on availability of ABS).
Helpful Hints:
- After replacing worn out brake pads with new ones, do not rush to immediately go to busy highways. It is possible that at the very first intensive braking you will be unpleasantly surprised by the low efficiency of the brakes, although the pads are branded. Brake discs also wear out, and new pads only touch them at the edges, practically braking. Choose a quiet street or driveway for car bases and brake gently several times so that the pads get used * and begin to fit the entire surface. At the same time, evaluate the effectiveness of the brakes.
- Try not to brake sharply for at least the first 100 km. With strong heating of unprocessed pads, the top layer of their pads burns and the brakes will not be as effective as possible for a long time.
Removing
Place the vehicle on a two-post lift, apply the parking brake and turn off the ignition.
Remove front wheels. Raise the vehicle to a height convenient for work. Clean Front Brake Parts (metal brush).
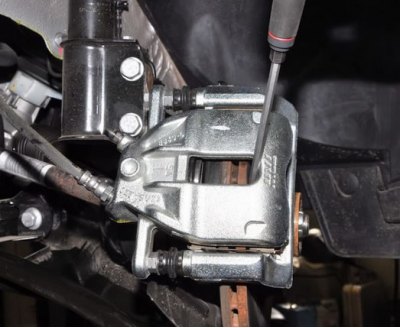
Spread the blocks. To do this, you need to move the piston as much as possible inside the wheel cylinder. When performing this operation, unscrew the cap of the reservoir of the hydraulic drive of the brakes and monitor the level of the brake fluid, remove excess fluid (flat screwdriver, syringe or rubber bulb, container).
Having inserted a screwdriver through the hole between the brake disc and the caliper and leaning on the caliper with it, we move the bracket, sinking the piston into the cylinder.
For cars LADA LARGUS R90 with K7M engine
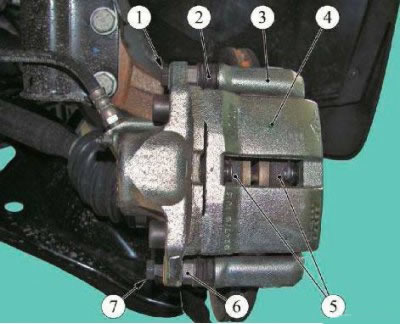
Figure 8-1 - Front brake caliper: 1.7 - bolts for fastening the guide pins; 2 - protective cover for the guide pin; 3 - front brake guide; 4 - support; 5 - brake pads; 6 - guide pin
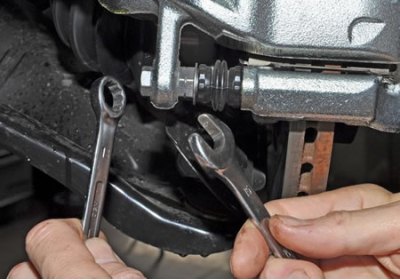
Loosen and remove the lower bolt 7, Figure 8-1, fastening the guide pin, while holding the guide pin 6 with a wrench (key "at 13" And "at 15").
Rotate the caliper bracket up.
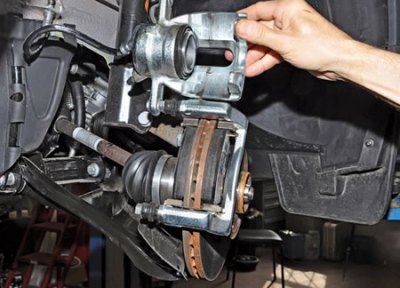
Figure 8-2 - Caliper Bracket Raised: 1 - front brake guide; 2 - noise reduction plates; 3 - support; 4 - brake pads
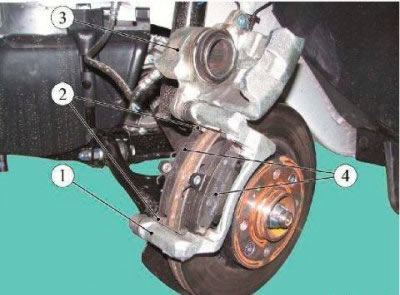
Remove brake pads 4,
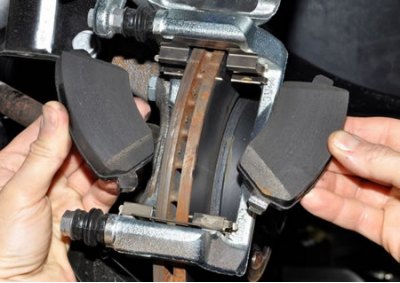
as well as two spring noise reduction plates 2.
For LADA LARGUS R90 cars with K4M engine and LADA LARGUS F90 cars
Remove the spring 3, Figure 8-3 from the bores of the front brake caliper 2 (flathead screwdriver, pliers).
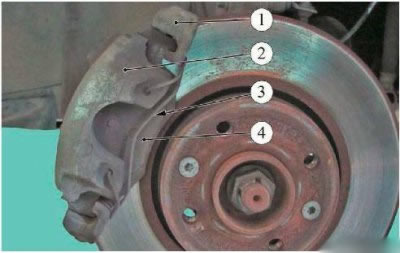
Figure 8-3: 1 - front brake guide; 2 - support; 3 - caliper spring; 4 - brake pads
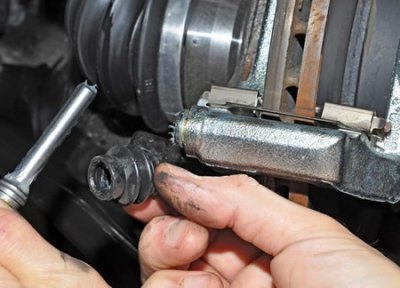
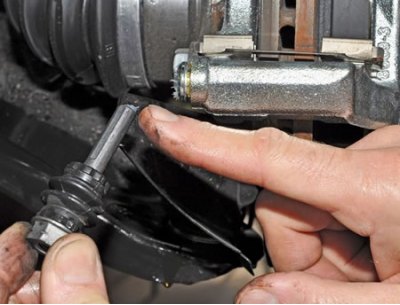
Remove the protective caps 4, Figure 8-4, from the wells of the guide pins (flat screwdriver).
Unscrew and remove guide pins 5 (replaceable nozzle with external hexagon type 7 "INHEX" 03 05 00 07 f. "Stahlwille", ratchet key).
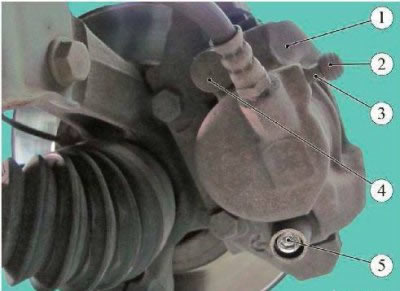
Figure 8-4: 1 - support; 2 - protective cap of the bleed valve; 3 - bleed valve; 4 - protective cap of the guide pin; 5 - guide pin
Remove and hang the front brake caliper 1 to the suspension spring (technological hook).
Attention. To prevent damage to the brake hose, it is not allowed to subject it to tensile loads, twisting, and also to exclude the contact of the hose with the sharp edges of the vehicle suspension parts.
Remove front brake pads.
Installation
Check brake pad thickness according to Table 8-1 and replace if necessary.
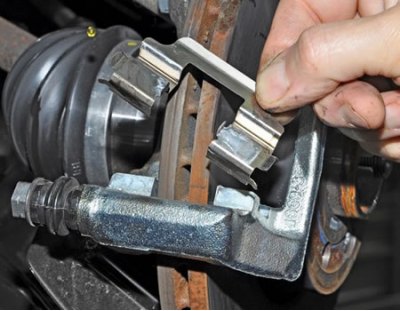
Check the condition of the dust cap of the working piston, dust caps of the guide pins and replace if necessary. To do this, remove the guide pin from the hole in the guide shoe and replace the anther
To replace the boot of the upper finger, you need to unscrew the bolt securing the bracket to the finger and remove the bracket from the shoe guide.
Before installing the finger, apply a little lubricant to it, as well as to the guide hole.
For cars LADA LARGUS R90 with K7M engine
Attention. (according to the company's technical instructions) After removing the bolts 1, 7, Figure 8-1, the fastenings of the guide pins must be replaced, since the fixation of the bolts is carried out with an adhesive composition applied to the threaded surface of the bolt. Bolts must not be reused.
Attention. (according to the company's technical instructions) When replacing the pads, the noise reduction plates 2, Figure 8-2, must be replaced with new ones.
Install new noise reduction plates in the front brake guide, install the brake pads.
Turn the caliper down and secure it with the guide pin mounting bolt, first apply adhesive to the threaded part of the bolt "FRENETANCHE" in the amount of 1 g Bolt tightening torque 34 Nm (3.4 kgf·m) spare part number 77 11 236 471).
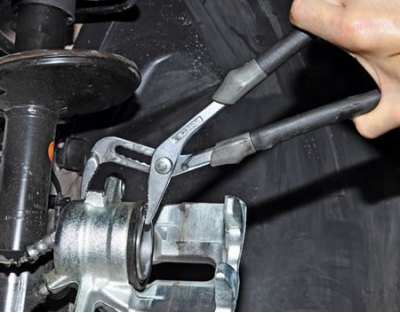
If it is not possible to lower the caliper bracket due to the piston protruding from the wheel cylinder, then we sink it with the help of large pliers and lower the caliper bracket onto the pads.
For LADA LARGUS R90 cars with K4M engine and LADA LARGUS F90 cars
Install the brake pads into the front brake guide.
Install the front brake caliper on the guide and secure it with guide pins. Tightening torque for guide pins 28 Nm (2.8 kgf·m) (replaceable nozzle with external hexagon type 7 "INHEX" 03 05 00 07 f. "Stahlwille", ratchet wrench, torque wrench).
Install the protective caps in the wells of the guide pins.
Install the spring into the holes in the caliper (pliers, flat head screwdriver).
For all
Install front wheels.
Press the brake pedal 2-3 times, check and, if necessary, top up the level of brake fluid in the reservoir of the hydraulic brake drive. Install the brake fluid reservoir cap.
Check the efficiency of the service brake system.
About some features of replacing pads
Even a simple replacement of brake pads is fraught with bad surprises, let alone a more serious repair, so it is advisable to keep an eye on what is happening in the repair zone if possible. All bypass technologies used by negligent servicemen are well known to most, respectively, the client's task is to prevent them from being used on his car.
So, change the brake pads. Let's go in order from the most egregious violations of technology to the less egregious.
1. Most vehicles are equipped with floating calipers. There are exceptions, but monolithic multi-piston calipers are found mainly on powerful and premium vehicles, however, this does not change the essence of the matter. By the time the pads have worn out, the caliper piston has come out quite a bit. In order for the new pads to fall into place, the piston must be driven back. How? If the master grabbed two mounting blades and is going to do this operation with them, stop him - save on a new caliper, not this minute, of course, in half a year or a year. The fact is that in nine cases out of ten, one of the blades will slip and is guaranteed to pierce the piston boot, sand, water, dirt will begin to get there, the caliper will jam over time and will have to be changed. This situation is one of the most common, one of my clients had anthers torn at every pad change, and in a company service.
2. «Fast is not good», a well-known saying, but there is a great temptation to do everything quickly, get money from the client and take on another car. The approach is wrong, but quite common. When replacing the pads, in any case, it is necessary to check the integrity of all anthers, pay attention to the condition of the bracket guides, the ease and smoothness of its movement. It is desirable, of course, to disassemble and lubricate everything, but in our realities this is rather from the realm of fantasy. But with uneven wear of the pads, this must be done. If the friction layer has worked out as a wedge, this means that one of the guide pins is sticking and it is impossible to postpone the check of the guides until later - it is fraught with failure during braking. Special lubricants that are laid in the moving parts of the brake mechanisms are strictly not recommended to be replaced with something «universal», not tolerant of high temperatures.
Now a little about the timing of replacing pads and discs, «non-original», groove and other elements of the system and related actions. Modern brake pads usually signal wear themselves - either with the help of built-in sensors, or rather primitive but effective ones «squeakers» - metal plates, which, in case of critical wear, reach the brake disc and begin to emit an unpleasant loud squeal. Now you can’t postpone maintenance for a long time, even if you see that the friction layer still seems to be on the pads. It is almost gone, believe me, although visually, it may not look like that. Why? The fact is that those 2-3 mm that you see not yet worked out are not, in fact, a brake layer - this is a special glue on which the friction base is held, and it will slow down badly. In general, this glue is quite powerful in terms of characteristics and is developed by each company but with its own recipes. Judge for yourself what serious shear and pressure loads the block experiences, but this glue is designed for anything, but not for friction work.