



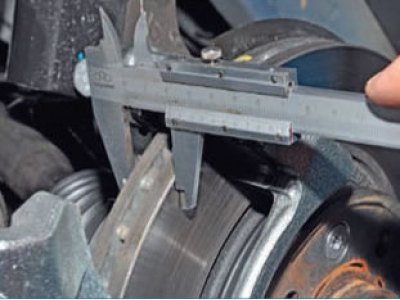
Note: Discs that have grooves, scoring, are completely worn out or warped must be replaced or resurfaced.
Before measuring the axial runout of the disc, make sure that the runout of the front wheel bearing is within the limits specified in the manufacturer's specifications.
Raise and securely support the vehicle on supports. When raising only the front of the vehicle, apply the parking brake and block the rear wheels.
Remove the wheel.
Remove the brake caliper and secure it to a wire outside the work area. Do not disconnect the brake hose, but do not allow the caliper to hang by the hose. For more details see Replacing brake discs.
If the disc comes off the hub easily, install the bolts and tighten them slightly more than finger tight. Make sure that the tightening torque for all nuts is approximately the same.
Install the dial indicator with a magnetic or universal holder on the car body so that the indicator needle touches the side surface of the disk at a distance of about 13 mm from its outer edge.
[Article copied from a web page: www.ladaman.ru]
Set the indicator to "zero". Rotate the disc one full revolution and record the maximum axial runout reading. Compare the obtained value with the one specified for your vehicle.
• If the axial runout value exceeds the maximum allowable value, the disc may need to be reinstalled. If the disc comes off easily enough, remove it, clean the contact surfaces of the disc and hub, and reinstall the disc in a new position. Measure the runout value again. If this time the runout is within the specifications, then the problem is solved. If not, replace or sharpen the disk.
The thickness of the disc significantly affects its ability to withstand heat and provide adequate deceleration force. Each disc has a minimum thickness permitted by the manufacturer.
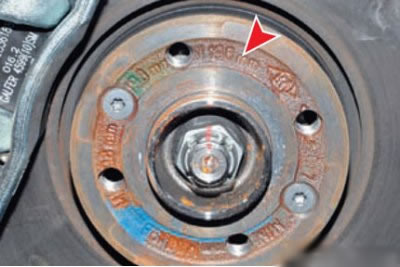
The marking indicating the minimum permissible thickness is indicated on the brake disc itself.
In this case it is 19.8 mm.
This minimum thickness must not exceed the limits specified in the technical requirements. A disc that is thinner than required may crack when braking.
If any part of the disc is less than the minimum thickness, it must be replaced.
Thickness and thickness change can be measured using a micrometer. All measurements must be taken at some distance from the edge of the disc, since the box has a flange. Take measurements at four points symmetrically located on the circumference of the disk, and record the measurement results. Compare them with the minimum values given in the technical requirements. Disc thickness unevenness of more than 0.025 mm may cause brake pedal vibration and/or vibration in the front of the vehicle during braking. A disc that does not meet technical requirements for thickness or uneven thickness must be replaced.
The new disc has a smooth, even surface that changes quickly during operation. Sometimes very fine concentric grooves appear and develop on the surface of the disc (similar to the soundtracks on music records), which are formed as a result of the impact of dust and small solid particles that enter the disc from the brake linings. This slight roughness is quite normal, but if any of the grooves are deep enough to catch a fingernail, the disc should be replaced.
If disc discolouration, metal discoloration, severe rust or even chipping occurs, the disc should be replaced. If anything raises doubts during inspection, replace the disc. The front brakes are a very important system and must be 100% effective.
At the same time as the disc, the brake pads should be replaced, as their surface must be perfect. Since the brake pads are replaced as a set (on both wheels), accordingly, both disks must be replaced, even if only one is damaged.