
Car repair AvtoVAZ Car repair Renault Car repair Hyundai Car repair Ford Car repair Volkswagen Car repair Audi Car repair Chevrolet
English Русский
Български
Беларускі
Український
Српски
Hrvatski
Română
Polski
Slovenský
Magyar
articles sitemap contacts bookmark
LadaMan.ru


Kalina Granta Priora Vesta Largus XRAY
Largus 1 (2012-2023)

Wheel (working) rear cylinder — removal and installation (Largus 1)

  • Main
  • Largus
  • Largus 1
  • Chassis (running gear)
  • Brake system
  • Wheel (working) rear cylinder — removal and installation
0
Contents: Removal ⇣ Installation ⇣
As a result of wear, the seals (arrow) of the working brake cylinders may be damaged. The indicated malfunction can be detected without disassembling the brakes.

With the vehicle raised and securely supported on jack stands, remove the rear wheels and brake drums on both sides. (see here).


Carefully lift the edge of the protective cover away from the body of each brake cylinder.
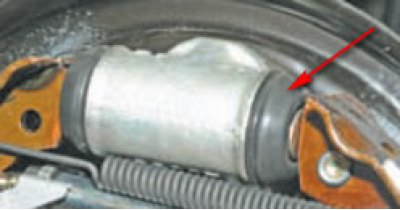
Carefully lift the edge of the protective cover away from the body of each brake cylinder.


Inspect the inner surface of the casing and the edges (edges) of the cylinder. Very slight moisture may be detected (what is normal) in this area (usually covered with dust), but any signs of brake fluid in it indicate the need for immediate repair. A leak, no matter how small, can significantly reduce the braking force on that wheel. It can also allow air to enter the brake system, which in turn causes a phenomenon known as a "soft" brake pedal.

Removal


Jack up or place the car on a two-post lift (jack, wheel chocks), turn off the ignition, engage first gear.

Remove the rear wheels.

Release the hand brake lever.

Remove the brake drum. (see here).

Remove the guide springs while keeping the spacer bar in contact with the brake shield (flat head screwdriver, pliers).


Remove the upper tension spring (brake spring pliers).

Disconnect the automatic clearance adjustment spring from the shoe (flat head screwdriver, pliers).

Move the brake pads apart.
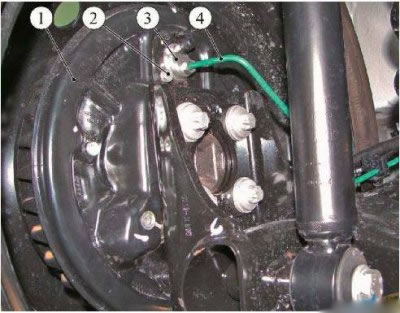
Figure 15-1 - Removing the rear brake wheel cylinder: 1 - rear brake shield; 2 - wheel cylinder…

Figure 15-1 - Removing the rear brake wheel cylinder: 1 - rear brake shield; 2 - wheel cylinder mounting bolt; 3 - rear brake wheel cylinder; 4 - brake pipe


Unscrew the fitting for fastening the brake pipe 4, Figure 15-1, to the wheel cylinder of the rear brake and install plugs on the brake pipe and in the hole of the wheel cylinder (brake pipe wrench, technological plugs).
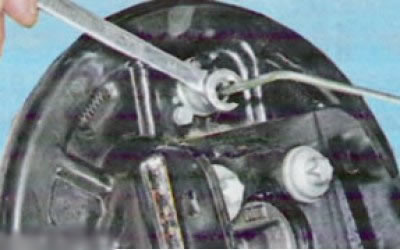
Unscrew the fitting for fastening the brake pipe 4, Figure 15-1, to the wheel cylinder of the rear…


Caution: Proceed with caution, using the appropriate key to disconnect the fitting. This fitting is usually rusty or dirty, requiring a lot of effort to remove. Do not damage the main line.


Helpful advice: After prolonged use, the brake pipe nut "grows together" with the pipe into one whole, and when you try to unscrew the nut, the pipe twists and breaks. In this case, just loosen the tube nut a little, then unscrew the cylinder mounting bolt and disconnect it from the tube by unscrewing the cylinder from its nut. After disconnecting the cylinder from the tube, the mobility of the released nut can be restored by wetting it with brake fluid and turning the nut with a wrench alternately in both directions.


Loosen bolt 2 securing wheel cylinder 3 to rear brake shield 1.
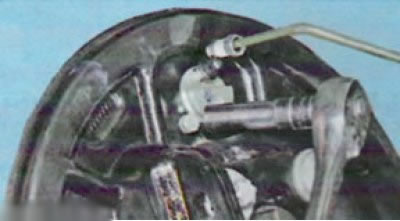
Loosen bolt 2 securing wheel cylinder 3 to rear brake shield 1.


...and remove the cylinder (replacement head 10, extension, ratchet wrench).
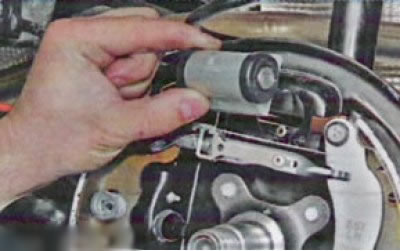
...and remove the cylinder (replacement head 10, extension, ratchet wrench).


Installation


Clean the rear brake components (metal brush).


Install the wheel cylinder onto the rear brake shield and secure it with a bolt. Bolt tightening torque 14 Nm (1.4 kgf·m) (replacement head 10, extension, ratchet wrench, torque wrench).

Remove the plugs from the holes in the wheel cylinder and brake pipe and screw the brake pipe nipple into the hole in the wheel cylinder. Tightening torque of the nipple 14 Nm (1.4 kgf·m) (brake pipe wrench, replaceable insert, torque wrench).

Hook the spring of the automatic clearance adjustment mechanism to the shoe (flat head screwdriver, pliers).

Install the upper tension spring (brake spring pliers).

Install the guide springs while keeping the spacer bar in contact with the brake shield (flat head screwdriver, pliers).

Check the outside diameter of the brake pads and adjust if necessary.

Install the brake drum.

Install the rear wheel.

Bleed the brake system and, if necessary, the clutch hydraulic drive. (see here).

Check the efficiency of the service brake system.


This article is available at russian, bulgarian, belarusian, ukrainian, serbian, croatian, romanian, polish, slovak, hungarian
This article has been reviewed: Daniil Markelov
Share with friends:
◀ Previous
Lada Largus 1: Brake system
Next ▶

Rear drum brake shoes — removal and installation
Rear brake drum — removal, inspection and installation
Front Brake Disc Cover — Removal and Installation
Checking brake discs
Front Brake Disc — Removal, Installation and Checking
Rear Brake Pressure Regulator — Removal, Installation and Adjustment
Handbrake lever — removal, installation and adjustment
Handbrake cable — removal, installation and adjustment
Brake pipes — removal and installation
Flexible brake hoses of brake mechanisms — removal installation
More articles with information from manuals for Lada:

• Rear Wheel Hub Bearing — Replacement Lada Kalina Hatchback (2004-2013, VAZ-1119)
• Rear Wheel Hub Bearing — Replacement Lada Granta 1 (2011-2023, VAZ-2190)
• Removal and installation the rear wheel brake drum Lada Priora 1 (2007-2018, VAZ-2170)
• Rear Wheel Hub Bearing — replacement Lada Vesta 1 (2015-2023, VAZ-2180)
• Rear Brake Wheel Cylinder — removal and installation Lada X-Ray 1 (2015-2022)
Link to this article in various formats
Reviews and comments of visitors
No comments yet


Add up two numbers: 35 + 15


Largus 1 (2012-2023) 
  • General information
  • Vehicle device
  • User manual
  • Maintenance
  • Power unit
  • Engine repair
  • Cooling and lubrication system
  • Supply system
  • Ignition system
  • Exhaust system
  • Spare parts catalog
  • Transmission
  • Clutch
  • Car gearbox
  • Drive shafts
  • Spare parts catalog
  • Chassis (running gear)
  • Suspension and wheels
  • Steering
  • Brake system
  • Spare parts catalog
  • Body and interior
  • Exterior (external elements)
  • Interior (internal elements)
  • Doors, locks and windows
  • Heating and ventilation
  • Spare parts catalog
  • Electrical equipment
  • Equipment and devices
  • Power devices
  • Lighting and signaling
  • Spare parts catalog
  • Electrical circuits
LadaMan.ru © 2018–2026 | Mobile version | About Lada | Sitemap: EN BG BY UA RS HR RO PL SK HU | Contacts with admin | | Add to bookmarks
Kalina Hatchback (2004-2013) | Kalina Sedan (2004-2013) | Granta 1 (2011-2023) | Priora 1 (2007-2018) | Vesta 1 (2015-2023) | Largus 1 (2012-2023) | X-Ray 1 (2015-2022) |
This site uses cookies to ensure everything runs smoothly.