
Car repair AvtoVAZ Car repair Renault Car repair Hyundai Car repair Ford Car repair Volkswagen Car repair Audi Car repair Chevrolet
English Русский
Български
Беларускі
Український
Српски
Hrvatski
Română
Polski
Slovenský
Magyar
articles sitemap contacts bookmark
LadaMan.ru


Kalina Granta Priora Vesta Largus XRAY
Priora 1 (2007-2018, VAZ-2170)

Removal and installation the rear wheel brake drum (Priora 2170)

  • Main
  • Priora
  • Priora 1
  • Chassis (running gear)
  • Brake system
  • Removal and installation the rear wheel brake drum
0
The maximum permissible diameter of the drum working surface is 201.5 mm. Replace the drum if the diameter is greater than or equal to the maximum permissible value.

There should be no burrs or deep scratches on the working surface of the drum. Otherwise, replace…


There should be no burrs or deep scratches on the working surface of the drum. Otherwise, replace the drum or machine its working surface.

After turning, sand the surface with fine-grained abrasive bars; after processing, the drum diameter should not exceed 201 mm.

Replace the drum if cracks are found.

You will need: a 7 mm wrench, two mounting blades, a hammer, and a wooden spacer.

1. Engage 1st gear and place chocks under the front wheels.

2. Make sure the parking brake lever is fully depressed (the car is released).

3. Remove the rear wheel and clean the brake drum from dirt.
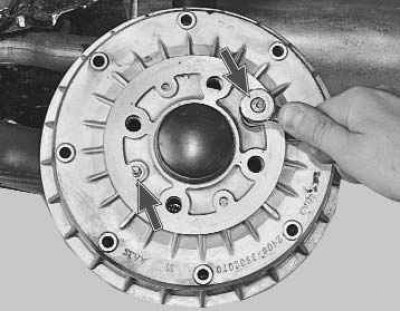
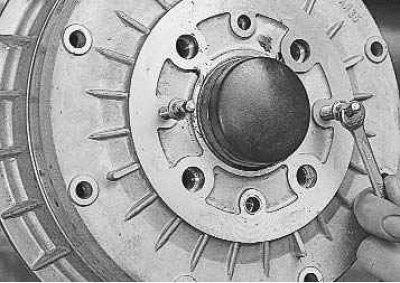
4. Using a 7 mm spanner, unscrew the two mounting pins.


4. Using a 7 mm spanner, unscrew the two mounting pins.


5. Apply a liquid such as WD-40 to the hub and, after waiting a few minutes, clean off any dirt or rust from the area.
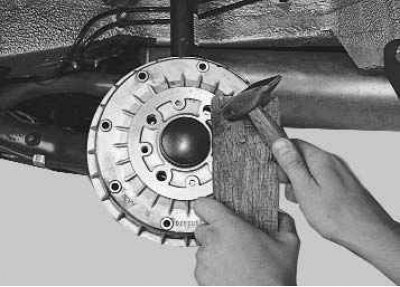
6. Using a hammer and a wooden spacer, loosen the drum from the hub.
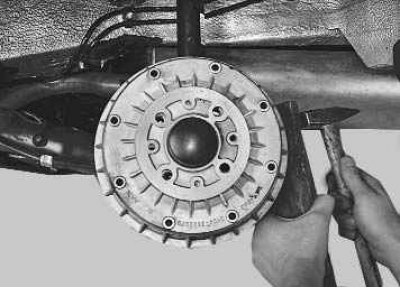

6. Using a hammer and a wooden spacer, loosen the drum from the hub.

7. Remove the drum from the hub. If this fails, knock it down with a hammer, striking it through a…


7. Remove the drum from the hub. If this fails, knock it down with a hammer, striking it through a wooden spacer on the flange on the back side of the drum...
8. ...or press by evenly driving pins or suitable bolts into the two threaded holes of the drum.
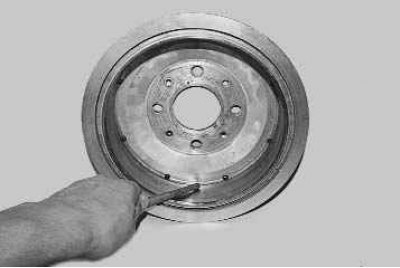

8. ...or press by evenly driving pins or suitable bolts into the two threaded holes of the drum.


9. When installing the old drum, use a file to remove the ridge on its working surface that has…


9. When installing the old drum, use a file to remove the ridge on its working surface that has formed as a result of wear.
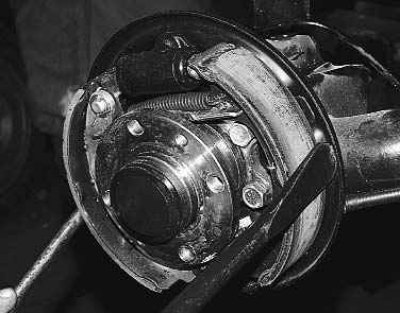
10. Install the drum in the reverse order of removal. First, lubricate the hub seat belt with…


10. Install the drum in the reverse order of removal. First, lubricate the hub seat belt with graphite grease or LSC-15 grease and bring the pads together using two mounting blades.

11. Check the ease of rotation of the wheel. Slight contact of the drum with the pads is permitted. With the vehicle on the ground, press the brake pedal two or three times to bring the shoes to the drum.


This article is available at russian, bulgarian, belarusian, ukrainian, serbian, croatian, romanian, polish, slovak, hungarian
This article has been reviewed: Vladislav Voloshin
Share with friends:
◀ Previous
Lada Priora 1: Brake system
Next ▶

Removal and installation the front brake slave cylinder
Removal and installation the front wheel brake disc
Replacing the brake pads of the front wheel brake mechanism
Removal and installation the master brake cylinder
Removal and installation the brake master cylinder reservoir
Replacing the brake pads of the rear wheel brake mechanism
Replacing the rear brake slave cylinder
Removal and installation the pressure regulator
Adjusting the pressure regulator drive
Replacing the front brake hoses
More articles with information from manuals for Lada:

• Removal and installation the rear wheel brake drum Lada Kalina Sedan (2004-2013, VAZ-1118)
• Rear wheel brake mechanism Lada Granta 1 (2011-2023, VAZ-2190)
• Rear Wheel Hub Bearing — replacement Lada Vesta 1 (2015-2023, VAZ-2180)
• Rear brake drum — removal, inspection and installation Lada Largus 1 (2012-2023)
• Rear brake drum — checking technical condition Lada X-Ray 1 (2015-2022)
Link to this article in various formats
Reviews and comments of visitors
No comments yet


Add up two numbers: 11 + 37


Priora 1 (2007-2018) 
  • General information
  • Vehicle device
  • User manual
  • Faults en route
  • Maintenance
  • Power unit
  • Engine repair
  • Cooling and lubrication system
  • Supply system
  • Exhaust system
  • Transmission
  • Clutch
  • Car gearbox
  • Drive shafts
  • Chassis (running gear)
  • Car suspension
  • Steering
  • Brake system
  • Body and interior
  • Exterior (external elements)
  • Interior (internal elements)
  • Doors, locks and windows
  • Electrical equipment
  • Equipment and devices
  • Power devices
  • Lighting and signaling
  • Cooling and heating
  • Electrical circuits
LadaMan.ru © 2018–2026 | Mobile version | About Lada | Sitemap: EN BG BY UA RS HR RO PL SK HU | Contacts with admin | | Add to bookmarks
Kalina Hatchback (2004-2013) | Kalina Sedan (2004-2013) | Granta 1 (2011-2023) | Priora 1 (2007-2018) | Vesta 1 (2015-2023) | Largus 1 (2012-2023) | X-Ray 1 (2015-2022) |
This site uses cookies to ensure everything runs smoothly.