



Removal
Place the vehicle on a two-post lift, apply the parking brake and turn off the ignition.
Remove the front wheel.
Raise the vehicle to a height convenient for performing work.
Clean the front brake parts (metal brush).
Remove the front brake hose.
For LADA LARGUS R90 cars with K7M engine
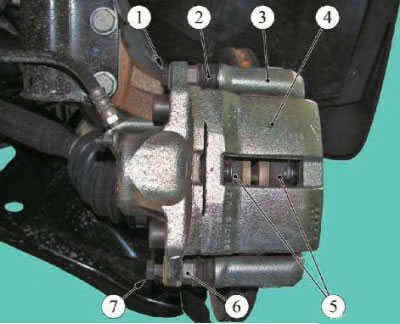
Figure 8-1 - Front Brake Caliper: 1, 7 - guide pin mounting bolts; 2 - protective cover for the guide pin; 3 - front brake guide; 4 - support; 5 - brake pads; 6 - guide pin
Loosen and remove bolts 1 and 7, Figure 8-1, securing the guide pins, holding the guide pins 6 with a wrench (spanner 17, replaceable head 13, ratchet wrench).
Remove the front brake caliper.
For LADA LARGUS R90 cars with K4M engine and LADA LARGUS F90 cars
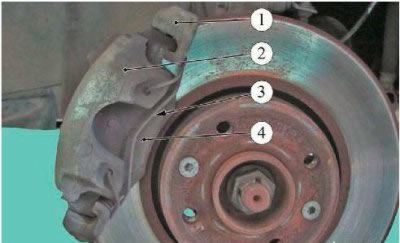
Figure 8-3: 1 - front brake guide; 2 - support; 3 - caliper spring; 4 - brake pads
Remove spring 3, Figure 8-3 from the holes in front brake caliper 2 (flat head screwdriver, pliers).
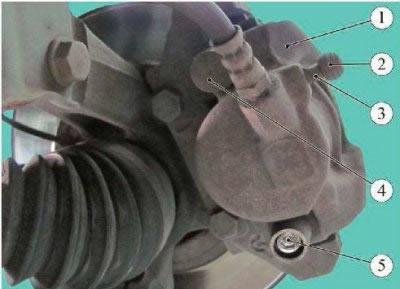
Figure 8-4: 1 - support; 2 - protective cap of the bleed nipple; 3 - bleed nipple; 4 - Protective cap of the guide pin; 5 - guide pin
Remove protective caps 4, Figure 8-4, from the guide pin wells (flat head screwdriver).
Unscrew and remove guide pins 5 (replaceable attachment with external hexagon 7 type "INHEX" 03 05 00 07 f. "Stahlwille", ratchet wrench).
Remove the front brake caliper.
Repair
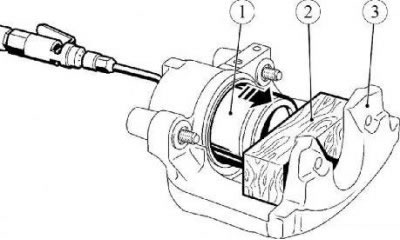
Figure 9-1 - Front Brake Caliper: 1 - piston; 2 - technological gasket; 3 - support
Remove the piston dust cap.
Remove piston 1, Figure 9-1, from the cylinder by forcing a stream of compressed air through the hole for connecting the brake hose, having first inserted a wooden lining 2 between the caliper and the piston to avoid damaging the piston (air gun, technological gasket).
Remove sealing ring 1 from the cylinder groove, Figure 9-2 (flat head screwdriver with rounded tip).
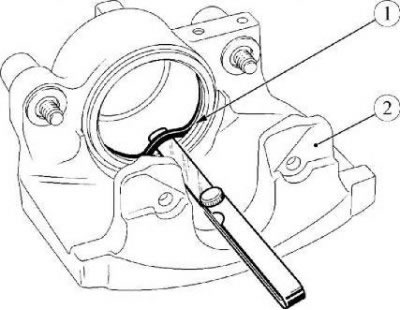
Figure 9-2 - Replacing the O-ring: 1 - sealing ring; 2 - support
Caution: If there are scratches or other damage on the piston skirt or cylinder mirror, replace the caliper assembly.
Wash the caliper parts with white spirit (wiping cloth, white spirit cleaning liquid).
Install a new sealing ring into the cylinder groove.
Apply 1.5 g of Castrol S-058 or PFG-111 grease to the piston skirt and the inside of the protective cap, insert the piston into the cylinder and move it inward until it stops. Install the protective cap (Castrol S-058 or PFG-111 grease according to the current "Codifier of main and auxiliary materials used in maintenance and repair of LADA vehicles" K 3100.25100.00018).
Installation
For LADA LARGUS R90 cars with K7M engine
Attention. After removal, bolts 1, 7, Figure 8-1, fastening the guide pins must be replaced, since the bolts are fixed with an adhesive compound applied to the threaded surface of the bolts. Reuse of bolts is not permitted.
Install the front brake caliper on the guide and secure it with new guide pin mounting bolts, after applying adhesive to the threaded surface of the bolts "FRENETANCHE" in the amount of 1 g for each bolt. Tightening torque of bolts 34 N·m (3.4 kgf·m) (spanner 17, replaceable head 13, ratchet wrench, torque wrench, glue "FRENETANCHE" part number 77 11 236 471).
For LADA LARGUS R90 cars with K4M engine and LADA LARGUS F90 cars
Install the front brake caliper onto the guide and secure it with the guide pins. Tightening torque of guide pins 28 Nm (2.8 kgf·m) (replaceable nozzle with external hexagon 7 type "INHEX" 03 05 00 07 f. "Stahlwille", ratchet wrench, torque wrench).
Install protective caps into the guide pin wells.
Install the spring into the caliper holes (pliers, flat screwdriver).
Install the front brake hose.
Install the front wheel.
Bleed the brake system and, if necessary, the clutch hydraulic drive.
(Article copied from a web page: LADAman.ru)
Check the efficiency of the service brake system.
Addition
The caliper body is made from a cast blank, making it the most reliable component. Even when recycled (restoration), which is the norm in developed countries, the support most often retains its properties. In Russia, by the way, it is also common to restore calipers, but most often using homemade methods.
However, this thing is reliable, and most problems are related to the moving parts of the part. Floating structures are especially guilty of this, where the weakest link is the guide pins.
It makes sense to make it a rule to combine every second replacement of brake pads with preventive maintenance of the calipers. By prevention we mean a close inspection of the guide pins and checking the mobility of the guide bracket (in floating structures), check the brake cylinders, be sure to check the integrity of all dust boots, seals and cuffs. And if there is a defect in at least one of these points, repairs must be carried out.
Moreover, today you can find a repair kit for almost every caliper; both original kits and kits from famous manufacturers of decent quality are available.
Using repair kits also solves jammed guides (just don't forget to clean them thoroughly first, or better yet, replace them with new ones, they are also available for sale), and sticking pistons (pistons can also be found separately), and individual problems with the hydraulic circuit, although, as practice shows, problems with the hydraulic system arise extremely rarely.
The main thing, we repeat, is to regularly check the integrity of the dust boots and other "rubber bands". Dirt, moisture and wear products getting through cracks can kill the components of the caliper in a few days. And even if the finger moves normally today, tomorrow it will "grab" tightly due to a crack in the boot. As a result, the pad will stop pressing, the disk will overheat and the penny boot will cause expensive repairs or an accident.
Caliper lubrication
The most important point regarding caliper maintenance is lubrication. The guide pins must be treated only with a special lubricant. Since the caliper operates at high temperatures, the most popular mineral oil-based lubricants are not suitable - they will melt and run off.
It is forbidden to use not only lithol or solidol, but even ceramic and copper lubricants, since they all damage the rubber: the anthers lose their adhesion properties. Therefore, only special lubricants intended for calipers are used.
By following all these recommendations and performing the steps described above, you will ensure that your brakes will function for the full service life.