
Car repair AvtoVAZ Car repair Renault Car repair Hyundai Car repair Ford Car repair Volkswagen Car repair Audi Car repair Chevrolet
English Русский
Български
Беларускі
Український
Српски
Hrvatski
Română
Polski
Slovenský
Magyar
articles sitemap contacts bookmark
LadaMan.ru


Kalina Granta Priora Vesta Largus XRAY
Kalina Sedan (2004-2013, VAZ-1118) Kalina Hatchback (2004-2013, VAZ-1119)

Tailgate — Removal and Installation (Kalina 1119)

  • Main
  • Kalina
  • Kalina Hatchback
  • Body and interior
  • Exterior (external elements)
  • Tailgate — Removal and Installation
0
Contents: Removal ⇣ Installation ⇣
Note: This is a labor-intensive job and should only be done as a last resort. Power is supplied to the door electrical equipment via two wire harnesses laid along the rear pillars. To remove the door from the car, it is necessary to remove both wire harnesses from its internal cavities. To do this, you will have to remove the ends of all the wires from the junction blocks. You can cut the wires and connect them during assembly by putting plug connectors on their bare ends. The door can be removed as an assembly, and the door wiring harnesses can be removed from the passenger compartment through the holes in the body. To do this, you need to remove the pads from the rear pillars of the body, disconnect and disassemble the door wiring harness connectors. The work is shown with partial disassembly of the door.


An assistant will be needed to complete the job.

Removal


1. Remove the door trim (see "Tailgate Trim - Removal and Installation").

Tip: Remember how the wire harnesses are laid in the door, use a marker or an awl to mark the colors of the wires on all the connector blocks. This will make assembly easier.


2. Remove the rear window wiper (see "Rear Window Wiper - Removal and Installation").

3. Disconnect the wiring block from the door lock (see "Tailgate Lock - Removal, Installation and Adjustment")

4. Disconnect the wires from the license plate lights.

5. Disconnect the ends of the two wires from the rear window heating element (see "Rear window - removal and installation").

6. Remove the additional brake light (see "Additional brake light - removal and installation").


7. Disconnect the wire harness holders from the door panel.
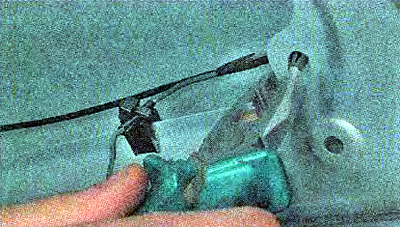
7. Disconnect the wire harness holders from the door panel.


8. Having straightened the metal paper clip, we press the two fixing protrusions of the terminal and pull the wire tip out of the block connected to the windshield wiper.
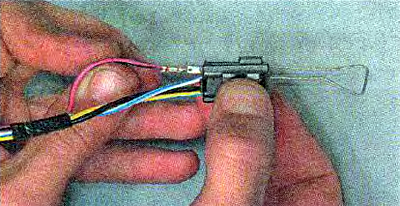
8. Having straightened the metal paper clip, we press the two fixing protrusions of the terminal…


9. Similarly, we disconnect all the wires from the block and disassemble the other blocks.

10. After unwinding or cutting the insulating tape, we separate the door wire harness into two branches.

11. Remove the rear window washer nozzle (see "Windscreen washer nozzles - replacement").

Tip: If the door is to be reinstalled on the vehicle, tie strong cords to the wires before removing them from the door. When assembling, the cords will allow you to run the wires inside the door. You can do the same with the windshield washer tube, attaching a cord or wire to its end using insulating tape or scotch tape.
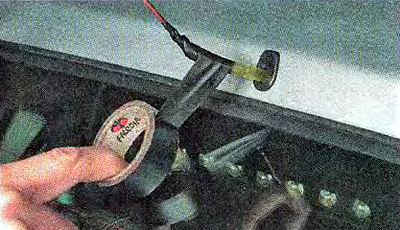


Tip: If the door is to be reinstalled on the vehicle, tie strong cords to the wires before removing…


After removing the wires and tube, do not forget to untie the cords, which should remain in the doors.

12. Remove the protective cover from the door opening and pull out the right branch of the wiring harness together with the windshield washer tube.
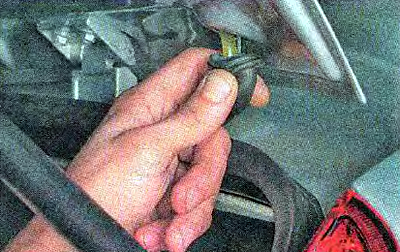
12. Remove the protective cover from the door opening and pull out the right branch of the wiring…


13. Similarly, remove the left branch of the wiring harness from the door.

14. Using a wooden strip, disconnect the gas struts from the door (see "Gas door struts - removal and installation").

Warning! Further operations are performed with an assistant, who must perform similar actions on the other side of the door.


15. Holding the door, use an 8 mm socket wrench to unscrew the two bolts securing the door to the hinge.
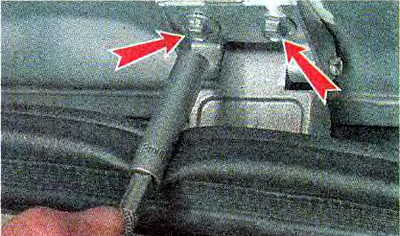
15. Holding the door, use an 8 mm socket wrench to unscrew the two bolts securing the door to the…


16. Remove the stand and remove the door from the car.
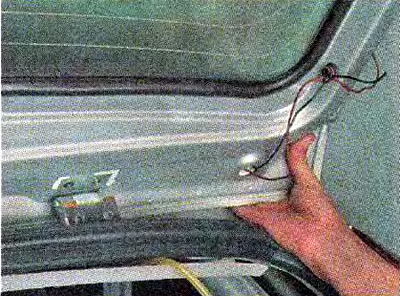


16. Remove the stand and remove the door from the car.


(The original was published on the portal: «LadaMan.ru»)

Note: Do not detach the hinges from the body unless absolutely necessary. The hinge mounting nuts are covered by the headlining, which is glued to the body.


Installation


We install the door in reverse order. When installing a new door, we pull the wires using copper or thin wire (diameter 0.8-1.0 mm) steel wire. We connect the wires in accordance with the marks made, or according to the vehicle's electrical equipment diagram.


This article is available at russian, bulgarian, belarusian, ukrainian, serbian, croatian, romanian, polish, slovak, hungarian
This article has been reviewed: Polina Kudryashova
Share with friends:
◀ Previous
Lada Kalina Hatchback: Exterior (external elements)
 

Rear glass — replacement
Tailgate Lock — Removal, Installation and Adjustment
Door lock switch (cylinder) — removal and installation
Tailgate Trim — Removal and Installation
Gas door struts — replacement
 
More articles with information from manuals for Lada:

• Trunk lid/tailgate Lada Granta 1 (2011-2023, VAZ-2190)
• Removal the left tailgate handle Lada Largus 1 (2012-2023)
• Adjusting the operation of front and rear door locks, hood, tailgate Lada X-Ray 1 (2015-2022)
Link to this article in various formats
Reviews and comments of visitors
No comments yet


Add up two numbers: 45 + 18


Kalina Sedan (2004-2013) 
  • General information
  • Vehicle device
  • Operation and maintenance
  • Faults en route
  • Power unit
  • Engine repair
  • Cooling and lubrication system
  • Exhaust system
  • Supply system
  • Ignition and control
  • Transmission
  • Clutch and drive shafts
  • Car gearbox
  • Chassis (running gear)
  • Front suspension
  • Rear suspension
  • Steering
  • Brake system
  • Body and interior
  • Exterior (external elements)
  • Interior (internal elements)
  • Doors, locks and windows
  • Electrical equipment
  • Equipment and devices
  • Power devices
  • Lighting and signaling
  • Heating and ventilation
Kalina Hatchback (2004-2013) 
  • General information
  • Vehicle Details
  • Maintenance
  • Troubleshooting
  • Power unit
  • Engine repair
  • Cooling system
  • Supply system
  • Control system
  • Exhaust system
  • Transmission
  • Clutch
  • Car gearbox
  • Drive shafts
  • Chassis (running gear)
  • Wheels and tires
  • Front suspension
  • Rear suspension
  • Steering
  • Brake system
  • Body and interior
  • Exterior (external elements)
  • Interior (internal elements)
  • Doors, locks and windows
  • Electrical equipment
  • Equipment and devices
  • Power devices
  • Lighting and signaling
  • Electrical circuits
LadaMan.ru © 2018–2026 | Mobile version | About Lada | Sitemap: EN BG BY UA RS HR RO PL SK HU | Contacts with admin | | Add to bookmarks
Kalina Hatchback (2004-2013) | Kalina Sedan (2004-2013) | Granta 1 (2011-2023) | Priora 1 (2007-2018) | Vesta 1 (2015-2023) | Largus 1 (2012-2023) | X-Ray 1 (2015-2022) |
This site uses cookies to ensure everything runs smoothly.