Car repair AvtoVAZ Car repair Renault Car repair Hyundai Car repair Ford Car repair Volkswagen Car repair Audi Car repair Chevrolet
English Русский
Български
Беларускі
Український
Српски
Hrvatski
Română
Polski
Slovenský
Magyar
articles sitemap contacts bookmark
LadaMan.ru


Kalina Granta Priora Vesta Largus XRAY
Kalina Sedan (2004-2013, VAZ-1118) Kalina Hatchback (2004-2013, VAZ-1119)

Removal and installation a telescopic stand (Kalina 1118)

  • Main
  • Kalina
  • Kalina Sedan
  • Chassis (running gear)
  • Front suspension
  • Removal and installation a telescopic stand
0
To remove and install a telescopic strut on a car, you will need: 13, 17, 19 keys, a 19 key and socket.

1. Brake the vehicle with the parking brake and install the anti-rollback stops ("shoes") under the rear wheels. Raise the front of the car with a jack and place it on supports. Remove the wheel from the car.

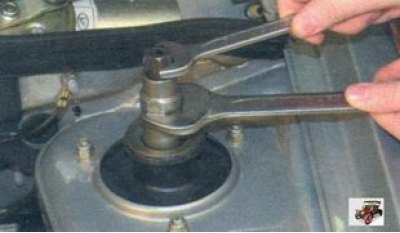
2. Place a wrench on the upper support mounting nut to loosen the nut.

3. Install a wrench to hold the shock absorber rod from turning.

3. Install a wrench to hold the shock absorber rod from turning.


4. Loosen the nut while holding the shock absorber rod from turning.

4. Loosen the nut while holding the shock absorber rod from turning.


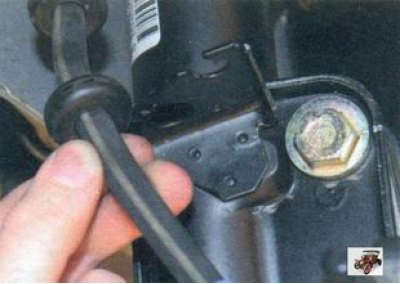
5. In the wheel well, remove the brake hose from the bracket on the telescopic strut. 6. Disconnect the steering rod from the steering arm (see "Removal, installation of the outer tie rod end and replacement of the ball joint protective boot").


7. Place marks on the eccentric washer and the strut to indicate the position of the adjusting bolt relative to the telescopic struts. This will help to maintain approximately the same wheel alignment when installing the telescopic strut.

7. Place marks on the eccentric washer and the strut to indicate the position of the adjusting bolt…


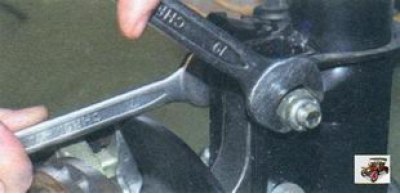
8. Loosen the nut of the adjusting (upper) bolt securing the telescopic strut to the steering knuckle and remove the bolt together with the eccentric washer.

9. In the same way, unscrew the nut of the lower bolt securing the telescopic strut to the steering knuckle and remove the bolt.

10. Disconnect the steering knuckle from the telescopic strut.

10. Disconnect the steering knuckle from the telescopic strut.


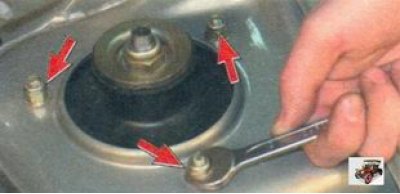
11. In the engine compartment of the car, unscrew the three nuts of the upper mount of the telescopic strut and remove the telescopic strut through the wheel well.


11. In the engine compartment of the car, unscrew the three nuts of the upper mount of the…


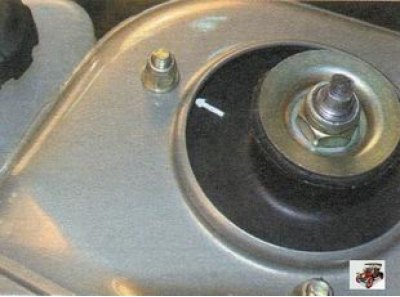
12. Install the telescopic strut on the vehicle in the reverse order of removal. Please note the position of the upper support of the telescopic strut: the arrow on the surface of the support must point forward in the direction of vehicle travel. When installing an old telescopic strut on a vehicle, tighten the eccentric washer in accordance with the previously made marks and, holding the adjusting bolt in this position from turning, tighten the mounting nut. After installation, check and adjust wheel alignment if necessary.


This article is available at russian, bulgarian, belarusian, ukrainian, serbian, croatian, romanian, polish, slovak, hungarian
This article has been reviewed: Daniil Markelov
Share with friends:
◀ Previous
Lada Kalina Sedan: Front suspension
Next ▶

Checking the technical condition of the front suspension parts
Front suspension faults, their causes and solutions
Features of the front suspension design
Disassembly and repair of a telescopic stand
Replacing the ball joint
Replacing the front suspension arm
Replacing the stretcher and the stretcher mounting bracket
Replacement of anti-roll bar components
More articles with information from manuals for Lada:

• Removal and installation the front telescopic strut Lada Priora 1 (2007-2018, VAZ-2170)
• Front suspension telescopic strut — removal and installation Lada X-Ray 1 (2015-2022)
Link to this article in various formats
Reviews and comments of visitors
No comments yet


Add up two numbers: 41 + 43


Kalina Sedan (2004-2013) 
  • General information
  • Vehicle device
  • Operation and maintenance
  • Faults en route
  • Power unit
  • Engine repair
  • Cooling and lubrication system
  • Exhaust system
  • Supply system
  • Ignition and control
  • Transmission
  • Clutch and drive shafts
  • Car gearbox
  • Chassis (running gear)
  • Front suspension
  • Rear suspension
  • Steering
  • Brake system
  • Body and interior
  • Exterior (external elements)
  • Interior (internal elements)
  • Doors, locks and windows
  • Electrical equipment
  • Equipment and devices
  • Power devices
  • Lighting and signaling
  • Heating and ventilation
Kalina Hatchback (2004-2013) 
  • General information
  • Vehicle Details
  • Maintenance
  • Troubleshooting
  • Power unit
  • Engine repair
  • Cooling system
  • Supply system
  • Control system
  • Exhaust system
  • Transmission
  • Clutch
  • Car gearbox
  • Drive shafts
  • Chassis (running gear)
  • Wheels and tires
  • Front suspension
  • Rear suspension
  • Steering
  • Brake system
  • Body and interior
  • Exterior (external elements)
  • Interior (internal elements)
  • Doors, locks and windows
  • Electrical equipment
  • Equipment and devices
  • Power devices
  • Lighting and signaling
  • Electrical circuits
LadaMan.ru © 2018–2026 | Mobile version | About Lada | Sitemap: EN BG BY UA RS HR RO PL SK HU | Contacts with admin | | Add to bookmarks
Kalina Hatchback (2004-2013) | Kalina Sedan (2004-2013) | Granta 1 (2011-2023) | Priora 1 (2007-2018) | Vesta 1 (2015-2023) | Largus 1 (2012-2023) | X-Ray 1 (2015-2022) |
This site uses cookies to ensure everything runs smoothly.