
Car repair AvtoVAZ Car repair Renault Car repair Hyundai Car repair Ford Car repair Volkswagen Car repair Audi Car repair Chevrolet
English Русский
Български
Беларускі
Український
Српски
Hrvatski
Română
Polski
Slovenský
Magyar
articles sitemap contacts bookmark
LadaMan.ru


Kalina Granta Priora Vesta Largus XRAY
Vesta 1 (2015-2023, VAZ-2180)

Checking the front brake mechanism (Vesta 2180)

  • Main
  • Vesta
  • Vesta 1
  • Chassis (running gear)
  • Brake system
  • Checking the front brake mechanism
0
To complete the work you will need a caliper.

Sequence of execution


1. Prepare the car for work (see "Preparing the car for maintenance and repair").

2. Remove the front wheel (see "Wheel replacement").

3. Through the inspection hole in the movable bracket of the caliper, we determine the thickness of the brake pad linings.
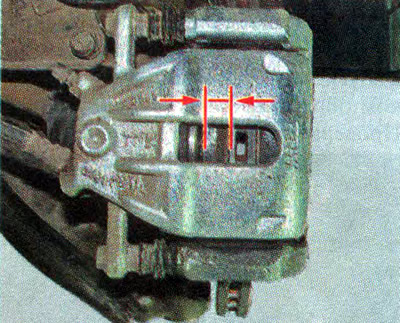
3. Through the inspection hole in the movable bracket of the caliper, we determine the thickness of…


4. We check the mobility of the brake cylinder pistons by spreading the pads with a slotted screwdriver.
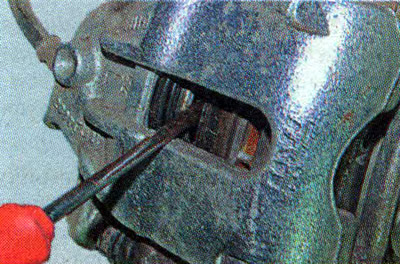
4. We check the mobility of the brake cylinder pistons by spreading the pads with a slotted…


Note: If the thickness of the friction lining of at least one pad is less than 1.5 mm, replace all four brake pads of the brake mechanisms of the right and left wheels (see "Front brake pads - replacement"). If the piston "sticks", replace the working cylinder (see, "Front brake caliper - removal, repair and installation").


5. Using a caliper, measure the thickness of the brake disc, which should not be less than 19.8 mm. If the disc is significantly worn, ridges form on its outer edges, which prevent accurate measurements. In this case, the measurement is performed with a micrometer...
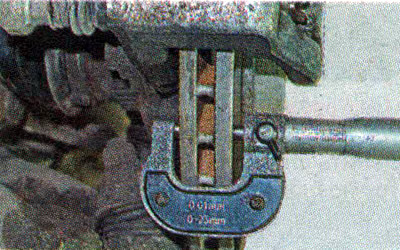
5. Using a caliper, measure the thickness of the brake disc, which should not be less than 19.8 mm.…


...or we reduce the flange with a file.

Warning! A damaged or worn disc must be replaced together with the second front brake disc (see "Front brake discs - replacement").


6. By successively bending the brake hose along its entire length, we make sure there are no cracks.
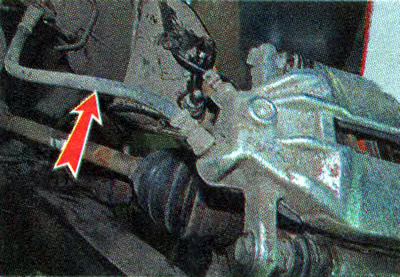
6. By successively bending the brake hose along its entire length, we make sure there are no cracks.


We also visually check that there are no cuts or other mechanical damage on the hose.

Warning! Damaged hoses may burst and must be replaced (see "Brake hoses - replacement").


Recommendation. Before installing the wheel, treat the working surface of the brake disc with a special compound - brake cleaner.


7. Install the wheel on the hub and secure it with bolts, tightening them to a torque of 105 Nm.

8. We check the brake mechanism of the other front wheel in the same way.

9. After completing the check, press the brake pedal several times to bring the pads to the brake disc.


This article is available at russian, bulgarian, belarusian, ukrainian, serbian, croatian, romanian, polish, slovak, hungarian
This article has been reviewed: Kirill Dementyev
Share with friends:
◀ Previous
Lada Vesta 1: Brake system
Next ▶

Checking the service brake system drive
Checking the brake fluid level
Description of the brake system design
Basic data for monitoring, adjustment and maintenance
Checking the rear brake mechanism
Checking the parking brake system
Hydraulic brake drive — bleeding
Replacing brake fluid
Master Brake Cylinder — replacement
More articles with information from manuals for Lada:

• Checking the technical condition of the front wheel drives Lada Kalina Hatchback (2004-2013, VAZ-1119)
• Checking the technical condition of the front wheel drives Lada Granta 1 (2011-2023, VAZ-2190)
• Replacing the brake pads of the front wheel brake mechanism Lada Priora 1 (2007-2018, VAZ-2170)
• Front Brake Disc — Removal, Installation and Checking Lada Largus 1 (2012-2023)
• Front brake disc — checking technical condition Lada X-Ray 1 (2015-2022)
Link to this article in various formats
Reviews and comments of visitors
No comments yet


Add up two numbers: 19 + 19


Vesta 1 (2015-2023) 
  • General information
  • Governing bodies
  • User manual
  • Maintenance
  • Troubleshooting
  • Power unit
  • Engine repair
  • Control system
  • Supply system
  • Cooling system
  • Exhaust system
  • Transmission
  • Clutch
  • Mechanical gearbox
  • Automatic gearbox
  • Drive shafts
  • Chassis (running gear)
  • Wheels, tires and hubs
  • Front suspension
  • Rear suspension
  • Steering
  • Brake system
  • Body and interior
  • Exterior (external elements)
  • Doors, locks and windows
  • Heating and ventilation
  • Electrical equipment
  • Equipment and devices
  • Power devices
  • Breakers and switches
  • Lighting and signaling
  • Electrical circuits
LadaMan.ru © 2018–2026 | Mobile version | About Lada | Sitemap: EN BG BY UA RS HR RO PL SK HU | Contacts with admin | | Add to bookmarks
Kalina Hatchback (2004-2013) | Kalina Sedan (2004-2013) | Granta 1 (2011-2023) | Priora 1 (2007-2018) | Vesta 1 (2015-2023) | Largus 1 (2012-2023) | X-Ray 1 (2015-2022) |
This site uses cookies to ensure everything runs smoothly.