
Car repair AvtoVAZ Car repair Renault Car repair Hyundai Car repair Ford Car repair Volkswagen Car repair Audi Car repair Chevrolet
English Русский
Български
Беларускі
Український
Српски
Hrvatski
Română
Polski
Slovenský
Magyar
articles sitemap contacts bookmark
LadaMan.ru


Kalina Granta Priora Vesta Largus XRAY
X-Ray 1 (2015-2022)

Front brake disc — checking technical condition (XRAY 1)

  • Main
  • XRAY
  • X-Ray 1
  • Chassis (running gear)
  • Brake system
  • Front brake disc — checking technical condition
0
Contents: Removal ⇣ Checking the technical condition ⇣ Installation ⇣

Removal


Place the vehicle on a two-post lift, apply the parking brake and turn off the ignition (electro-hydraulic lift type P-3.2G with a lifting capacity of 3.2 t).

Remove the front wheel in accordance with the requirements of TI 3100.25100.20594.

Raise the vehicle to a height convenient for performing work.

Clean the front brake parts (metal brush).

Loosen and remove the bolts securing the front brake guide to the steering knuckle, remove the front brake 1, Figure 7-1, as an assembly and hang it on the suspension spring (replaceable head 18, extension and handle, technological hook).
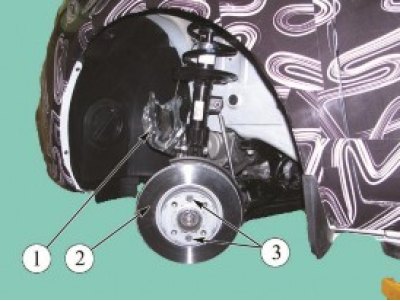
Figure 7-1 - Removing the brake disc: 1 - front brake mechanism; 2 - front brake disc; 3 - brake…

Figure 7-1 - Removing the brake disc: 1 - front brake mechanism; 2 - front brake disc; 3 - brake disc mounting screws


Checking the technical condition


Attention! The brake disc cannot be ground. If there are deep scratches, the disc must be replaced. If the disc thickness is less than 19.8 mm, the disc must be replaced.


Attention! When replacing the brake disc on one side, be sure to replace the brake disc on the opposite side.


Attention! When replacing brake discs, be sure to replace the brake pads.


Loosen and remove screw 3 securing the brake disc to the front wheel hub and remove the brake disc 2 (torx T40 replacement bit, extension, ratchet wrench).


Installation


Install the brake disc in place and secure it to the hub. Screw tightening torque 12...16 Nm (1.2...1.6 kgf·m) (torx T40 socket, extension, ratchet wrench, torque wrench).

Attention! After removal, bolts 1, Figure 6-1, securing the guide to the steering knuckle must be replaced.


Install the front brake assembly onto the steering knuckle and secure it with new mounting bolts. Tightening torque of bolts 90...120 Nm (9.0...12.0 kgf·m) (replaceable head 18, extension, ratchet, torque wrench).

Install the front wheel in accordance with the requirements of TI 3100.25100.20594.

Press the brake pedal 2-3 times, check and, if necessary, top up the brake fluid level in the brake hydraulic reservoir.

Check the efficiency of the service brake system in accordance with the requirements of TI 3100.25100.13062.

Present the vehicle to the Quality Control Department. The Quality Control Department will check the vehicle for compliance with the requirements of TU 017200-254-00232934, paragraphs 1.19.9, 1.19.22 in the scope of work performed.


This article is available at russian, bulgarian, belarusian, ukrainian, serbian, croatian, romanian, polish, slovak, hungarian
This article has been reviewed: Daniil Markelov
Share with friends:
◀ Previous
Lada X-Ray 1: Brake system
Next ▶

Front brake assembly — removal and installation
Front brake pads — removal and installation
Brake pedal with bracket assembly — removal and installation
Vacuum brake booster with master cylinder and reservoir assembly
Brake system — features of the device
Front Brake Disc Cover — removal and installation
Rear brake drum — checking technical condition
Rear Brake Pads — removal and installation
Rear Brake Wheel Cylinder — removal and installation
Handbrake lever — removal and installation, adjustment
More articles with information from manuals for Lada:

• Checking the technical condition of the front wheel drives Lada Kalina Hatchback (2004-2013, VAZ-1119)
• Checking the technical condition of the front wheel drives Lada Granta 1 (2011-2023, VAZ-2190)
• Checking the technical condition of the front suspension parts on the… Lada Priora 1 (2007-2018, VAZ-2170)
• Checking the technical condition of the front suspension Lada Vesta 1 (2015-2023, VAZ-2180)
• Front Brake Disc — Removal, Installation and Checking Lada Largus 1 (2012-2023)
Link to this article in various formats
Reviews and comments of visitors
No comments yet


Add up two numbers: 38 + 21


X-Ray 1 (2015-2022) 
  • General information
  • User manual
  • Maintenance
  • Daily care
  • Troubleshooting
  • Power unit
  • Engine repair
  • Fuel system
  • Cooling system
  • Repair H4M engine
  • Transmission
  • Clutch and drive shafts
  • Transmission
  • Chassis (running gear)
  • Front suspension
  • Rear suspension
  • Brake system
  • Steering
  • Body and interior
  • Exterior (external elements)
  • Interior (internal elements)
  • Electrical equipment
  • Equipment and devices
  • Lighting and signaling
LadaMan.ru © 2018–2026 | Mobile version | About Lada | Sitemap: EN BG BY UA RS HR RO PL SK HU | Contacts with admin | | Add to bookmarks
Kalina Hatchback (2004-2013) | Kalina Sedan (2004-2013) | Granta 1 (2011-2023) | Priora 1 (2007-2018) | Vesta 1 (2015-2023) | Largus 1 (2012-2023) | X-Ray 1 (2015-2022) |
This site uses cookies to ensure everything runs smoothly.