



Attention! Replace brake pads as a set on wheels of one axle. Installation of brake pads from different manufacturers or different types on wheels of the same axle is not permitted.
Removal
Place the vehicle on a two-post lift, apply the parking brake and turn off the ignition (electro-hydraulic lift type P-3.2G with a lifting capacity of 3.2 t).
Remove the rear wheels in accordance with the requirements of TI 3100.25100.20594.
Release the hand brake lever.
Raise the vehicle to a height convenient for performing work.
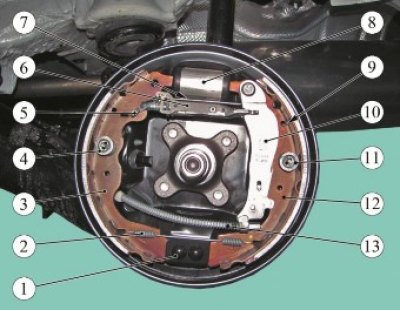
Figure 10-1 - Replacing the brake pads: 1 - stop; 2 - lower tension spring; 3, 12 - brake pads; 4, 11 - guide springs; 5, 9 - springs for fastening the automatic clearance adjustment mechanism; 6 - spacer bar with automatic gap adjustment mechanism; 7 - upper tension spring; 8 - brake cylinder; 10 - manual brake pad drive lever; 13 - hand brake cable
Remove the rear brake drums in accordance with the requirements of paragraph. real TI.
Remove the lower, then the upper tension springs 2 and 7, Figure 10-1 (brake spring pliers type 76 41 30 22 from "Stahlwille").
Remove springs 5 and fastenings of the spacer bar with the mechanism for automatic adjustment of the gap between the shoes and the drum (flat head screwdriver, pliers).
Remove springs 4 and 11 of the guide shoes (pliers).
Remove the spacer bar 6 with the automatic adjustment mechanism assembly.
Remove brake pads 3 and 12, disconnecting hand brake cable 13 from drive lever 10.
Installation
Clean the rear brake components (metal brush).
Apply 1 g of Litol 24 grease to the threaded surface of the spacer bar in accordance with the current "Codifier of the main and auxiliary materials used in the maintenance and repair of LADA vehicles" K 3100.25100.00018.
Before installing the pads on the brake shield, connect the pads together using a spacer bar with an automatic clearance adjustment mechanism and fastening springs, connect the manual brake drive cable to the drive lever (flat head screwdriver, pliers).
Install the pads on the brake shield.
Install the upper and lower tension springs (brake spring pliers type 76 41 30 22 from "Stahlwille").
Install the guide shoe springs (flat head screwdriver, pliers).
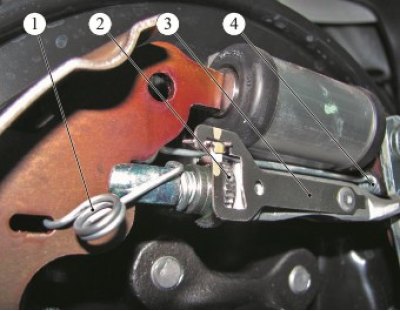
Figure 10-2 - Rear brake components: 1 - spacer bar fastening spring; 2 - ratchet of the automatic clearance adjustment mechanism; 3 - spacer bar with automatic gap adjustment mechanism; 4 - upper tension spring
Adjust the outer diameter of the pads by turning the ratchet 2, Figure 10-2, of the automatic clearance adjustment mechanism with a screwdriver. The outer diameter of the pads should be 202.5±0.1 mm (flat screwdriver, caliper).
Install the brake drum in accordance with the requirements of paragraph. 9 of this TI.
Install the rear wheel in accordance with the requirements of TI 3100.25100.20594.
Press the brake pedal 2-3 times, check and, if necessary, top up the brake fluid level in the brake hydraulic reservoir.
Check the functionality of the automatic clearance adjustment mechanism between the pads and the drum (when you press the brake pedal several times in a row, you should hear a characteristic click).
Adjust the parking brake in accordance with the requirements of paragraph. 12 of this TI.
Check the efficiency of the service brake system in accordance with the requirements of TI 3100.25100.13062.
Present the vehicle to the Quality Control Department. The Quality Control Department will check the vehicle for compliance with the requirements of TU 017200-254-00232934, paragraphs 1.19.9, 1.19.22 in the scope of work performed.