Car repair AvtoVAZ Car repair Renault Car repair Hyundai Car repair Ford Car repair Volkswagen Car repair Audi Car repair Chevrolet
English Русский
Български
Беларускі
Український
Српски
Hrvatski
Română
Polski
Slovenský
Magyar
articles sitemap contacts bookmark
LadaMan.ru


Kalina Granta Priora Vesta Largus XRAY
Vesta 1 (2015-2023, VAZ-2180)

Rear brake pads — replacement (Vesta 2180)

  • Main
  • Vesta
  • Vesta 1
  • Chassis (running gear)
  • Brake system
  • Rear brake pads — replacement
0
Contents: Removal ⇣ Installation ⇣
The need to perform work is determined during the process of checking the technical condition of the brake system (see "Brake system - checking technical condition").

Warning! When the brake pistons are pressed into the cylinders, the brake fluid level in the reservoir will increase, so pump out some of the brake fluid from the reservoir. After replacing the brake pads, check and, if necessary, top up the brake fluid level (see "Checking the brake fluid level"). If the brake pads are worn on only one side, then it is necessary to replace the pads on both sides of the car.
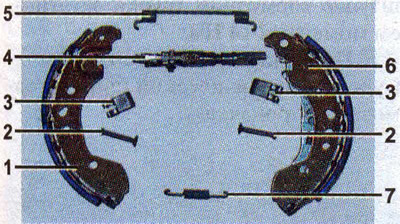

Rear brake mechanism parts: 1 - brake shoe (front); 2 - support stand; 3 - spring bracket for…

Rear brake mechanism parts: 1 - brake shoe (front); 2 - support stand; 3 - spring bracket for mounting the support stand; 4 - automatic adjustment device; 5 - tension spring (upper); 6 - brake shoe (rear); 7 - tension spring (lower)


Recommendation. When replacing brake pads, be sure to check the degree of wear and condition of the brake drum (see "Brake system - checking technical condition").


Removal


1. Prepare the car for work (see "Preparing the car for maintenance and repair").

2. Remove the brake drum (see "Rear brake drums - replacement").


3. Using a screwdriver, disconnect the parking brake cable from the brake shoe lever.
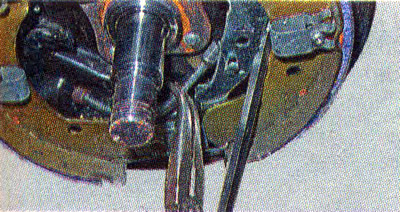
3. Using a screwdriver, disconnect the parking brake cable from the brake shoe lever.


4. Use pliers to remove the spring clip.
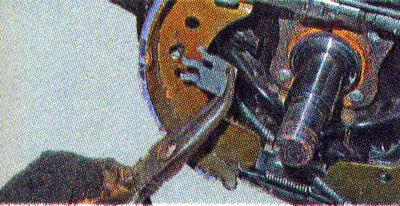
4. Use pliers to remove the spring clip.


5. Remove the support post.
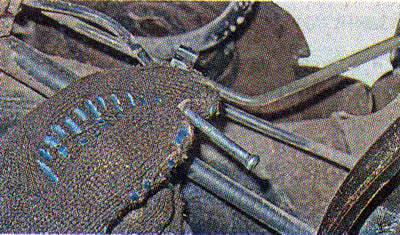
5. Remove the support post.


6. Similarly, remove the support post of the other pad.

7. We spread the brake pads apart and, in order not to damage the dust boots, carefully remove their stops from the brake cylinder...
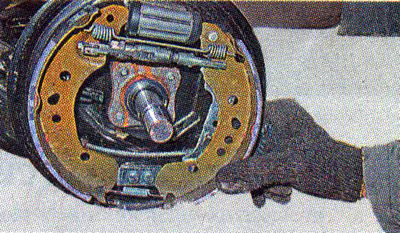


7. We spread the brake pads apart and, in order not to damage the dust boots, carefully remove…


...and remove the brake pads.

...and remove the brake pads.


8. Disconnect the lower part from the brake pads —
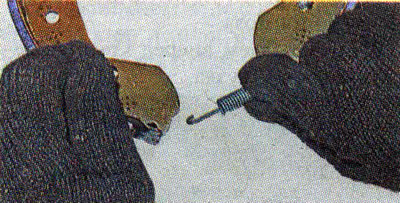
8. Disconnect the lower part from the brake pads —


...and the upper tension springs.
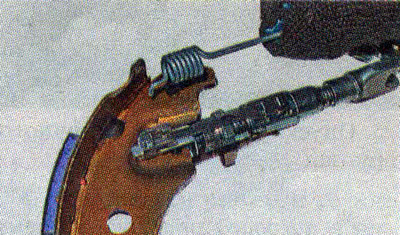
...and the upper tension springs.


9. We disengage the adjusting device from the rear brake shoe...
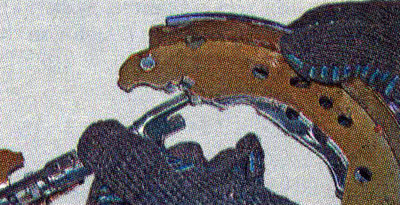


9. We disengage the adjusting device from the rear brake shoe...


...and we take it off.

Installation


1. Carefully clean the contact areas of the brake pads with the brake shield...

1. Carefully clean the contact areas of the brake pads with the brake shield...


...and apply a special lubricant for brake mechanisms to them.
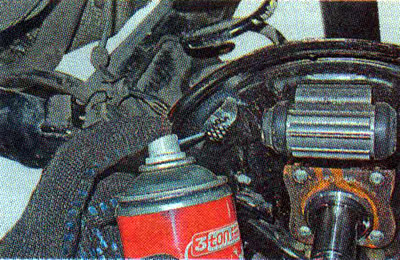
...and apply a special lubricant for brake mechanisms to them.


2. Install the brake pads in the reverse order.

3. Before installing the brake drum, we treat its working surface...
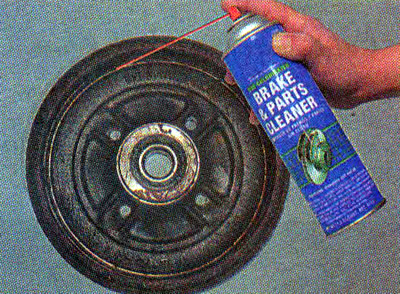
3. Before installing the brake drum, we treat its working surface...


...and the brake pad linings with a special brake cleaner.


4. Install the remaining parts in reverse order.

5. Similarly, replace the pads on the other side of the car.

6. Press the brake pedal several times to adjust the brake pads and check the parking brake adjustment (see below, "Parking brake - adjustment").


This article is available at russian, bulgarian, belarusian, ukrainian, serbian, croatian, romanian, polish, slovak, hungarian
This article has been reviewed: Kirill Dementyev
Share with friends:
◀ Previous
Lada Vesta 1: Brake system
Next ▶

Rear brake drums — replacement
Front brake discs — replacement
Front Brake Caliper — Removal, Repair and Installation
Front brake pads — replacement
Brake pipes — replacement
Wheel brake cylinder — replacement
Parking brake — adjustment
Front Wheel Speed Sensor — replacement
Rear Wheel Speed Sensor — replacement
More articles with information from manuals for Lada:

• Rear brake pads — removal and installation Lada Kalina Hatchback (2004-2013, VAZ-1119)
• Rear brake pads — removal and installation Lada Granta 1 (2011-2023, VAZ-2190)
• Replacing the brake pads of the rear wheel brake mechanism Lada Priora 1 (2007-2018, VAZ-2170)
• Front brake pads — removal and installation Lada Largus 1 (2012-2023)
• Rear Brake Pads — removal and installation Lada X-Ray 1 (2015-2022)
Link to this article in various formats
Reviews and comments of visitors
No comments yet


Add up two numbers: 44 + 43


Vesta 1 (2015-2023) 
  • General information
  • Governing bodies
  • User manual
  • Maintenance
  • Troubleshooting
  • Power unit
  • Engine repair
  • Control system
  • Supply system
  • Cooling system
  • Exhaust system
  • Transmission
  • Clutch
  • Mechanical gearbox
  • Automatic gearbox
  • Drive shafts
  • Chassis (running gear)
  • Wheels, tires and hubs
  • Front suspension
  • Rear suspension
  • Steering
  • Brake system
  • Body and interior
  • Exterior (external elements)
  • Doors, locks and windows
  • Heating and ventilation
  • Electrical equipment
  • Equipment and devices
  • Power devices
  • Breakers and switches
  • Lighting and signaling
  • Electrical circuits
LadaMan.ru © 2018–2026 | Mobile version | About Lada | Sitemap: EN BG BY UA RS HR RO PL SK HU | Contacts with admin | | Add to bookmarks
Kalina Hatchback (2004-2013) | Kalina Sedan (2004-2013) | Granta 1 (2011-2023) | Priora 1 (2007-2018) | Vesta 1 (2015-2023) | Largus 1 (2012-2023) | X-Ray 1 (2015-2022) |
This site uses cookies to ensure everything runs smoothly.