
Car repair AvtoVAZ Car repair Renault Car repair Hyundai Car repair Ford Car repair Volkswagen Car repair Audi Car repair Chevrolet
English Русский
Български
Беларускі
Український
Српски
Hrvatski
Română
Polski
Slovenský
Magyar
articles sitemap contacts bookmark
LadaMan.ru


Kalina Granta Priora Vesta Largus XRAY
Vesta 1 (2015-2023, VAZ-2180)

Parking brake — adjustment (Vesta 2180)

  • Main
  • Vesta
  • Vesta 1
  • Chassis (running gear)
  • Brake system
  • Parking brake — adjustment
0
The parking brake must be adjusted after replacing the drive cables, and also if the check (see "Checking the parking brake system") revealed the need for adjustment. The parking brake lever travel should be 5-7 clicks.

Sequence of execution


1. Prepare the car for work (see "Preparing the car for maintenance and repair").

2. Pry it off with a screwdriver...
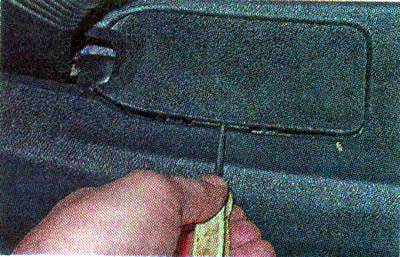
2. Pry it off with a screwdriver...


...and open the cover at the rear of the floor tunnel lining.
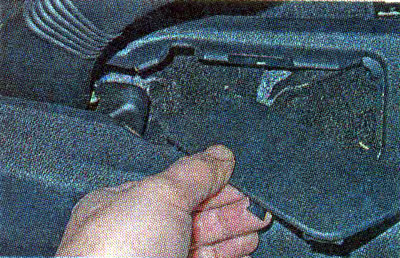
...and open the cover at the rear of the floor tunnel lining.


3. Pull up the parking brake lever.

4. Fold the cover of the adjustment unit forward.
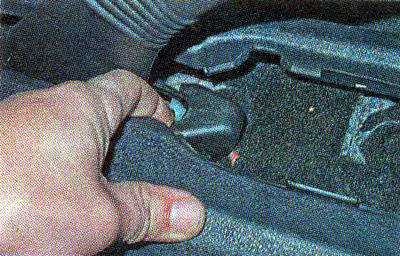
4. Fold the cover of the adjustment unit forward.


5. Lower the parking brake lever.


6. Using a 10 mm socket wrench with an extension, tighten or loosen the adjusting nut depending on what is needed: to decrease or increase the number of clicks of the lever stroke.
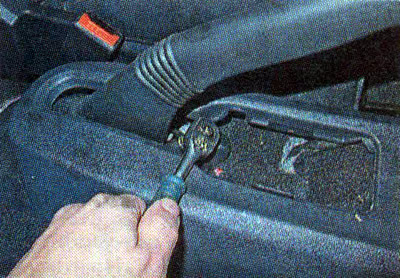
6. Using a 10 mm socket wrench with an extension, tighten or loosen the adjusting nut depending on…


7. After the parking brake has been adjusted (the number of clicks is normal), we lift the rear wheels of the car and make sure that when the parking brake lever is raised one click, the parking brake control lamp lights up and the wheels rotate freely, and when the lever is raised, both wheels are locked.


This article is available at russian, bulgarian, belarusian, ukrainian, serbian, croatian, romanian, polish, slovak, hungarian
This article has been reviewed: Kirill Dementyev
Share with friends:
◀ Previous
Lada Vesta 1: Brake system
Next ▶

Wheel brake cylinder — replacement
Rear brake pads — replacement
Rear brake drums — replacement
Front brake discs — replacement
Front Brake Caliper — Removal, Repair and Installation
Front Wheel Speed Sensor — replacement
Rear Wheel Speed Sensor — replacement
More articles with information from manuals for Lada:

• Parking brake — adjustment Lada Kalina Hatchback (2004-2013, VAZ-1119)
• Parking brake — adjustment Lada Granta 1 (2011-2023, VAZ-2190)
• Replacing the spring of the parking brake lever pawl Lada Priora 1 (2007-2018, VAZ-2170)
• Rear Brake Pressure Regulator — Removal, Installation and Adjustment Lada Largus 1 (2012-2023)
• Adjusting the parking brake Lada X-Ray 1 (2015-2022)
Link to this article in various formats
Reviews and comments of visitors
No comments yet


Add up two numbers: 42 + 49


Vesta 1 (2015-2023) 
  • General information
  • Governing bodies
  • User manual
  • Maintenance
  • Troubleshooting
  • Power unit
  • Engine repair
  • Control system
  • Supply system
  • Cooling system
  • Exhaust system
  • Transmission
  • Clutch
  • Mechanical gearbox
  • Automatic gearbox
  • Drive shafts
  • Chassis (running gear)
  • Wheels, tires and hubs
  • Front suspension
  • Rear suspension
  • Steering
  • Brake system
  • Body and interior
  • Exterior (external elements)
  • Doors, locks and windows
  • Heating and ventilation
  • Electrical equipment
  • Equipment and devices
  • Power devices
  • Breakers and switches
  • Lighting and signaling
  • Electrical circuits
LadaMan.ru © 2018–2026 | Mobile version | About Lada | Sitemap: EN BG BY UA RS HR RO PL SK HU | Contacts with admin | | Add to bookmarks
Kalina Hatchback (2004-2013) | Kalina Sedan (2004-2013) | Granta 1 (2011-2023) | Priora 1 (2007-2018) | Vesta 1 (2015-2023) | Largus 1 (2012-2023) | X-Ray 1 (2015-2022) |
This site uses cookies to ensure everything runs smoothly.