
Car repair AvtoVAZ Car repair Renault Car repair Hyundai Car repair Ford Car repair Volkswagen Car repair Audi Car repair Chevrolet
English Русский
Български
Беларускі
Український
Српски
Hrvatski
Română
Polski
Slovenský
Magyar
articles sitemap contacts bookmark
LadaMan.ru


Kalina Granta Priora Vesta Largus XRAY
Granta 1 (2011-2023, VAZ-2190)

Parking brake — adjustment (Granta 2190)

  • Main
  • Granta
  • Granta 1
  • Chassis (running gear)
  • Brake system
  • Parking brake — adjustment
0
The stroke of the parking brake lever should be 2-4 clicks. During operation of the vehicle, it is permissible to increase the stroke of the lever to eight clicks.

Recommendation. If the lever travel is six or more clicks, adjust the parking brake drive.


To carry out the work you will need an inspection pit or overpass.

Sequence of execution


1. Prepare the car for work ("Preparing the car for maintenance and repair").

2. Raise the parking brake lever all the way up, determining the length of its travel. If it is less than 2 clicks, the drive must be lengthened, and if it is more than 6, it must be shortened.

3. Fully lower the parking brake lever.

4. Remove the cushions from the brackets of the additional muffler 1 ("Exhaust System Suspension - Replacement of Cushions"). Using a socket wrench, unscrew the four nuts 2 securing the protective screen.
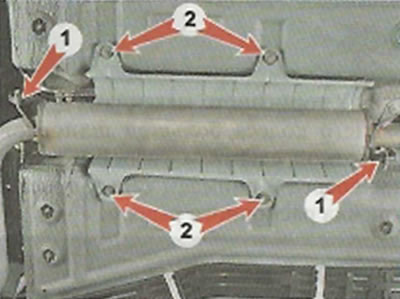
4. Remove the cushions from the brackets of the additional muffler 1 («Exhaust System Suspension -…


5. Having pulled the additional muffler away from the bottom of the car, we place a wooden block under the muffler pipe. We remove the protective screen.
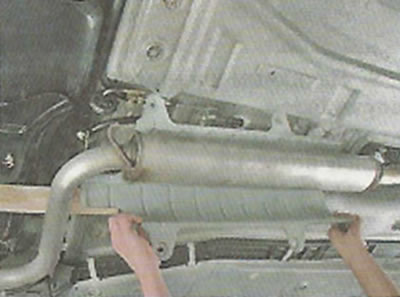
5. Having pulled the additional muffler away from the bottom of the car, we place a wooden block…


6. Using a 13 mm open-end wrench to hold the adjusting nut from turning, loosen the lock nut with a 13 mm spanner.
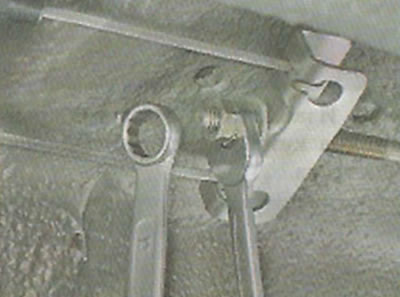


6. Using a 13 mm open-end wrench to hold the adjusting nut from turning, loosen the lock nut with a…


7. When the adjusting nut is loosened, the drive is lengthened; when tightened, it is shortened.

8. Periodically during the adjustment process, check the lever travel.

Note: If the length of the threaded part of the rod is not enough to adjust the lever stroke, it is necessary to replace the drive cables, and if the linings are heavily worn, the brake pads as well.


9. Having adjusted the stroke of the parking brake lever, we lift the rear of the car. We check the ease of rotation of the rear wheels and the reliability of their fixation with the parking brake.

10. If the brake pads do not interfere with the rotation of the wheels, secure the adjusting nut with a lock nut. We install the protective screen in place.

Source link - website: LADAMAN.RU

11. We check the functionality of the parking brake system: on an incline with a slope of 23%, it should reliably hold the car in a stationary position. If necessary, we check the condition of the parking brake drive parts, the condition of the rear brake pads and brake drums. We replace faulty and worn parts. After which we repeat the adjustment.


This article is available at russian, bulgarian, belarusian, ukrainian, serbian, croatian, romanian, polish, slovak, hungarian
This article has been reviewed: Polina Kudryashova
Share with friends:
◀ Previous
Lada Granta 1: Brake system
Next ▶

Parking brake system
Rear Brake Fluid Pressure Regulator — Removal and Installation
Rear Brake Fluid Pressure Regulator — Adjustment
Vacuum brake booster — removal and installation
Master Brake Cylinder — Removal and Installation
Parking brake cables — removal and installation
Anti-lock braking system
More articles with information from manuals for Lada:

• Parking brake — adjustment Lada Kalina Hatchback (2004-2013, VAZ-1119)
• Replacing the spring of the parking brake lever pawl Lada Priora 1 (2007-2018, VAZ-2170)
• Parking brake — adjustment Lada Vesta 1 (2015-2023, VAZ-2180)
• Rear Brake Pressure Regulator — Removal, Installation and Adjustment Lada Largus 1 (2012-2023)
• Adjusting the parking brake Lada X-Ray 1 (2015-2022)
Link to this article in various formats
Reviews and comments of visitors
No comments yet


Add up two numbers: 36 + 13


Granta 1 (2011-2023) 
  • User manual
  • Governing bodies
  • Vehicle operation
  • Maintenance
  • Radio receiver
  • Radio receiver (option)
  • Power unit
  • Engine repair
  • Control system
  • Supply system
  • Cooling system
  • Exhaust system
  • Transmission
  • Clutch
  • Car gearbox
  • Drive shafts
  • Chassis (running gear)
  • Wheels, tires and hubs
  • Front suspension
  • Rear suspension
  • Steering
  • Brake system
  • Body and interior
  • Exterior (external elements)
  • Interior (internal elements)
  • Doors, locks and windows
  • Heating and ventilation
  • Electrical equipment
  • Equipment and devices
  • Power devices
  • Breakers and switches
  • Lighting and signaling
  • Electrical circuits
LadaMan.ru © 2018–2026 | Mobile version | About Lada | Sitemap: EN BG BY UA RS HR RO PL SK HU | Contacts with admin | | Add to bookmarks
Kalina Hatchback (2004-2013) | Kalina Sedan (2004-2013) | Granta 1 (2011-2023) | Priora 1 (2007-2018) | Vesta 1 (2015-2023) | Largus 1 (2012-2023) | X-Ray 1 (2015-2022) |
This site uses cookies to ensure everything runs smoothly.