
Car repair AvtoVAZ Car repair Renault Car repair Hyundai Car repair Ford Car repair Volkswagen Car repair Audi Car repair Chevrolet
English Русский
Български
Беларускі
Український
Српски
Hrvatski
Română
Polski
Slovenský
Magyar
articles sitemap contacts bookmark
LadaMan.ru


Kalina Granta Priora Vesta Largus XRAY
Vesta 1 (2015-2023, VAZ-2180)

Checking the service brake system drive (Vesta 2180)

  • Main
  • Vesta
  • Vesta 1
  • Chassis (running gear)
  • Brake system
  • Checking the service brake system drive
0
1. Prepare the car for work (see "Preparing the car for maintenance and repair").

Recommendation. It is convenient to inspect pipelines and brake hoses on an inspection pit or overpass.


2. Carefully inspect the brake system pipes for cracks and brake fluid leaks.

3. Inspect the brake hoses for fatigue cracks, abrasions, swelling and brake fluid leaks (see below for relevant sections).

Note: The front brake mechanisms are connected by hoses to tubes on the car body.
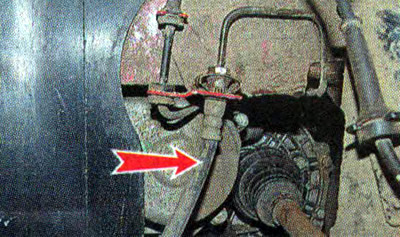

Note: The front brake mechanisms are connected by hoses to tubes on the car body.


Two hoses connect the tubes running along the bottom of the car to the tubes on the rear axle.
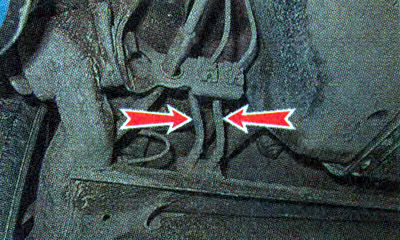
Two hoses connect the tubes running along the bottom of the car to the tubes on the rear axle.


3. With the engine not running, press the brake pedal several times until the hissing sound in the brake booster stops.

Note: If the pedal is "soft", there may be air in the brake hydraulic system. To remove air, bleed the brake hydraulic system (see "Hydraulic brake drive - bleeding").


Original text is available on the website: LADAMAN.RU

4. Press the brake pedal and remove your foot from the pedal, the pedal should return to its original position.

5. Press the pedal and start the engine.

6. If the pedal moves down slightly immediately after starting the engine, the brake booster is working properly.

7. Otherwise, check the integrity of the vacuum supply hose to the vacuum booster 1, the tightness of the connection of hose 2 with the inlet pipe and the branch pipe of the check valve of the booster 3. Check the check valve.
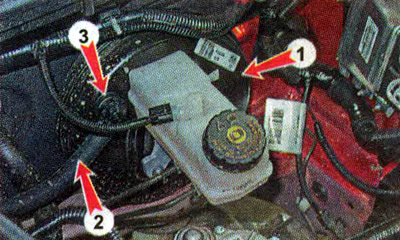
7. Otherwise, check the integrity of the vacuum supply hose to the vacuum booster 1, the tightness…


Note: If the hose, tube and valve are in good condition and the connections are tight, then the vacuum booster is faulty.


8. Press the brake pedal and, holding it down, turn off the engine. While holding the brake pedal, make sure that its position does not change for at least 30 seconds.

9. By pressing the brake pedal several times with a 5-second delay, we release the vacuum from the vacuum booster (see above, point 2). At the same time, we make sure that with each press the distance from the brake pedal to the floor increases.

Note: If the pedal feels "giveable", the system is not sealed. If a visual inspection does not reveal any brake fluid leaks and the brake fluid does not decrease, the most likely cause is that the brake master cylinder is faulty and must be replaced (see "Master Brake Cylinder - Replacement").


This article is available at russian, bulgarian, belarusian, ukrainian, serbian, croatian, romanian, polish, slovak, hungarian
This article has been reviewed: Kirill Dementyev
Share with friends:
◀ Previous
Lada Vesta 1: Brake system
Next ▶

Checking the brake fluid level
Description of the brake system design
Basic data for monitoring, adjustment and maintenance
Checking the front brake mechanism
Checking the rear brake mechanism
Checking the parking brake system
Hydraulic brake drive — bleeding
Replacing brake fluid
More articles with information from manuals for Lada:

• Service brake system drive Lada Kalina Hatchback (2004-2013, VAZ-1119)
• Service brake system drive Lada Granta 1 (2011-2023, VAZ-2190)
• Checking the tightness of the hydraulic brake drive Lada Priora 1 (2007-2018, VAZ-2170)
• Diagnostics of brake system faults Lada Largus 1 (2012-2023)
• Checking the tightness of the service brake system Lada X-Ray 1 (2015-2022)
Link to this article in various formats
Reviews and comments of visitors
No comments yet


Add up two numbers: 47 + 50


Vesta 1 (2015-2023) 
  • General information
  • Governing bodies
  • User manual
  • Maintenance
  • Troubleshooting
  • Power unit
  • Engine repair
  • Control system
  • Supply system
  • Cooling system
  • Exhaust system
  • Transmission
  • Clutch
  • Mechanical gearbox
  • Automatic gearbox
  • Drive shafts
  • Chassis (running gear)
  • Wheels, tires and hubs
  • Front suspension
  • Rear suspension
  • Steering
  • Brake system
  • Body and interior
  • Exterior (external elements)
  • Doors, locks and windows
  • Heating and ventilation
  • Electrical equipment
  • Equipment and devices
  • Power devices
  • Breakers and switches
  • Lighting and signaling
  • Electrical circuits
LadaMan.ru © 2018–2026 | Mobile version | About Lada | Sitemap: EN BG BY UA RS HR RO PL SK HU | Contacts with admin | | Add to bookmarks
Kalina Hatchback (2004-2013) | Kalina Sedan (2004-2013) | Granta 1 (2011-2023) | Priora 1 (2007-2018) | Vesta 1 (2015-2023) | Largus 1 (2012-2023) | X-Ray 1 (2015-2022) |
This site uses cookies to ensure everything runs smoothly.