
Car repair AvtoVAZ Car repair Renault Car repair Hyundai Car repair Ford Car repair Volkswagen Car repair Audi Car repair Chevrolet
English Русский
Български
Беларускі
Український
Српски
Hrvatski
Română
Polski
Slovenský
Magyar
articles sitemap contacts bookmark
LadaMan.ru


Kalina Granta Priora Vesta Largus XRAY
Priora 1 (2007-2018, VAZ-2170)

Removal and installation the gearbox (Priora 2170)

  • Main
  • Priora
  • Priora 1
  • Transmission
  • Car gearbox
  • Removal and installation the gearbox
0
You will need: keys "10", "13", "17", "19", a large screwdriver with a flat blade.

Place the vehicle on a lift or inspection pit. Raise the hood and lock it in this position. Before removing the gearbox, disconnect the wire from the negative terminal of the battery, drain the oil from the gearbox (see "Gearbox oil change") and remove the starter (see "Removing and installing the starter").

1. Disconnect the clutch drive cable from the clutch release fork and remove it from the bracket on the gearbox (see "Replacing the clutch release cable").
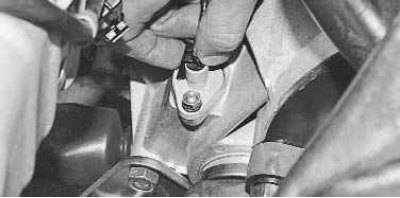
2. Bend back the plastic retainer and disconnect the wiring harness connector from the speed sensor.

2. Bend back the plastic retainer and disconnect the wiring harness connector from the speed sensor.

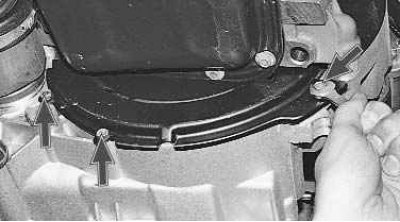
3. Using a 10 mm spanner, unscrew the three bolts securing the front clutch housing cover…

3. Using a 10 mm spanner, unscrew the three bolts securing the front clutch housing cover…


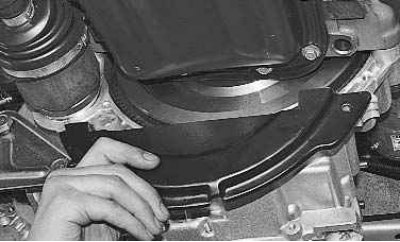
4. …and remove the lid.


4. …and remove the lid.

5. Place a secure support under the engine or lift it using a lifting mechanism.

6. Remove the rear support of the power unit (see "Replacing the powertrain supports").

7. Press the plastic retainer and disconnect the wiring harness connector from the reverse light…


7. Press the plastic retainer and disconnect the wiring harness connector from the reverse light switch.
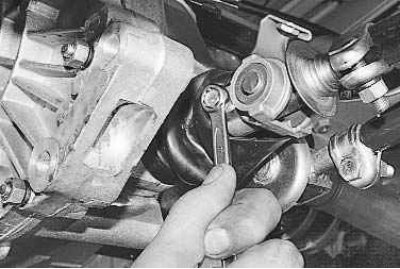
8. Using a 10 mm spanner, unscrew the bolt securing the gear shift drive hinge housing to the gear…


8. Using a 10 mm spanner, unscrew the bolt securing the gear shift drive hinge housing to the gear selection rod…
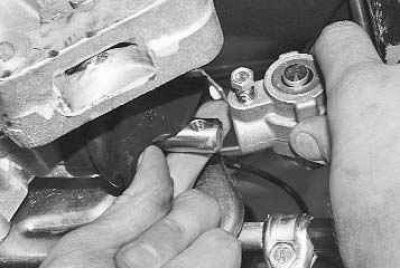


9. …and disconnect the gear selection rod from the rod together with the joint.

9. …and disconnect the gear selection rod from the rod together with the joint.

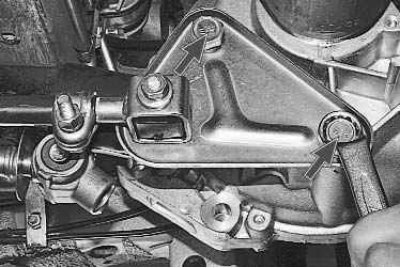
10. Using a 17 mm spanner, unscrew the two bolts securing the torque rod bracket.


10. Using a 17 mm spanner, unscrew the two bolts securing the torque rod bracket.

11. Remove the wheel drives (see "Removing and installing front wheel drives"). The right drive does not need to be removed completely. It is enough to disconnect it from the gearbox and, moving it to the side, hang it on the body.

Caution! Disconnect the right drive only after removing the front clutch housing cover (see points 3 and 4), otherwise, you can bend the cover with a mounting blade, and the flywheel will touch it.


Attention! Do not disconnect both drives at the same time, as this may cause the axle gears to shift in the differential, making it impossible to install the drives without disassembling the gearbox. If it is necessary to disconnect both drives, after disconnecting one of them, insert a technological plug or the old housing of the inner joint in its place and tie the plug or housing to the gearbox with wire so that they do not fall out when removing the gearbox. After this, disconnect the second drive
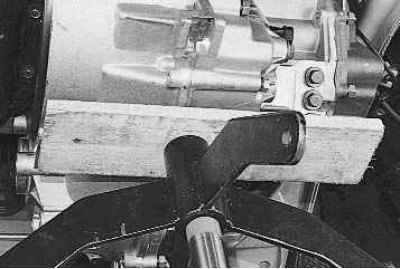


12. Install a secure support under the gearbox.

12. Install a secure support under the gearbox.

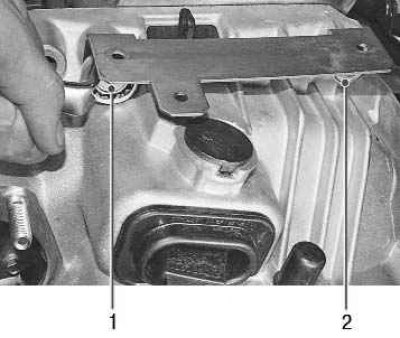
13. Using a 19 mm spanner, unscrew the two bolts that secure the upper gearbox to the engine. Bolt…


13. Using a 19 mm spanner, unscrew the two bolts that secure the upper gearbox to the engine. Bolt 1 (front in the direction of vehicle travel) – short, bolt 2 – long.
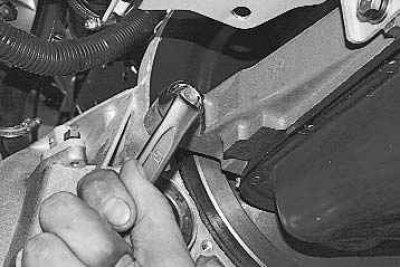
14. Using a 19 mm spanner, unscrew the nut on the right lower mount of the gearbox to the engine…


14. Using a 19 mm spanner, unscrew the nut on the right lower mount of the gearbox to the engine (from the engine side).
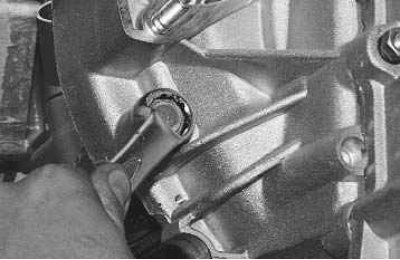


15. Using a 19 mm spanner, unscrew the bolt securing the left lower gearbox to the engine.


15. Using a 19 mm spanner, unscrew the bolt securing the left lower gearbox to the engine.

16. Move the gearbox as far back as possible (the primary shaft must disengage from the clutch).…


16. Move the gearbox as far back as possible (the primary shaft must disengage from the clutch). While holding the gearbox, remove the support and remove the gearbox from under the car.

Caution! Do not rest the gearbox input shaft on the clutch pressure spring petals to avoid damaging them.


17. Install the gearbox and all removed parts and assemblies in the reverse order of removal.

Note: Before installing the gearbox, we recommend lubricating the splines of the input shaft and the outer surface of the clutch release bearing guide sleeve with a thin layer of consistent grease.


Note: Use a special mandrel to check how the clutch driven disc is centered (see "Removing and installing the clutch")


18. If necessary, restore the initial setting of the clutch release cable (see "Replacing the clutch release cable") and adjust the gearbox control drive (see "Adjusting the gearbox control drive").

19. Fill the gearbox with oil (see "Gearbox oil change").


This article is available at russian, bulgarian, belarusian, ukrainian, serbian, croatian, romanian, polish, slovak, hungarian
This article has been reviewed: Vladislav Voloshin
Share with friends:
◀ Previous
Lada Priora 1: Car gearbox
Next ▶

Possible gearbox malfunctions
Gearbox design features
Disassembling the gearbox and identifying its parts
Secondary shaft repair
Primary shaft repair
Synchronizer repair
Differential repair
More articles with information from manuals for Lada:

• Reference data on gearbox components Lada Kalina Hatchback (2004-2013, VAZ-1119)
• Gearbox Reference Data Lada Granta 1 (2011-2023, VAZ-2190)
• Manual gearbox — technical condition check Lada Vesta 1 (2015-2023, VAZ-2180)
• Gearbox JH3, JR5, 21809 — design description Lada Largus 1 (2012-2023)
• Troubleshooting the gearbox Lada X-Ray 1 (2015-2022)
Link to this article in various formats
Reviews and comments of visitors
No comments yet


Add up two numbers: 35 + 19


Priora 1 (2007-2018) 
  • General information
  • Vehicle device
  • User manual
  • Faults en route
  • Maintenance
  • Power unit
  • Engine repair
  • Cooling and lubrication system
  • Supply system
  • Exhaust system
  • Transmission
  • Clutch
  • Car gearbox
  • Drive shafts
  • Chassis (running gear)
  • Car suspension
  • Steering
  • Brake system
  • Body and interior
  • Exterior (external elements)
  • Interior (internal elements)
  • Doors, locks and windows
  • Electrical equipment
  • Equipment and devices
  • Power devices
  • Lighting and signaling
  • Cooling and heating
  • Electrical circuits
LadaMan.ru © 2018–2026 | Mobile version | About Lada | Sitemap: EN BG BY UA RS HR RO PL SK HU | Contacts with admin | | Add to bookmarks
Kalina Hatchback (2004-2013) | Kalina Sedan (2004-2013) | Granta 1 (2011-2023) | Priora 1 (2007-2018) | Vesta 1 (2015-2023) | Largus 1 (2012-2023) | X-Ray 1 (2015-2022) |
This site uses cookies to ensure everything runs smoothly.