
Car repair AvtoVAZ Car repair Renault Car repair Hyundai Car repair Ford Car repair Volkswagen Car repair Audi Car repair Chevrolet
English Русский
Български
Беларускі
Український
Српски
Hrvatski
Română
Polski
Slovenský
Magyar
articles sitemap contacts bookmark
LadaMan.ru


Kalina Granta Priora Vesta Largus XRAY
Priora 1 (2007-2018, VAZ-2170)

Replacing the clutch release cable (Priora 2170)

  • Main
  • Priora
  • Priora 1
  • Transmission
  • Clutch
  • Replacing the clutch release cable
0
You will need: 8 mm and 17 mm wrenches, calipers or a ruler.

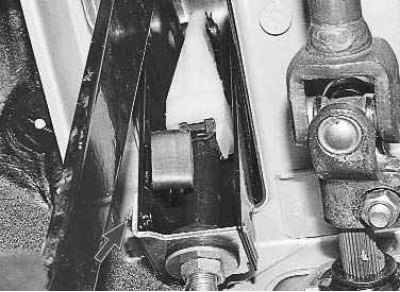
1. In the passenger compartment, under the instrument panel, use an 8 mm spanner to loosen the nut…


1. In the passenger compartment, under the instrument panel, use an 8 mm spanner to loosen the nut securing the cable sheath stop to the pedal bracket and remove the stop from the bracket.
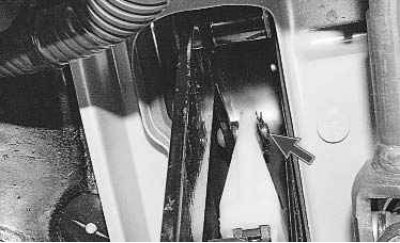
2. Using a screwdriver, remove the locking bracket and the housing of the clutch disc lining wear…


2. Using a screwdriver, remove the locking bracket and the housing of the clutch disc lining wear compensation mechanism from the clutch pedal pin.

3. Remove the plastic sleeve from the pedal pin and inspect it. Replace a heavily worn or damaged bushing by lubricating it with Litol-24 or LSC-15 grease before installation.
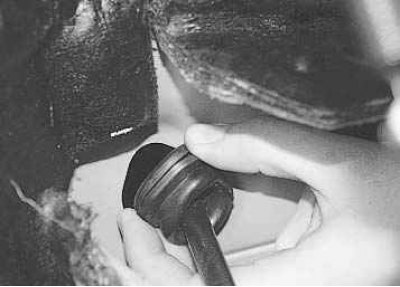
4. In the engine compartment, remove the clutch release cable housing seal from the hole in the…


4. In the engine compartment, remove the clutch release cable housing seal from the hole in the front shield.
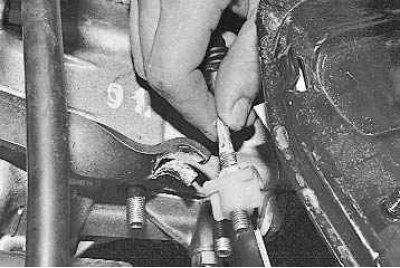


5. Pull the cable end forward in the direction of vehicle travel to remove the end from the clutch…


5. Pull the cable end forward in the direction of vehicle travel to remove the end from the clutch release fork groove.
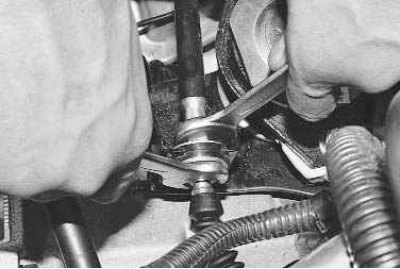
6. Using a 17 mm wrench, unscrew the nut securing the tip to the bracket on the gearbox, holding…


6. Using a 17 mm wrench, unscrew the nut securing the tip to the bracket on the gearbox, holding the tip from turning with a second wrench…
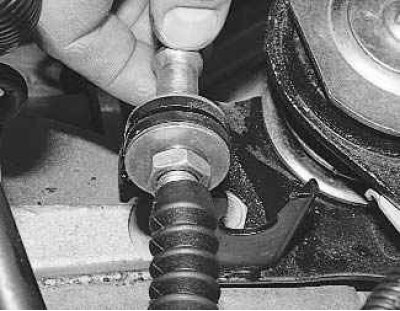
7. ... remove the tip from the bracket and remove the cable from the vehicle by pulling it out of…


7. ... remove the tip from the bracket and remove the cable from the vehicle by pulling it out of the hole in the front shield.


8. To install a new clutch release cable, first pass it through the hole in the front shield and secure the wear compensation mechanism housing to the clutch pedal pin.

Note: Before installing the compensation mechanism on the pedal pin, apply LSC-15 or Litol-24 grease to the pin bushing.


9. Secure the cable housing stop to the pedal bracket.

10. Install the cable sheath seal into the hole in the front shield.

11. Install the cable sheath end into the gearbox bracket and tighten its mounting nut.

12. Screw the leash onto the lower end of the cable, ensuring that the end protrudes relative to the end of the leash by 0–1 mm.
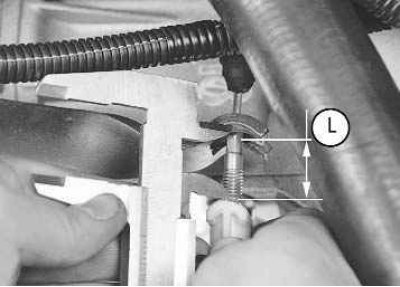
13. Set the clutch release cable to its original position by moving the lower end of the cable…


13. Set the clutch release cable to its original position by moving the lower end of the cable forward in the direction of vehicle travel until it stops. Keeping the tip in an extended position, measure the size L between the fork and the leash, it should be 27 mm. If the size does not correspond to the specified value, set it by rotating the leash in the desired direction.
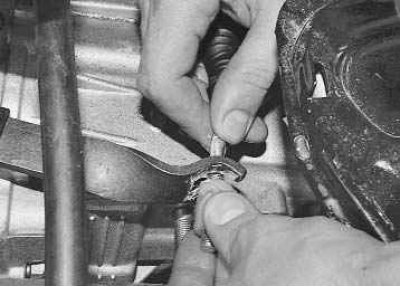
14. Insert the cable end into the groove of the clutch release fork and release it - under the…


14. Insert the cable end into the groove of the clutch release fork and release it - under the action of the spring, the end of the cable should be installed on the fork without a gap.


Note: Before installing the tip leash on the fork, apply LSC-15 or Litol-24 grease to its surface that contacts the fork.


15. Press the clutch pedal three times to the stop and re-measure the distance L (see item 13). Repeat the adjustment if necessary.


This article is available at russian, bulgarian, belarusian, ukrainian, serbian, croatian, romanian, polish, slovak, hungarian
This article has been reviewed: Vladislav Voloshin
Share with friends:
◀ Previous
Lada Priora 1: Clutch
 

Replacing the clutch release fork
Replacing the clutch release bearing
Removal and installation the clutch
Possible clutch malfunctions
Clutch design features
 
More articles with information from manuals for Lada:

• Replacing the clutch release cable Lada Kalina Sedan (2004-2013, VAZ-1118)
• Clutch release drive — adjustment Lada Granta 1 (2011-2023, VAZ-2190)
• Clutch Pedal Position Sensor — Checking and Replacing Lada Vesta 1 (2015-2023, VAZ-2180)
• Clutch cable — removal, installation and adjustment Lada Largus 1 (2012-2023)
• Clutch Release Actuator and Transmission Wiring Harness Lada X-Ray 1 (2015-2022)
Link to this article in various formats
Reviews and comments of visitors
No comments yet


Add up two numbers: 18 + 27


Priora 1 (2007-2018) 
  • General information
  • Vehicle device
  • User manual
  • Faults en route
  • Maintenance
  • Power unit
  • Engine repair
  • Cooling and lubrication system
  • Supply system
  • Exhaust system
  • Transmission
  • Clutch
  • Car gearbox
  • Drive shafts
  • Chassis (running gear)
  • Car suspension
  • Steering
  • Brake system
  • Body and interior
  • Exterior (external elements)
  • Interior (internal elements)
  • Doors, locks and windows
  • Electrical equipment
  • Equipment and devices
  • Power devices
  • Lighting and signaling
  • Cooling and heating
  • Electrical circuits
LadaMan.ru © 2018–2026 | Mobile version | About Lada | Sitemap: EN BG BY UA RS HR RO PL SK HU | Contacts with admin | | Add to bookmarks
Kalina Hatchback (2004-2013) | Kalina Sedan (2004-2013) | Granta 1 (2011-2023) | Priora 1 (2007-2018) | Vesta 1 (2015-2023) | Largus 1 (2012-2023) | X-Ray 1 (2015-2022) |
This site uses cookies to ensure everything runs smoothly.