



- place the car on a level ground and brake it with a parking brake and engaging the first gear, in the version for cars with automatic transmission, move the gear lever to position P (parking);
- remove the spare wheel and tool;
- remove the wheel cover (in a variant);
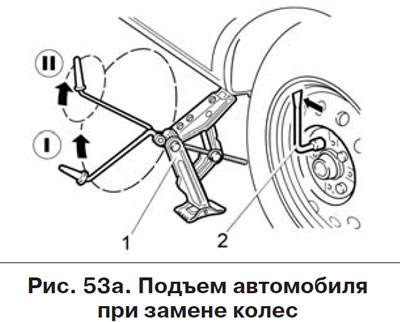
- loosen one turn with combination wrench 2 (pic. 53a) replacement wheel mounting bolts;
- install the jack 1 so that the notch in the jack stop fits into the edge of the threshold closer to the wheel being replaced, and the jack heel is exactly under the stop. To make it easier to find the correct place for installing the jack, special stampings are made on the thresholds of the car. Turning the jack handle (position I) raise the wheel above the supporting surface to a height of 50-60 mm. If the distance to the support surface does not allow turning the handle a full turn, turn the handle in a small radius (position II);
- unscrew the bolts and remove the wheel. Install the spare wheel, tighten the mounting bolts and evenly tighten them crosswise;
- lower the car and remove the jack. Tighten the bolts and check the tire pressure.
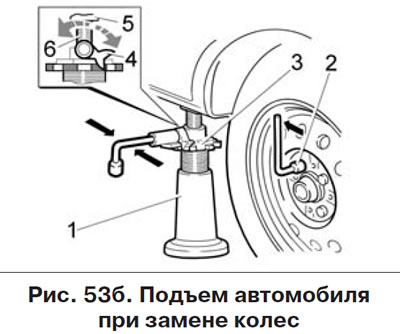
In the variant version, the car is equipped with a jack shown in Fig. 53b and to replace the wheel, you will need to perform the following steps:
- place the car on a level ground and brake it with a parking brake and engaging the first gear, in the version for cars with automatic transmission, move the gear lever to position P (parking);
- remove the spare wheel and tool;
- remove the wheel cover (in a variant);
- loosen one turn with a special wrench 2 bolts fastening the wheel to be replaced;
- install the jack 1 on the site so that the upper support 5 of the jack is exactly under the vehicle stop (near the special punching closer to the wheel to be replaced), having previously rotated the ratchet mechanism drive 3 clockwise, having raised the upper support 5 to close to the required height. Lifting is carried out with the upper support 5 fixed from rotation. If it is necessary to achieve the maximum lifting height or facilitate adjustment to the required pickup height, first unscrew the internal screw 6 with the upper support 5 to a height of 30 mm;
- raise the jack until the upper support 5 is fixed with the car stop, inserting the handle of the special wrench 2 into the ratchet drive tube, rocking the wrench in a horizontal plane with a clockwise force to ensure that the car is lifted up to «separation» replaceable wheel from the supporting surface;
Attention! The maximum lifting height is approximately 390 mm and is limited from turning out the screws by technological stops, therefore, when lifting the car to a close specified height with increasing effort, further rotation should be stopped in order to avoid breaking the jack.
- unscrew the bolts and remove the wheel. Install the spare wheel, tighten the mounting bolts and evenly tighten them crosswise;
- move the pawl 4 of the ratchet mechanism to the stop counterclockwise and by swinging the wrench 2 in a horizontal plane counterclockwise lower the car and release the jack. Tighten the bolts and check the tire pressure.
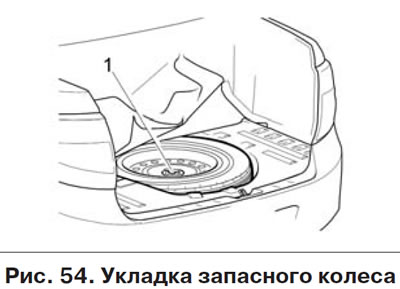
Upon completion of work, place the replaced wheel in the niche of the luggage compartment, fix it with screw 1 (pic. 54) and cover the niche with a rug.
After the first 1000 km of the car run, it is necessary to check the tightening force of the wheel bolts, tighten if necessary. Carry out a similar operation each time new wheels are installed on the car.
In a variant version, a stamp-welded spare wheel is used on vehicles with alloy wheels.
Vehicles equipped with 15" alloy wheels use a temporary spare tire. Installing more than one such spare wheel on a vehicle is prohibited. When using this spare wheel, the speed of the vehicle must not exceed the value indicated on the label (warning sign limiting the maximum speed of the vehicle) wheels. Installing a temporary use spare tire may affect vehicle performance. Care must be taken while driving. Do not accelerate or slow down too quickly. Reduce speed when turning. As soon as possible, replace the temporary use spare wheel with a wheel of the same type and size as the original one.