
Block headlight
To access the dipped/main beam lamp, remove the protective cover 2 (pic. 60), disconnect the wiring harness block and remove the rubber lamp cover, take it one by one to the sides «antennae» 4 springs of the lamp holder, after pressing them, remove the lamp 5 from the seat of the reflector. Mount the new lamp in the reverse order. Wear gloves when installing a halogen lamp to avoid leaving marks on the lamp bulb. After installing the dipped/main beam bulb, make sure that the rubber cover is firmly seated on the bulb base and the headlight housing.
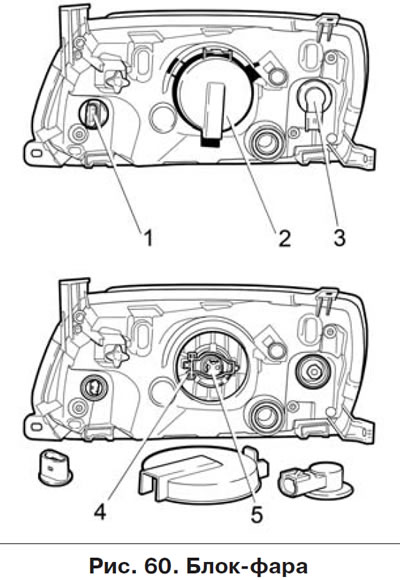
To remove the parking light/daytime running light bulb, do the following:
- in the right headlight, turn cartridge 1 counterclockwise;
- in the left headlight unit, first fold the air filter housing back and turn cartridge 1 counterclockwise;
- remove the lamp from the socket.
Install a new lamp in the reverse order.
To remove the turn signal lamp, do the following:
- in the right headlight, remove the cartridge 3 of the direction indicator lamp from the seat by turning the cartridge clockwise;
- in the left headlight unit, remove the cartridge 3 of the direction indicator lamp from the seat by pressing and turning the cartridge counterclockwise;
- dismantle the lamp from the socket by first sinking the lamp into the socket and turning it counterclockwise.
Install a new lamp in the reverse order.
Back light
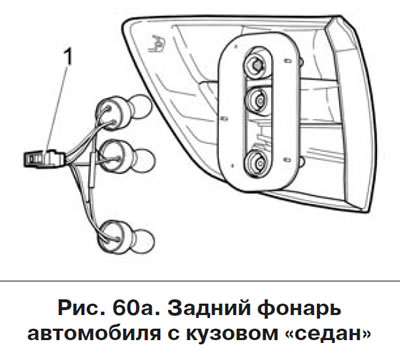
For removing lamps in the rear light of a car with a body «sedan» (pic. 60a) do the following:
- open the trunk lid (Velcro), located in the rear light installation area;
- turning the cartridge counterclockwise, remove it from the seat;
- Remove the bulb from its socket by pushing it in and turning it counterclockwise.
Install a new lamp in the reverse order.
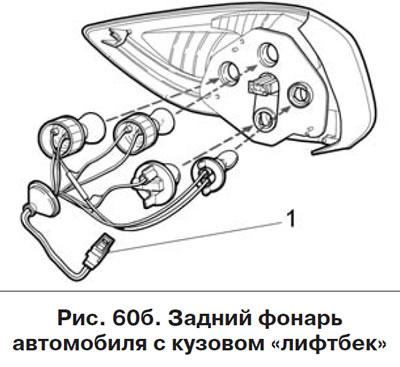
For removing lamps in the rear light of a car with a body «lift back» (pic. 60b) do the following:
- open the tailgate;
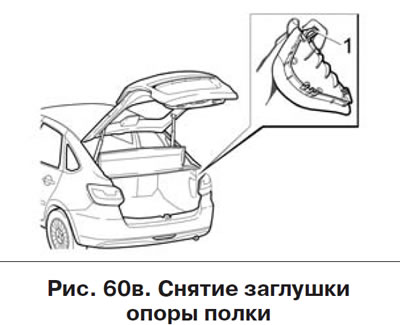
- press with your finger through the hole in the plug of the shelf support on the latch 1 (pic. 60v);
- pull the plug of the shelf support towards you;
- pull up the plug of the shelf support to release the lower hooks, providing access to the rear light;
- turning the cartridge of the replaced lamp counterclockwise, remove it from the seat;
- Remove the bulb from the socket by turning it counterclockwise.
Install a new lamp in the reverse order.
On a car with a body «liftback» a rear fog lamp is installed in the rear bumper. Light emitting diodes are used as light sources in the rear fog lamp. The design of the lantern is non-separable. In case of failure of 2 or more light sources, the rear fog lamp is completely replaced by a certified PSSS.
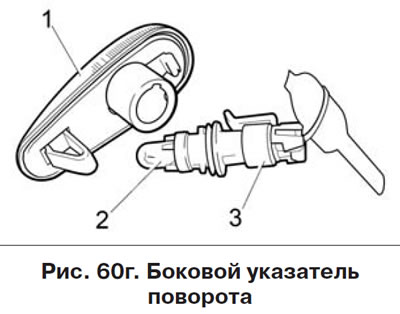
Side turn signal
To replace the bulb in the side turn signal 1 (pic. 60g) remove it from the car. The lantern is held in the socket by a spring latch and a latch. Slide the lamp in the direction of vehicle travel and disengage the retainer. Turning the cartridge 3 counterclockwise, remove it complete with the lamp from the lamp housing and pull the lamp 2 towards you.
On a car with a body «lift back» in a variant version, a side rear-view mirror with a turn indicator is installed. Light-emitting diodes are used as light sources in the direction indicator. In case of failure of light sources, the side rear-view mirror is completely replaced by a certified PSSS.
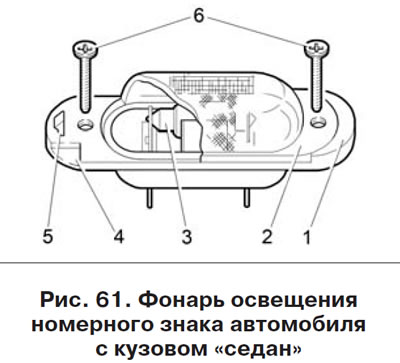
License plate light
On a car with a body «sedan» burnt out lamp 3 (pic. 61) change in the license plate light only after removing it from the vehicle, to do this, unscrew screws 6, insert a screwdriver into groove 4, press latch 5 with your finger to the center and carefully remove diffuser 2 with a screwdriver. Lamp 3 in housing 1 is held by spring contacts.
On a car with a body «liftback» to replace the lamp in the lamp 1 (pic. 61a) license plate, remove it from the vehicle.

The flashlight is held in the socket by a spring latch and a latch. Insert a flathead screwdriver into the slot on the left side of the light, gently slide it to the right and disengage the latch. Turning the cartridge 3 counterclockwise, remove it complete with the lamp from the lamp housing 1 and pull the lamp 2 towards you.
After replacing the bulb, reassemble and install the license plate light in reverse order.
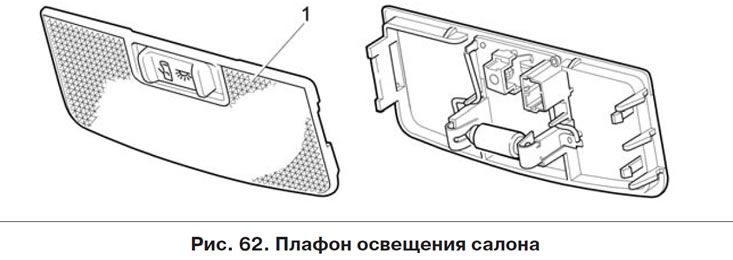
Interior lighting dome
To replace the lamps in the interior dome light, it is necessary to remove the diffuser 1 (pic. 62) from the frame of the ceiling mount. The plafond is held by a metal spring latch and hooks on the reverse side in the seat of the frame. To remove the cover, insert a flathead screwdriver into the slot on the right side of the cover (from the front passenger seat) and carefully unscrew the cover towards you. Wring out contacts and take out a lamp. After replacing the lamp, install the ceiling lamp hooks in the block socket on the left and press the right side of the lampshade until it locks.
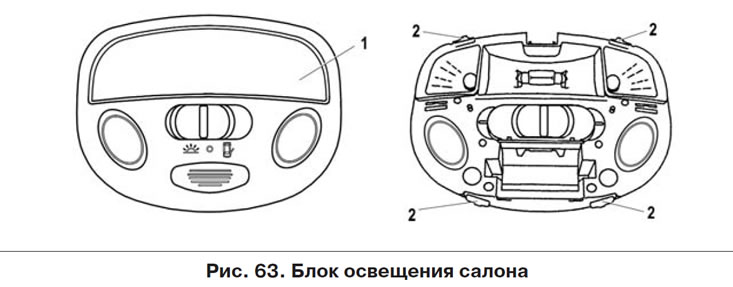
Interior lighting unit
To replace the lamps in the interior lighting unit, it is necessary to remove the diffuser 1 (pic. 63) using a flat screwdriver, inserting it into the special slots. Individual lighting lamps are removed after turning 450 clockwise or counterclockwise. The block is held in place with latches 2.
Trunk light
On a car with a body «sedan» for lamp replacement 3 (pic. 63a) in the trunk light, remove the light from the seat on the body, for which insert a screwdriver into groove 2 on the right side of the light and carefully turn it towards you. Then press the latch 7, pull it out of the hole 6 and remove the diffuser 1. The lamp is held by spring contacts. After replacing the lamp, install diffuser 1 so that the mounting holes fit into its grooves «antennae» 4 cases 5 lanterns.

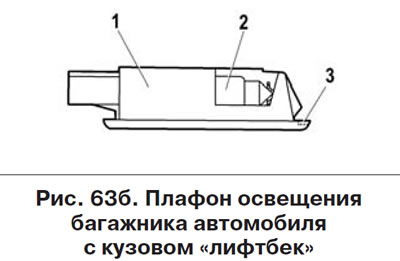
On a car with a body «liftback» for lamp replacement 2 (pic. 63b) in the ceiling light 1 of the trunk, remove it from the car. In the nest, the ceiling is held by a spring latch. Insert a flathead screwdriver into slot 3 on the right side of the lampshade, carefully press the lampshade down and pull lamp 2 towards you.
After replacing the bulb, reassemble and install the trunk light in the reverse order.
Anti-fog headlight
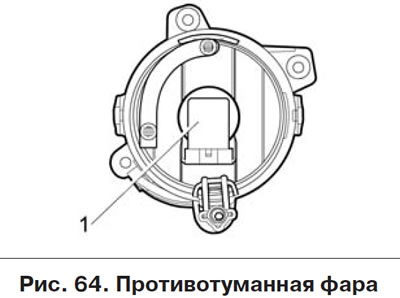
Dismantle the inoperative lamp in the fog lamp (pic. 64). Turn it counterclockwise by base 1 and remove it from the reflector, disconnect the wiring harness block from the lamp. Install the new lamp in reverse order. When installing a halogen lamp, wear gloves to avoid leaving marks on the lamp bulb. This type of work is recommended to be carried out using a hoist certified by the manufacturer.
To release access to the fog lamp from under the front wheel arch, you must first dismantle the wheel and partially release the front wing shield fastening by unscrewing 6 screws. Bend the shield, dismantle the inoperative lamp from the fog lamp.
In a variant version, the front fenders of the car have special hatches for access to the fog lights. If there is such a hatch, the procedure for replacing the lamp will be as follows:
- turn the front wheel as far as possible inside the arch to gain access to the hatch cover;
- remove the hatch cover of the front wing shield;
- after removing the cover, access to the lamp is through a hatch in the front wing shield;
- turn the lamp counterclockwise and pull it out;
- Disconnect the wiring harness and replace the bulb.
Install a new lamp in the reverse order. It is recommended that, in order to facilitate the work carried out on replacing the lamp, first remove the front wheel.