



Caution: Before replacing a lamp, make sure that the corresponding signal lighting device is switched off.
Block headlights
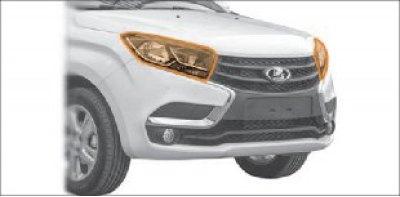
Figure 8.11. Headlights
To remove the low beam lamp (Figure 8.11) do the following:
- open the hood and remove the headlight cover by turning it counterclockwise;
- disconnect the wiring harness from the lamp;
- remove the spring retainer tabs from the grooves;
- remove the lamp.
When installing a new halogen lamp, carry out the installation work in reverse order, wearing gloves, to avoid leaving marks on the lamp bulb.
To remove the high beam bulb, follow these steps:
- remove the cap by turning it counterclockwise;
- disconnect the wiring harness from the lamp;
- remove the spring retainer tabs from the grooves;
- remove the lamp.
When installing a new halogen lamp, carry out the installation work in reverse order, wearing gloves, to avoid leaving marks on the lamp bulb.
To remove the turn signal lamp, follow these steps:
- turn the cartridge counterclockwise and remove it from the seat together with the lamp;
- remove the bulb from the socket by turning it counterclockwise. Install the new lamp in reverse order.
Light-emitting diodes are used as light sources for the daytime running lights and parking lights. In case of failure of the LEDs, the headlight unit is replaced completely at a specialized service station.
Rear lights
Attention! When removing or installing the rear light, do not apply excessive force or strike the surface of the diffuser, as this may lead to the destruction of the weld and loss of tightness of the rear light.
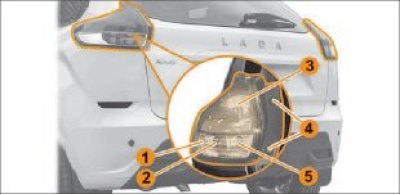
Figure 8.12. Rear lights
To replace the lamp in the rear light, you first need to remove the light itself, for this (Figure 8.12):
- open the tailgate to expose self-tapping screws 4 and screw 7 (Figure 8.13) lantern mounts 1 (see Figure 8.12);
- unscrew the self-tapping screws 4;
- unscrew screw 7 (see Figure 8.13) from the luggage compartment, to do this you need to remove the plastic trim 6 by pulling it in the direction shown in the figure;
- carefully remove the lantern 1 (see Figure 8.12), pulling it towards himself;
- disconnect the rear light from the vehicle's electrical system by disconnecting the connector.
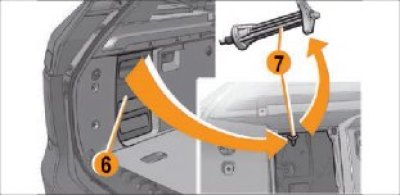
Figure 8.13. Removing the trim and screw
To replace reverse light bulbs 5:
- turn the cartridge counterclockwise and remove it from the seat together with the lamp;
- remove the bulb from the socket by pulling it towards you;
- install the new lamp in reverse order.
To replace the turn signal 2 and brake/side light 3 bulbs:
- turn the cartridge counterclockwise and remove it from the seat together with the lamp;
- remove the bulb from the socket by turning it counterclockwise;
- install the new lamp in reverse order.
After replacing the bulbs, assemble and install the rear light in the reverse order.
Rear fog light
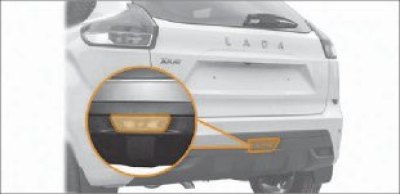
Figure 8.14. Rear fog light
To replace the rear fog light bulb (Figure 8.14):
- put your hand between the bumper and the body at the bottom of the car and get to the socket;
- turn the socket counterclockwise, remove it from the flashlight body and hang it on the length of the wire harness;
- remove the bulb from the socket by pulling it towards you.
After changing the lamp, install the socket in the reverse order.
If you have difficulty replacing the bulb in the rear fog light, contact your LADA dealer for assistance.
Side direction indicator in rear view mirror
The replacement of the side direction indicator lamps must be carried out at an ambient temperature of at least +20°C.
To replace the side turn signal bulb:
- rotate the mirror element to its maximum lateral position as shown in Figure 8.15;
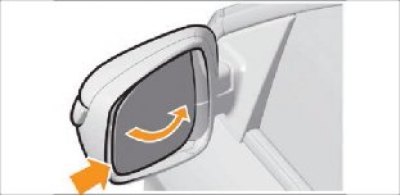
Figure 8.15. Mirror element in maximum lateral position
- through the resulting gap, carefully unclip the mirror element and remove it from the housing (Figure 8.16);
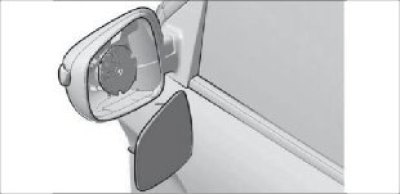
Figure 8.16. Removing the mirror element
- disconnect the two contacts from the heating element (Figure 8.17);
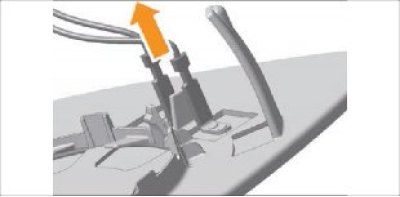
Figure 8.17. Heating element contacts
- remove the mirror cover, to do this, carefully unfasten the 3 latches with a screwdriver (Figure 8.18 and 8.19);
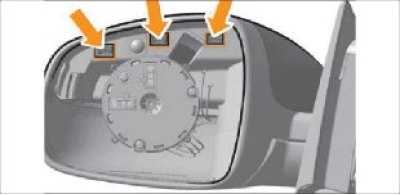
Figure 8.18. Mirror cover latches
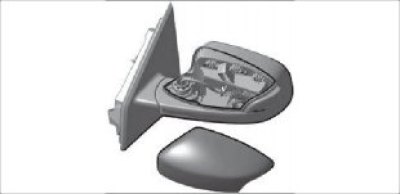
Figure 8.19. Removing the mirror cover
- remove the cartridge from its seat (Figure 8.20);
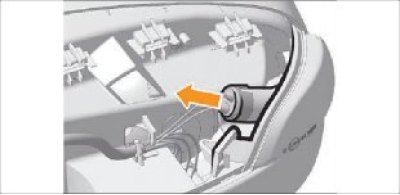
Figure 8.20. Removing the cartridge
- remove the bulb from the socket by pulling it towards you (Figure 8.21);
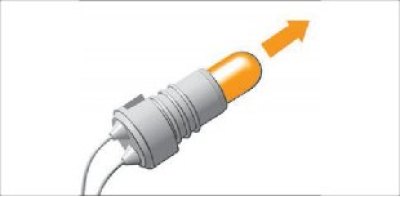
Figure 8.21. Removing the lamp
- install the new lamp in reverse order;
- after replacing the turn signal lamp, assemble and install the rearview mirror in the reverse order.
When reassembling, special attention should be paid to the installation of the mirror cover (Figure 8.22), to install the overlay you need:
- carefully insert and align the overlay in directions 1 and 2;
- then press the pad in direction 3.
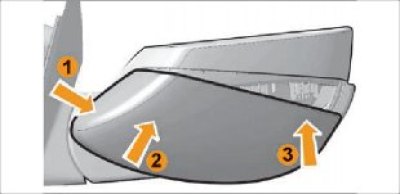
Figure 8.22. Installing the mirror cover
If you have difficulty replacing the lamp in the side turn signal in the mirror, contact your LADA dealer for help.
Additional brake light
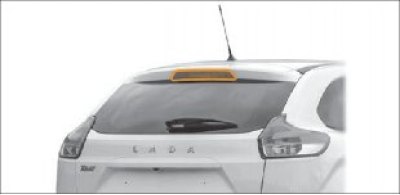
Figure 8.23. Additional brake signal
As light sources for additional brake lights (Figure 8.23) light emitting diodes are used. In case of failure of the LEDs, the additional brake light is completely replaced by a LADA dealer.
License plate light
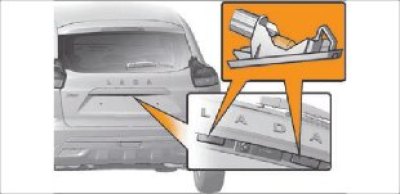
Figure 8.24. License plate light
To replace the lamp in the flashlight (Figure 8.24):
- insert a flat-head screwdriver into the slot on the right side of the light, gently slide it to the left and disengage the spring latch;
- remove the bulb from the flashlight by pulling it down.
After replacing the bulb, assemble and install the license plate light in the reverse order.
Fog light
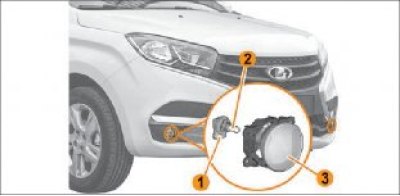
Figure 8.25. Fog lamp: 1 – Lamp holder. 2 – Lamp. 3 – Fog light.
It is recommended to replace the bulbs in the fog lights at a LADA dealer (using a lift).
Lamps for lighting the luggage compartment, glove compartment
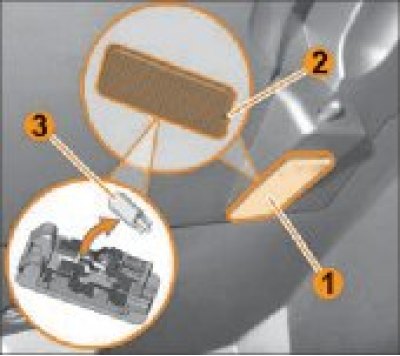
Figure 8.26. Glove compartment light: 1 – Ceiling lamp. 2 – Groove. 3 – Lamp.
To replace the lamp in the lampshade (Figure 8.26):
- remove lampshade 1 from its seat, for which insert a screwdriver into slot 2, carefully push the lampshade outward;
- remove lamp 3 from the lampshade by pulling it towards you.
After replacing the lamp, install the lampshade hook into the seat and press the opposite side of the lampshade until it locks into place.
Caution: To avoid the possibility of a short circuit, remove the battery terminal before replacing the lamp.