



 flashing or constant signal.
If the indicator lights up continuously, you need to check the tire pressure in your vehicle.
If the indicator lights up with a flashing signal for approximately one minute, you should contact LADA dealers.
Check the air pressure in your tires periodically with a pressure gauge. Operating tires at pressures other than those recommended (see table 1), leads to their premature wear, as well as to deterioration of the vehicle's stability and controllability.
If you notice a constant drop in tire pressure, check for air leaks through the valve core. If there is an air leak, tighten the valve, and if this does not help, replace it with a new one.
If the pressure drops even though the valve is working properly, the tire needs to be repaired.
To avoid damaging the sealing layer of the tire, dismantle and mount it using a special device or at dealers. To avoid disturbing the wheel balance, before removing the tire, make a mark with chalk on the tire opposite the valve, and when installing the tire, install it according to this mark. After installing new tires, be sure to have the wheels balanced at a LADA dealer.
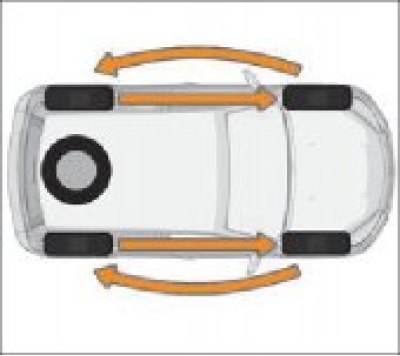
Figure 9.3. Wheel rotation diagram
To ensure even wear of the tires, rotate the wheels as shown in Figure 9.3 according to the instructions in the service book.
When operating your vehicle, avoid rubbing the wheels against road curbs and driving fast on roads with damaged surfaces (potholes, bumps, etc.), since damage to the wheel rim can cause not only its imbalance, but also loss of tightness of tubeless tires. If vibrations occur while driving, check the wheel balancing at a LADA dealer.
When the car is equipped with 16 and 17 inch wheels, the spare wheel is 15 inches (195/65R15 91T/H or 185/65 R15 88H) is a wheel for temporary use.
It is necessary to drive carefully with a temporary use tire installed, the maximum permissible speed is 80 km / h. It is necessary to repair or buy a new tire of the same brand, size, type and tread pattern as the rest of the tires as soon as possible.
It is not permitted to operate a vehicle with more than one temporary spare wheel installed on it.
It is permitted to use winter tires (M+S) of the above dimensions and index Q with the corresponding maximum vehicle speed limitation (up to 160 km/h).
Table 1. Permissible sizes of tires, wheels and air pressure in tires
Modification and execution of the car | Tire dimensions with load capacity and speed indexes* | Technical data of the wheels used | |||||
DIA**, mm | PCD***, mm | number of mounting holes, pcs. | rim width (inches) | rim offset (ET)****, mm | air pressure in tires, front/rear, MPa (kgf/cm²) | ||
Set by the manufacturer | |||||||
All modifications | 195/65R15 91N | 60,1 | 100 | 4 | 6J | 37-40 | 0,22/0,20 (2,2/2,0) |
205/55R16 91H | 41 | ||||||
205/50R17 89V | 6½J | ||||||
205/50R17 93W | |||||||
allowed to be installed during operation | |||||||
All modifications | 195/65R15 91T, H,V | 60,1 | 100 | 4 | 5½J, 6J, 6½J | 37-40 | 0,22/0,20 (2,2/2,0) |
205/55R16 91T, H,V | 41 | ||||||
205/50R17 89H, V | |||||||
205/50R17 93W | |||||||
Table 2. Wheel mounting

Number of bolts,Threadbolt pcs. | Length of cylindrical Hexagon size Strength class of bolt, parts of bolt, mm bolt heads under key, mm not less than | Tightening torque b Nm | |||
4 | M12x1.5 | 24,5±0,5 | 17 | 9,8 | 105±15% |
* Speed indices: T – up to 190 km/h, H – up to 210 km/h, V – up to 240 km/h, W – up to 270 km/h. Load capacity indices: 89–580 kg, 91–615 kg, 93–650 kg.
** DIA – diameter of the central hole of the wheel.
*** PCD – diameter of the wheel mounting holes.
**** Rim offset (ET) – the distance from the mating plane of the disc to the center of the rim.
Wheel replacement
In case of a puncture, you can use the spare wheel.
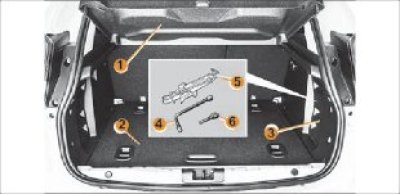
Figure 9.4.1. Luggage compartment and tool storage location: 1 – Luggage compartment shelf. 2 – Removable floor (in a variant design). 3 – Lid of the tool compartment. 4 – Wheel wrench. 5 – Jack. 6 – Towing eye.
The wheel is located in the luggage compartment. To prepare for a tire change:
- open the tailgate;
- open cover 3, remove jack 5 and wheel wrench 4 from the niche (Figure 9.4.1);
- install removable floor 2 (in a variant design) in an inclined position (see subsection "Transporting items in the luggage compartment") or, at your discretion, remove it from the luggage compartment;
- lift the boot floor mat 3 (Figure 9.4.2) up and hold it with your hand;
- with the other hand, unscrew the central fastening 2 and remove the spare wheel 1.
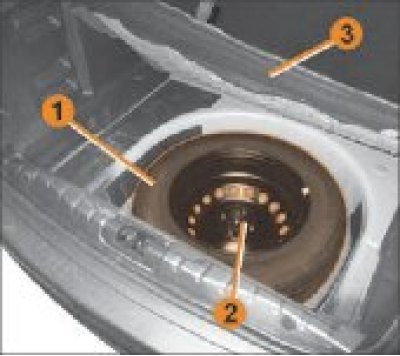
Figure 9.4.2. Spare wheel location: 1 – Spare wheel. 2 – Central mount. 3 – Floor mat.
Data obtained from the website (ladaman)
Warning! If the spare wheel has been stored for several years, you should contact your LADA dealer to check the suitability of the wheel for safe use.
When stowing tools, make sure they are positioned correctly in the luggage compartment as they were originally. do not leave tools unsecured as they may move and injure people when braking.
Turn on the hazard warning lights.
Stop the vehicle away from traffic on a hard, horizontal, non-slip surface.
Apply the parking brake, then engage the gear (first or reverse).
Ask all passengers to exit the vehicle and stay away from the roadway.
Make a few turns until the wheel lifts off the ground.
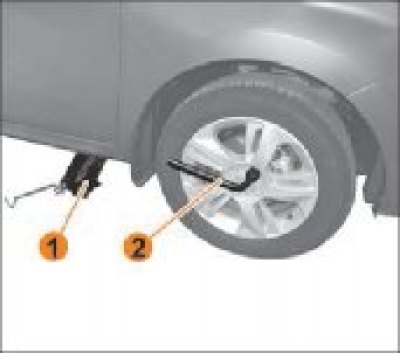
Figure 9.5. Removing the wheel: 1 – Jack. 2 – Wheel wrench.
Warning! To avoid the risk of injury or damage to the vehicle, raise the jack to a position where the wheel is no higher than 10-20 mm from the supporting surface.
Remove the bolts and remove the wheel. Place the spare tire on the center hub and rotate it until the mounting holes in the hub and wheel align.
Tighten the bolts, making sure the wheel is correctly positioned on the hub, and lower the jack.
After lowering the jack, tighten the bolts firmly and contact a LADA dealer to check the bolt tightening (tightening torque 110 Nm) and the air pressure in the spare wheel.
Once the work is completed, place the replaced wheel in the luggage compartment niche, secure it with a screw and cover the niche with a mat. After the first 1000 km of vehicle mileage, it is necessary to check the tightening force of the wheel bolts and tighten them if necessary. Perform a similar operation each time you install wheels.
- Loosen the wheel mounting bolts with a wheel wrench 2 (Figure 9.5). Position it so that you can press down from above.
- Place jack 1 horizontally, making sure to set its head at the height of the stiffening rib near the corresponding wheel.
- Start rotating the jack handle 1, having correctly positioned its lower support heel (it should go slightly under the car and be on the same vertical axis as the jack head).
Tires and traffic safety
Tires are the only part of the car that is in constant contact with the road, so it is very important to monitor the condition of your car's tires.
You must strictly follow the local requirements provided by the Road Traffic Regulations.
Warning!
- when replacing tires, use only the same brand, size, type and tread pattern that were originally installed on the vehicle.
- new tires installed on the vehicle must be completely identical to the tires originally installed or match the tires recommended by the LADA dealer.