
Car repair AvtoVAZ Car repair Renault Car repair Hyundai Car repair Ford Car repair Volkswagen Car repair Audi Car repair Chevrolet
English Русский
Български
Беларускі
Український
Српски
Hrvatski
Română
Polski
Slovenský
Magyar
articles sitemap contacts bookmark
LadaMan.ru


Kalina Granta Priora Vesta Largus XRAY
Priora 1 (2007-2018, VAZ-2170)

Checking the pressure in the engine fuel system (Priora 2170)

  • Main
  • Priora
  • Priora 1
  • Power unit
  • Supply system
  • Checking the pressure in the engine fuel system
0
The main indicator of the engine fuel system's health is the fuel pressure in the fuel rail.

If the fuel pressure is insufficient, the following may occur:
  • unstable engine operation;
  • engine stop at idle;
  • reduced idle speed of the crankshaft;
  • insufficient vehicle responsiveness (the engine does not develop full power);
  • engine failures while the vehicle is moving.

To begin with, we recommend checking the reliability of the electrical contacts in the ECU wiring harness blocks responsible for fuel supply (fuel pump module, injectors, fuel relay and associated fuses).
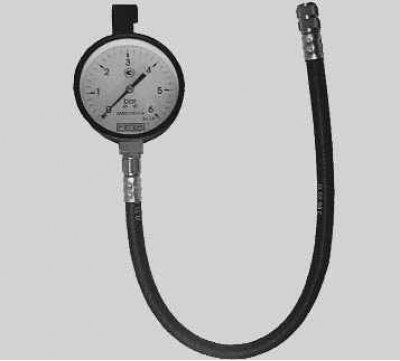
The fuel pressure in the fuel system is checked using a professional pressure gauge and a hose with…


The fuel pressure in the fuel system is checked using a professional pressure gauge and a hose with an original fitting for connection to the valve located on the fuel rail.

1. Turn on the ignition and listen: within a few seconds you should hear the sound of the electric fuel pump. If you cannot hear it, check the electrical circuit of the electric fuel pump.

Note: If you have turned on the ignition three times without attempting to start the engine, the electric fuel pump will not turn on again, which is not a sign of a malfunction. It will turn on simultaneously with the starter starting the engine.


2. Reduce the pressure in the fuel system (see "Loss of fuel pressure in the engine fuel system").
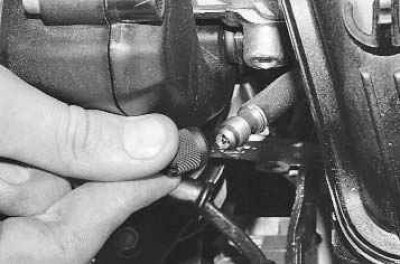
3. Unscrew the protective cap of the fuel pressure control nipple at the end of the fuel rail.…


3. Unscrew the protective cap of the fuel pressure control nipple at the end of the fuel rail. Please note that the cap has a sealing ring. If the ring is torn or has lost elasticity, replace it or the entire cap.

Note: For clarity, the work is shown with the decorative engine cover removed.


Note: If it is not possible to use a professional pressure gauge, use a regular pressure gauge with a hose and clamp. The pressure gauge must have a measurement scale of no more than 1000 kPa (10 kgf/cm²) and a division value of no more than 20 kPa (0.2 kgf/cm²). Please pay attention to the secure connection (rolling) pressure gauge and hose.


(The original was published on the portal: LADAman.ru)
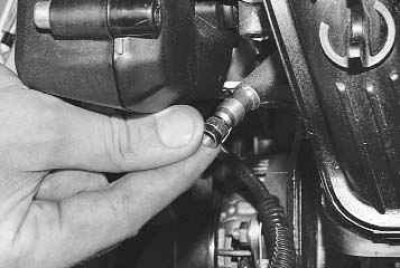
4. Using the metal protective cap of the tire valve, unscrew the valve core (the same as in the…


4. Using the metal protective cap of the tire valve, unscrew the valve core (the same as in the tire)…


Note: When unscrewing the valve, a small amount of fuel may leak out, so place a rag under the fitting beforehand.
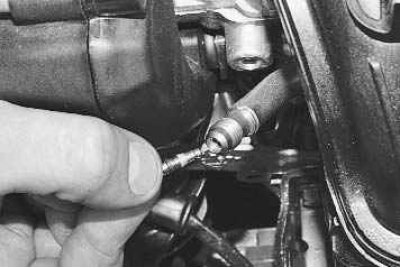

5. …and remove it from the fitting.

5. …and remove it from the fitting.

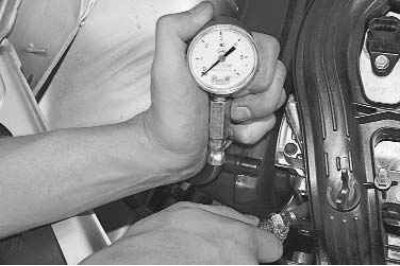
6. Connect a hose with a pressure gauge to the fitting. Secure the hose to the fitting with a clamp…


6. Connect a hose with a pressure gauge to the fitting. Secure the hose to the fitting with a clamp and check that it is securely fastened. Start the engine and check the pressure on the pressure gauge. It should be 380–400 kPa (3.8–4.0 kgf/cm²).

The following are possible reasons for the decrease in pressure:
  • the fuel pressure regulator is faulty;
  • the fine fuel filter or fuel intake filter is clogged;
  • the electric fuel pump is faulty.

7. Stop the engine and reduce the pressure in the fuel system (see "Loss of fuel pressure in the engine fuel system").

8. Disconnect the pressure gauge from the pressure control nipple, screw the valve into the nipple and install the protective cap on the nipple.


This article is available at russian, bulgarian, belarusian, ukrainian, serbian, croatian, romanian, polish, slovak, hungarian
This article has been reviewed: Vladislav Voloshin
Share with friends:
◀ Previous
Lada Priora 1: Supply system
Next ▶

Features of the design of the engine power supply system
Reduced fuel pressure in the engine fuel system
Removal and installation the air filter
Removal and installation the fuel pump
Fuel pump repair
Replacing the fuel tank and its filler pipe
More articles with information from manuals for Lada:

• Checking the fuel pressure in the engine fuel system Lada Kalina Sedan (2004-2013, VAZ-1118)
• Checking the technical condition of the engine management system Lada Granta 1 (2011-2023, VAZ-2190)
• Checking the technical condition of the engine management system Lada Vesta 1 (2015-2023, VAZ-2180)
• Checking the level and replacing the engine oil and filter Lada Largus 1 (2012-2023)
• Checking the oil level in the engine oil pan Lada X-Ray 1 (2015-2022)
Link to this article in various formats
Reviews and comments of visitors
No comments yet


Add up two numbers: 20 + 31


Priora 1 (2007-2018) 
  • General information
  • Vehicle device
  • User manual
  • Faults en route
  • Maintenance
  • Power unit
  • Engine repair
  • Cooling and lubrication system
  • Supply system
  • Exhaust system
  • Transmission
  • Clutch
  • Car gearbox
  • Drive shafts
  • Chassis (running gear)
  • Car suspension
  • Steering
  • Brake system
  • Body and interior
  • Exterior (external elements)
  • Interior (internal elements)
  • Doors, locks and windows
  • Electrical equipment
  • Equipment and devices
  • Power devices
  • Lighting and signaling
  • Cooling and heating
  • Electrical circuits
LadaMan.ru © 2018–2026 | Mobile version | About Lada | Sitemap: EN BG BY UA RS HR RO PL SK HU | Contacts with admin | | Add to bookmarks
Kalina Hatchback (2004-2013) | Kalina Sedan (2004-2013) | Granta 1 (2011-2023) | Priora 1 (2007-2018) | Vesta 1 (2015-2023) | Largus 1 (2012-2023) | X-Ray 1 (2015-2022) |
This site uses cookies to ensure everything runs smoothly.