
Car repair AvtoVAZ Car repair Renault Car repair Hyundai Car repair Ford Car repair Volkswagen Car repair Audi Car repair Chevrolet
English Русский
Български
Беларускі
Український
Српски
Hrvatski
Română
Polski
Slovenský
Magyar
articles sitemap contacts bookmark
LadaMan.ru


Kalina Granta Priora Vesta Largus XRAY
Priora 1 (2007-2018, VAZ-2170)

Replacing the idle speed control valve (Priora 2170)

  • Main
  • Priora
  • Priora 1
  • Power unit
  • Supply system
  • Replacing the idle speed control valve
0
The regulator consists of a two-pole stepper motor and a cone valve connected to it. At the signal of the electronic engine control unit, the electric motor moves the valve, thereby changing the flow area of the air duct.

You will need: a Phillips-head screwdriver, a tester.
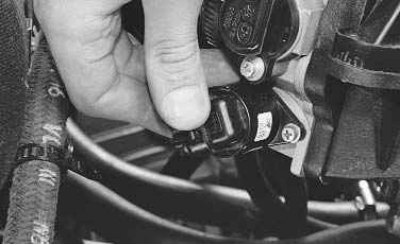
1. Press the lock of the wiring harness connector…
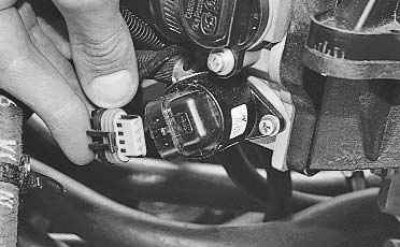

1. Press the lock of the wiring harness connector…

2. …and disconnect the connector from the idle speed control valve.
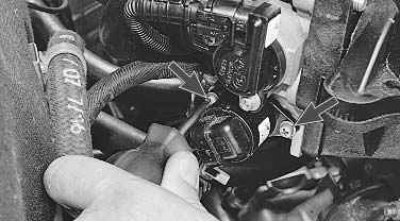

2. …and disconnect the connector from the idle speed control valve.

3. Remove the two screws securing the regulator to the throttle assembly…
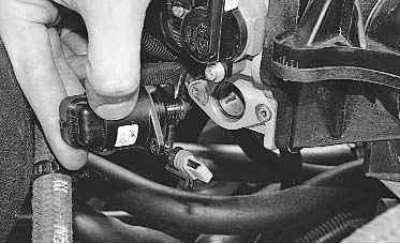

3. Remove the two screws securing the regulator to the throttle assembly…


4. …and remove the regulator from the throttle body hole.
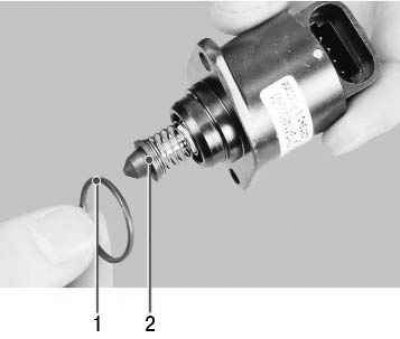

4. …and remove the regulator from the throttle body hole.

Note: Please note: the connection is sealed with a rubber ring 1.


Note: Please note: the connection is sealed with a rubber ring 1.


Note: Do not attempt to pull or push in valve 2 of the regulator as this may damage the regulator.
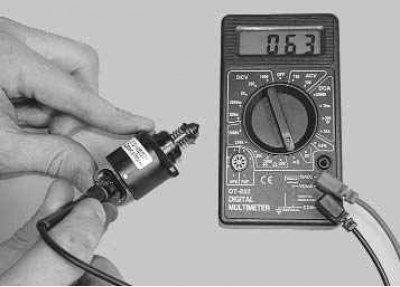

5. Switch the tester to the ohmmeter mode and measure the resistance between terminals «A» and «B»…


5. Switch the tester to the ohmmeter mode and measure the resistance between terminals "A" and "B" of the regulator, and then between terminals "C" and "D". The resistance should be within 0.040–0.080 kOhm.


Note: There are no terminal markings on the idle air control valve body, but their locations can be determined by the corresponding markings on the wiring harness connector.
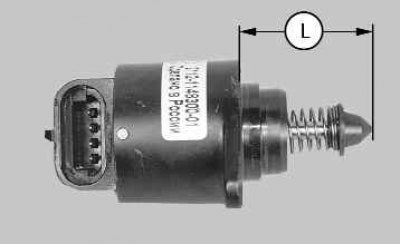

6. When replacing the regulator with a new one, pay attention to the distance L between the end of…


6. When replacing the regulator with a new one, pay attention to the distance L between the end of the valve needle and the mounting flange - it should be no more than 23 mm. If this distance is greater, the regulator needle will rest against the seat of the throttle assembly and when tightening the mounting screws, the regulator will be damaged.

7. Before installing the regulator, clean the seat and air channel in the throttle assembly, as well as the surface under the regulator sealing ring, from dirt.

8. Lubricate the O-ring with engine oil and install the regulator in the reverse order of removal. Tighten the regulator mounting screws to a torque of 3–4 N·m.


This article is available at russian, bulgarian, belarusian, ukrainian, serbian, croatian, romanian, polish, slovak, hungarian
This article has been reviewed: Vladislav Voloshin
Share with friends:
◀ Previous
Lada Priora 1: Supply system
Next ▶

Removal and installation the throttle assembly
Replacing the fuel tank and its filler pipe
Fuel pump repair
Removal and installation the fuel pump
Removal and installation the air filter
Removal and installation the fuel rail
Checking and replacing injectors
Replacing the throttle cable
Replacement of fuel vapor recovery system components
More articles with information from manuals for Lada:

• Idle speed control valve — checking and replacing Lada Kalina Hatchback (2004-2013, VAZ-1119)
• Cruise control and speed limiter control Lada Granta 1 (2011-2023, VAZ-2190)
• Replacing the battery in the remote control Lada Vesta 1 (2015-2023, VAZ-2180)
• Lighting control Lada Largus 1 (2012-2023)
• Replacing the remote control battery Lada X-Ray 1 (2015-2022)
Link to this article in various formats
Reviews and comments of visitors
No comments yet


Add up two numbers: 41 + 49


Priora 1 (2007-2018) 
  • General information
  • Vehicle device
  • User manual
  • Faults en route
  • Maintenance
  • Power unit
  • Engine repair
  • Cooling and lubrication system
  • Supply system
  • Exhaust system
  • Transmission
  • Clutch
  • Car gearbox
  • Drive shafts
  • Chassis (running gear)
  • Car suspension
  • Steering
  • Brake system
  • Body and interior
  • Exterior (external elements)
  • Interior (internal elements)
  • Doors, locks and windows
  • Electrical equipment
  • Equipment and devices
  • Power devices
  • Lighting and signaling
  • Cooling and heating
  • Electrical circuits
LadaMan.ru © 2018–2026 | Mobile version | About Lada | Sitemap: EN BG BY UA RS HR RO PL SK HU | Contacts with admin | | Add to bookmarks
Kalina Hatchback (2004-2013) | Kalina Sedan (2004-2013) | Granta 1 (2011-2023) | Priora 1 (2007-2018) | Vesta 1 (2015-2023) | Largus 1 (2012-2023) | X-Ray 1 (2015-2022) |
This site uses cookies to ensure everything runs smoothly.